 Graphics One Maxcut
January 7, 2014
The Graphics One Maxcut is a cut only device, and is only available if the special registration code, "CUTTING", is enabled.
Physical Connection Setup:
- USB:
- Plug the GO Maxcut into an available USB port on your PC and let Windows detect and setup new hardware.
- Enter the SoftRIP Print Setup window and select the GO Maxcut as the 'Printer Model'.
- Next to the Physical Connection selection control, click on the Setup button and choose 'Scan USB'.
- 'USB connections found' should be reported. If so, USB_0 (or USB_1, etc.) will be on the list of physical connections. Choose this option.
- Serial: RS-232 connections are not supported by SoftRIP.
Properties:

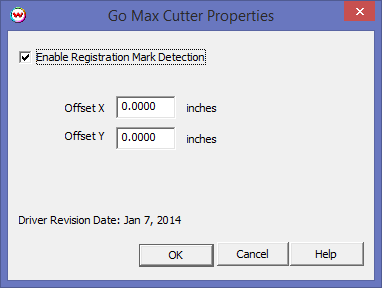
- Enable Registration Mark Detection: Enabling this control will allow the GO Maxcut to search for and detect printed registration marks before performing a contour cut. It should be checked unless a 'Cut-only' workflow is being used.
- Offset X: Use this control to adjust the cut path in relation to the printed image. This control adjusts horizontally.
- Offset Y: Use this control to adjust the cut path in relation to the printed image. This control adjusts vertically.
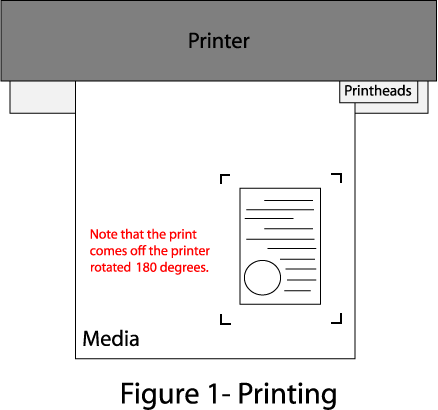
Note: When printing the image to be cut, note the way it comes off the printer. The image will be loaded in the cutter in the same direction (Generally upside-down)

Device-Specific Instructions for Print now, Cut later (RIP Detect Registration)
Note: The print should have been printed with "GO Maxcut" Register marks. Select these marks from the "Cutting Mark" menu on the Print/Setup screen.

Loading the media:
- As the print comes off the printer, note the edge that is to the lower right corner of the print. That corner will be referred to hereafter as the origin of the print (see Figure 1).
- Insert the media in the same direction as the media originally came out of the printer.
- Set the pinch rollers.
- Use the cutter front panel controls to turn on the laser and place the point within the registration mark shown with a red square in Figure 2.
- The cutter is now ready for the cut path to be sent from the Cutting Queue.
- See the user manual for further assistance.
Device-Specific Instructions for Cut Only
Loading the media:
- Insert the media in the cutter and align the media as shown in Figure 2 above.
- Move the cutting blade to the point you wish the cut job to begin.
- The cutter is now ready for the cut path to be sent from the queue.
- See the user manual for further assistance.
 Graphics One Maxcut
 Graphics One Maxcut

