 Mutoh SC Pro Cutter
May 27, 2009
The Mutoh SC Pro is a cut only device, and is only available if the special registration code, CUTTING, is enabled.
Consult the cutter's user manual for information on setting the cutter's origin point, force, and speed.
Connection: Choose the physical connection from the 'Print->Setup' window.
- USB: When you first plug the cutter into a USB port you will be prompted for a USB driver. The driver is included on the CD provided by Mutoh. The USB connection will show up in the physical connection as a COM port. See the Mutoh documentation associated with installing the USB driver for details on which COM port to select.
Note: Two devices will need to be installed, be sure to complete both device setups.
- COM: Choose the COM port to which the serial cable is connected.
Note: Basic set up should be performed to make sure that the plotter is in the correct state to receive data from SoftRIP. In particular, see the User Manual for selecting an
appropriate Page Mode 1 and for instructions on setting the origin.
Note: For best performance it is recommended that you use USB2 port.
If you go to Print Setup, Edit and click the Properties button, the window shown below will be displayed.
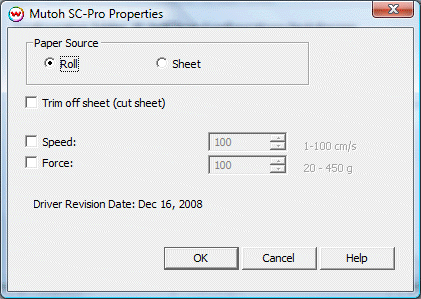
- Paper Source: Roll or Sheet.
- Speed: Control the cutting speed in millimeters per second .
- Force: Controls the pressure exerted on the media. If the blade is not cutting through the media, one may need to increase the force as well as extend the blade.
- Trim off sheet: Check this control to cut the sheet off of the roll. This is most useful in vinyl cutting work flows.
Note: There is a front panel setting that effects how the driver finishes a cut when not trimming (cutting) the sheet off. Setup needs to be performed once.
Device-Specific Instructions for Print now, Cut Later (RIP Detect Registration)
Note:The print should have been printed with Mutoh SC Pro Registration marks. These marks can be selected from the "Cutting Mark" menu on the Print/Setup screen prior to printing.
Note: The print must be printed with sufficient margins for cutting. See the user manual for minimum margins.
Note: Too much of a leading edge will result in the cutter not being able to detect marks, likewise too little of a trailing edge will prevent the cutter from detecting marks
Loading the media:
- As the print comes off the printer, note the edge that is to the lower right corner of the print. That corner will be referred to hereafter as the Origin (TP1) of the print.
- Insert the media in the same direction as the media originally came out of the printer. Since the cutter cannot cut any media beyond the pinch roller nearest the control panel or the pinch roller furthest from the control panel, align the media so that the pinch rollers are outside of the cutting area.
- The cutter is now ready for the cut path to be sent from the queue. See the user manual for further assistance.
Device-Specific Instructions for Print now, Cut Later (Manual Registration)
Note: The print should have been printed with 1/4" or 1/2" Register marks (1/2" are preferred). Select these marks from the "Cutting Mark" menu on the Print/Configuration screen.
Note: The cutting registration marks are numbered 1 through 4. The order that this cutter detects the marks differs from how the registration marks are numbered. It should proceed in order of 1,3,4,2.
Loading the media:
- As the print comes off the printer, note the edge that is to the lower right corner of the print. That corner will be referred to hereafter as the Origin (TP1) of the print.
- Insert the media in the same direction as the media originally came out of the printer. Since the cutter cannot cut any media beyond the pinch roller nearest the control panel or the pinch roller furthest from the control panel, align the media so that the pinch rollers are outside of the cutting area.
- After setting the pinch roller, let the device detect the media.
- Once the Media has been detected, the cutter is now ready for the cut path to be sent from the queue. Once the cut path has been sent you will see the message Manual aligning method please select point on the console of the cutter. Use the console to adjust the laser point to center on the cross hairs of the first registration mark TP1. Press Enter on the console.
- The laser point will then move to the next mark. Adjust the laser point so it centers on the cross hairs of the next mark, and press Enter
- Repeat previous step through the remaining marks. Once all marks have been detected, the device will proceed to cut.
Device-Specific Instructions for Cut Only
Loading the media:
- Insert the media in the cutter and align the media so that the pinch rollers are outside of the cutting area.
- After setting the pinch roller, use arrow keys to place the knife over the desired starting point (lower right corner of the print).
- Press Origin
- The cutter is now ready for the cut path to be sent.