 Emblem EC-120
October 27, 2011
The Emblem EC-120 is a cut only device, and is only available if the special registration code, "CUTTING", is enabled.
Connection: Choose the physical connection from the 'Print->Setup' window.
- LPT: To support the parallel interface.
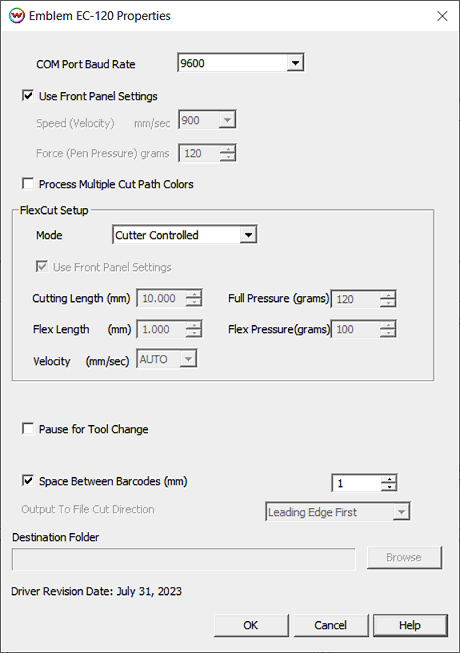
- COM: Choose the COM port to which the serial cable is connected. The driver and the device will default to a baud rate of 9600. If you wish to speed up the serial interface, the setting on the front panel must match the setting on the properties page of the driver.
- USB: When you first plug the cutter into a USB port you will be prompted for a USB driver. Install the Emblem driver provided with the cutter. Once complete, the Emblem will show up in the physical connection list on the print->setup screen as USB

Properties:
- COM Port Baud Rate: If connecting via COM ensure the front panel is set to the same Baud rate as this control.
- Use front panel settings: This control will respect all settings on the front panel for velocity, force, etc.
- Speed: Set the velocity for cutting Non-FlexCut paths in mm/sec.
- Force: Set the force for cutting Non-FlexCut paths in grams.
- Process multiple Cut Path Colors Enables cutting of paths defined by spot colors other than 'CutPath'. See File -> Preferences to configure custom cut colors.
- Mode: Set the FlexCut mode. Accurate, Fast or Cutter controlled.
- Use front panel settings: This control will respect front panel settings for FlexCut controls for length, pressure, velocity, ect.
- Cutting Length: Set the length for Full Pressure cuts for FlexCut paths.
- Flex Length: Set the length for Flex Pressure cuts for FlexCut paths.
- Velocity: Set the speed for FlexCut paths in mm/sec.
- Full Pressure: Set the force for Full Pressure cuts for FlexCut paths
- Flex Pressure: Set the force for Flex Pressure cuts for FlexCut paths
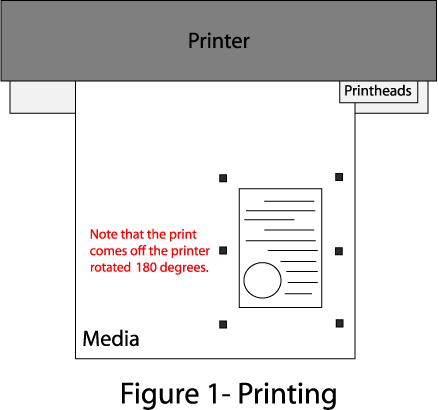
Note: When printing the image to be cut, note the way it comes off the printer. The image will be loaded in the cutter in the same direction (Generally upside-down)

Device-Specific Instructions for Print now, Cut Later (RIP Detect Registration)
Note: The print should have been printed with "Emblem EC-120" Register marks. Select these marks from the "Cutting Mark" menu on the Print/Setup screen. In addition there is an option to set the desired interval between the registration marks. See interval mark discussion below.

Loading the media:
- As the print comes off the printer, note the edge that is to the lower right corner of the print. That corner will be referred to hereafter as the origin of the print (see Figure 1).
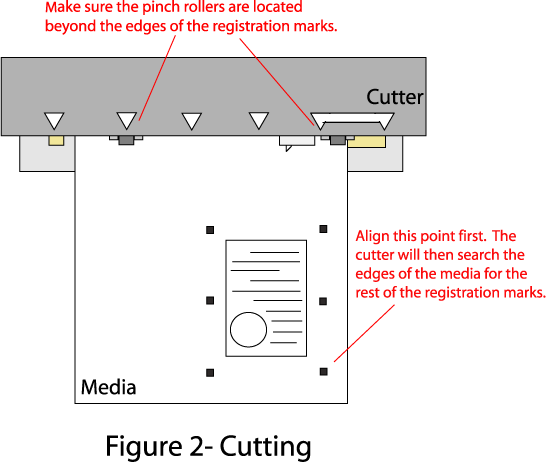
- Insert the media in the same direction as the media originally came out of the printer. Since the cutter cannot cut any media beyond the pinch rollers, align the media so that the pinch rollers are outside of the cutting area. (See Figure 2)
- Set the pinch rollers
- The cutter is now ready for the cut path to be sent from the Cutting Queue
- When the job is sent to the cutter, the cutter will ask you to set the first point
See the user manual for further assistance.
Device-Specific Instructions for Cut Only
Loading the media:
- Insert the media in the cutter and align the media so that the pinch rollers are outside of the cutting area.
- After setting the pinch roller, the cutter will detect the paper
- Set the origin to the point you wish the cut job to begin
See the user manual for further assistance
- The cutter is now ready for the cut path to be sent from the Cutting Queue
Interval Between Cut Marks
If you select 'Emblem EC-120' register marks from the 'Cutting Registration Marks' menu in Wasatch SoftRIP, registration marks will be printed at regular intervals down the edges of any print layout. (This feature only works with layouts and with the print spooler, never with immediate print of a single page.)
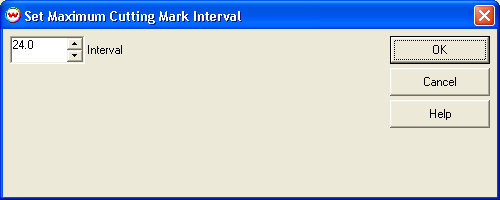
When you make this selection, you'll be presented with the following control.

If the length of the print is close to or greater than the maximum cutting mark interval, subdivisions of cutting mark spacing start there. This means that the interval should never exceed that maximum, and may be half of the maximum, as would happen if you had a 24 inch interval, as shown above, and were printing 24.1 inches.
 Emblem EC-120
 Emblem EC-120


