 Allen Datagraph i-TECH Series Cutters Allen Datagraph i-TECH Series Cutters
November 6, 2009
The Allen Datagraph i-TECH Series cutters are cut only devices, and are only available if the special registration code, "CUTTING", is enabled.
Consult the cutter's user manual for information on setting the cutter's force, speed, and other available options.
Note: To ensure constant effective cutting, "Calibrating to printer" and the SmartMark calibration should be done before normal operation, please refer to the i-TECH user manual to complete this process. For an optimal setup and operation, use the i-TECH remote control (download from Allen Datagraph's website). Different sized Allen Datagraph registration marks are available for use with the i-TECH series cutters, you will need to use the i-TECH remote control to adjust the registration mark scan radius when changing the size of the marks (refer to the user's manual for this operation).
Click on "Properties" to access the controls for cutting. The following window will be displayed:
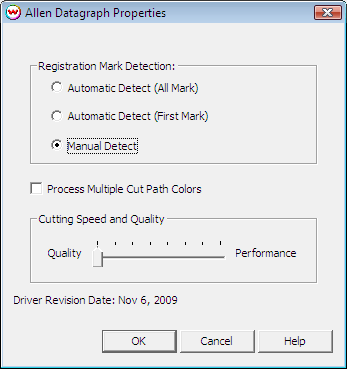
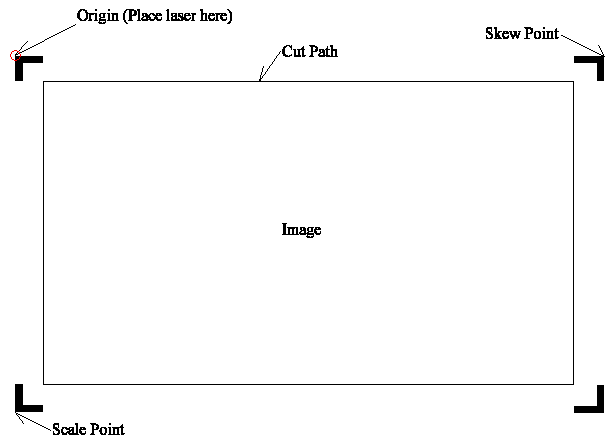
Automatic Alignment (all mark): This choice will perform skew and scaling on the image. There must be Allen Datagraph type registration marks. Place the Laser as shown below. There is no origin set button as other cutters have, where you place the Laser is the origin. Automatic Alignment (one mark): This choice will align the origin with one mark. There must be Allen Datagraph type registration marks. Place the Laser as shown below. There is no origin set button as other cutters have, where you place the Laser is the origin. Manual Alignment: If there are either Allen Datagraph marks or Wasatch marks (1/4 Inch Register or 1/2 Inch Register), the driver will go through a manual alignment set up (see image below). This image will be upside down when looking at the front of the cutter. For Allen Datagraph marks, align the sensor with the outside corner of the mark. Center the sensor with Wasatch type (1/4 Inch Register or 1/2 Inch Register) marks.
When Manual alignment is set and the cut path is sent to the cutter, a window will say, "Use the joystick to move the SmartMark Laser over point #1 and press LOAD on the front panel..". Using the joystick, move the Laser over the cutting registration mark #1. Press the "LOAD" button on the front panel.
Warning: Do not move joystick until the red load light is illuminated.
The screen will now say to move to point #2. Move the Laser over to cutting registration mark #2. Press the "LOAD" button on the front panel.
Warning: Do not move joystick until the red load light is illuminated.
The screen will now say to move to point #3. Move the Laser over cutting registration mark #3. Press the "LOAD" button on the front panel. The head will now move back to the 1st position once you click OK on the last window displayed in Wasatch.
NOTE:The cutter is now set up and ready to print. Do not move the joystick or the print will become unregistered!
First point: The origin
Second point: Scale Point
Third point: Skew Point
Note: If there are Allen Datagraph marks that are not found when an automatic alignment is performed. There will be a choice whether to continue or abort the cut.