 Allen Datagraph iTech Talon
May 27, 2020
General Workflow Overview:
- Set one Print Unit to the printer model being used to generate your labels.
- Set a second Print Unit to the Allen Datagraph iTech Talon.
- Before printing labels, set the Cutting Registration Marks appropriately as desired on the printing unit.
- Before printing labels, set the 'Cutting unit' to "Unit X: Allen Datagraph iTech Talon" on the printing unit.
- Print your labels.
- Load printed labels onto the the Talon.
- Using the joystick on the Talon, set the red laser to the upper left corner of the Origin Mark.
- Start cutting. ( Note: Reference to Print or Printing = Cut or Cutting when using the Allen Datagraph iTech Talon )
| *** |
Prints that are expected to be cut using the ADSI Talon typically should be created in SoftRIP by placing images on the Layout window or by printing the images using the Fast Layout option.
However, on occassion, it may be necessary to print multiple copies of a single image. When this is the case, only a single entry will be listed in the print queue for the Talon. This entry will need to have the correct number of copies set prior to sending to the Talon. Double-click the print queue entry, or select Show the properties for the selected job(s) from the right-click menu, to set the number of copies.
|
NOTES:
- Physical Connection: Set the appropriate connection in SoftRIP's Print > Setup window.
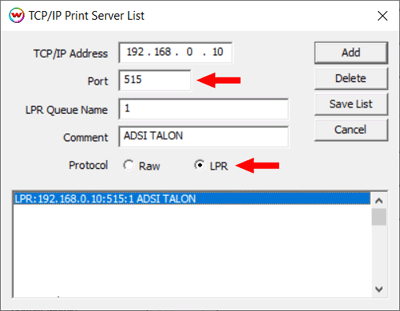
- TCP/IP: To use the Talon cutter via TCP/IP, click the TCP/IP List button located on the Print > Setup window. Enter the IP address of the Talon cutter then select LPR for the Protocol, this sets the Port to 515. The LPR Queue Name does not need to change, and a Comment can be added to help clarify the IP list when multiple IP addresses exist. Remember to click Add then Save List.
- TO FILE: Selecting the TO FILE option allows you to print over TCP/IP or USB through the Allen Datagraph windows Cutter Driver. To use this option first run SetupCutterDriver3.02.exe which can be downloaded here and then set up your destination folder and file output option on the printer properties page which are described below.
- Consult the Talon's user manual for information on setting the origin point, force, and speed.
Cutting Registration Marks:
To print the appropriate cutting marks with your image, check the Cutting Registration Marks box located on the Print > Setup window, then select Rotary Marks and Allen Datagraph Rotary Marks from the list. Clicking the Cutting Mark button will also bring up the list of marks.
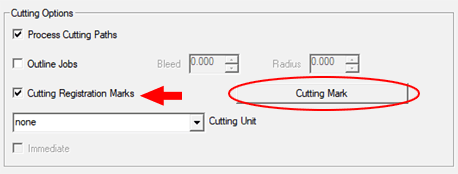
When 'Allen Datagraph Rotary Marks' is selected the following options will be displayed:
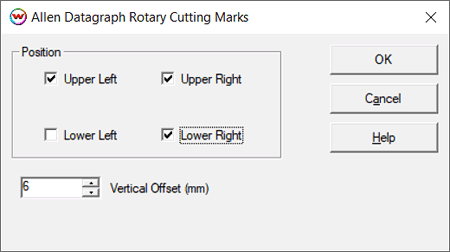
The marks can be configured in a variety of ways to support different work flows.
- Upper Left: Select to print the mark, along the left edge outside the image and aligned with the top of image. Typically known as the Origin mark. If 'Reverse Roll' is selected on the Properties window, see the note below.
- Upper Right: Select to print the mark, along the right edge outside the image and aligned with the top of image. Typically known as the Skew mark. If 'Reverse Roll' is selected on the Properties window, see the note below.
- Lower Left: Select to print the mark, along the left edge outside the image and aligned with the bottom of image. Typically known as the Scale mark. If 'Reverse Roll' is selected on the Properties window, see the note below.
- Lower Right: Select to print the mark, along the right edge outside the image and aligned with the bottom of image. If Reverse Roll is selected on the Properties window, see the note below.
- Vertical Offset: Enter value in millimeters to move the top and bottom marks away from the edge of the image. A setting of zero will leave the marks aligned to the top (or bottom) edge of the image.
Note about 'Reverse Roll': This option is used when printing to a device with the intention of removing the take-up roll and placing it directly onto the Talon cutter. In this scenario the last print made will be the first print to be cut. In this case the Reverse Roll option on the Properties window needs to be checked (see the Properties section below).
When intending to use the Reverse Roll option it is important that the printer is set upappropriately before printing. The Allan Datagraph Rotary Marks should be set as follows on the on the Setup window of the printer being used.
- Origin Mark only...................... Lower Right mark, when using Reverse Roll.
- Origin and Scale marks........... Upper Right & Lower Right marks, when using Reverse Roll.
- Origin and Skew marks........... Lower Right & Lower Left marks, when using Reverse Roll.
- Origin, Scale, & Skew marks... Upper Right, Lower Right, & Lower Left marks, when using Reverse Roll.
Properties:
To launch the printer properties for this driver, choose Setup from the Print menu, then click on the Edit button, and then click on Properties.
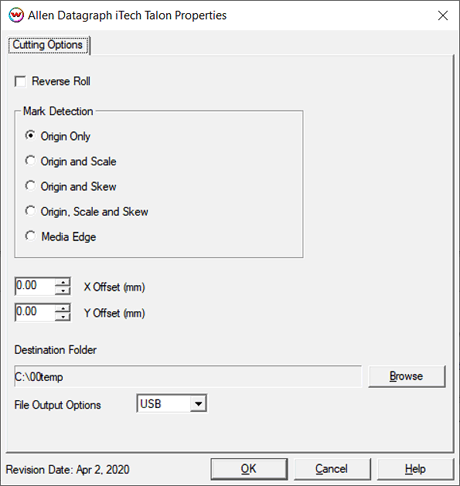
- Reverse Roll: Rotates the cutpath 180 degrees. Select when printing onto a roll of media and then directly loading the roll onto the cutter, so that the roll becomes reverse-rolled.
- Mark Detection: Mark detection can be set to scan 1-3 marks. All marks need to be positioned outside of the cut area. The image below shows the naming and position of each mark.
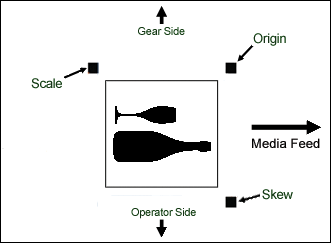
- Origin: The cutter will only scan for the single "Origin" mark at the top left of the image.
- Origin and Scale: The cutter will scan for the two marks along the left side of the image.
- Origin and Skew: The cutter will scan for the two marks at the top of the image.
- Origin, Scale, and Skew: The cutter will scan for all the marks.
Note: Always align the laser within the upper left cutting mark, referred to as the'Origin' mark.
- Media Edge: Select when creating blank labels on unprinted media.
- Set the amount of distance (in inches) between the detected edge of the media and the cutpath for the blank label being created.
- X / Y Offsets: Use the offset controls to make minor adjustments with aligning the cutpath to image. Controls are in millimeters.
- Destination Folder: When the physical connection in SoftRIP has been set to TO FILE, then the option to save the cutpath to file is available.
- File Output Options: Select the Physical Connection that the saved output file will be spooled through.