 Roland CAMMJET CJ-400/500 Roland CAMMJET CJ-400/500
The Roland CAMMJET CJ-400/500 can be used as a print only, print and cut, or cut only device. Cutting controls are only displayed if the special registration code, "CUTTING", is enabled.
For either Print Only or Print and Cut operation, select either of the following two options from the "Printer Model" combo box on the Print/Configuration tab:
For Cut Only operation, select either of the following two options from the "Printer Model" combo box on the Print/Configuration tab:
In these modes, printing will be suppressed.
Click on "Properties" to access the controls for printing and cutting. The following window will be displayed:
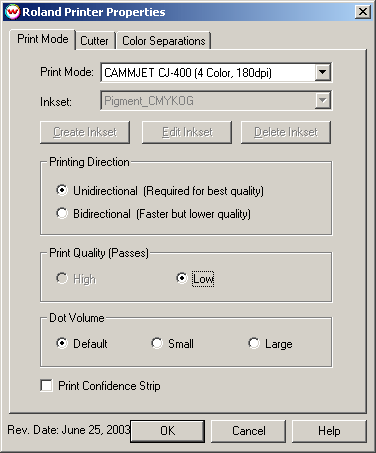
On the first tab, you can select the print mode (resolution and inks to be printed with), print direction, pass count, and dot volume.
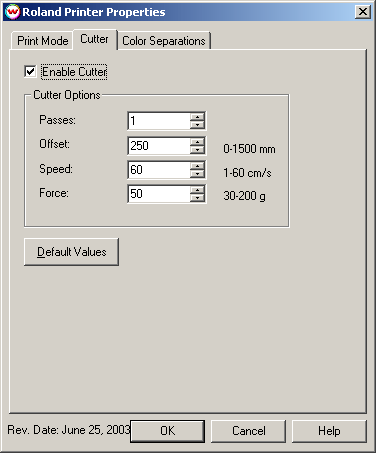
On the second tab, you can turn on and off the cutter and change cutting options. Passes defines the number of times the cutter will pass over the same area. Offset, speed, and force are defined as the following (from the users manual of the printer):
Offset
Set the appropriate value for the blade in use. Inappropriate values in this field can lead to poor cut
quality or unfinished cut lines. The default value is 250 (0.25mm).
Speed
Set the cutting speed. Usually setting a lower speed will result in longer cut times, but will produce higher
quality results.
Force
Set the blade pressure for cutting. When the values set here are too small, the blade will not have
enough pressure to cut the sheet. Similarly, if the pressure is too high, not only it will not work properly,
but also it can cut through the back of the media and may cause damage to printer. Be careful to set the
correct value for the thickness and the hardness of the material you are using.

On the third tab, color separation controls are enabled if a monochrome mode is selected.
Device-Specific Instructions for Print now, Cut Later
Insert the media from the rear of the cutter in the same direction as the media originally came out of the printer. (The cutting registration marks #1 and #2 should be on the leading edge.) Since the cutter cannot cut any media beyond the pinch roller nearest the control panel, align the media so that the pinch roller is over the left margin, but not over the any part of the print that is to be cut.
After lowering the pinch roller, select 'piece' (for sheet-fed media), then press "Setup". The cutter will determine the width and height of the sheet.
Using the arrow keys on the front panel, move the knife (or pen) over the cutting registration mark #1. By pressing Tool Up/Down, you can more easily see what point that the knife (or pen) is over. Press "Base Point".
Using the arrow keys as above, move the knife over the cutting registration mark #2. Press "Align Point".
The cutter is now ready for the cut path to be sent from the Cutting Queue.