 Graphtec FC9000 / CE7000/8000 Cutters
September 3, 2024
Notes:
- The Graphtec FC9000 and CE7000/8000 are cut only devices, and is only available when the Cutting Option is enabled for your license.
- The Graphtec FC9000 and CE7000/8000 cutters can be used for cutting of DTF prints. For more information about this workflow click HERE.
- SoftRIP supports USB and TCP/IP connections with the FC9000 and CE7000/8000 cutters. Set the proper physical connection in the Print > Setup window.
Cutting Properties
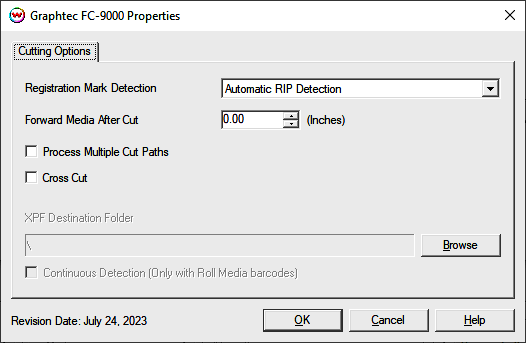
- Registration Mark Detection: Choose to have Automatic Detection of the registration marks or if you will be Manually setting the position of each mark from the front panel of the cutter.
- Forward Media After Cut: Set a distance the media will be forwarded after a cut job is complete. Can be used to help with mark detection of subsequent cut jobs.
- Process Multiple Cut Paths: Enables cutting of paths defined by spot color names other than CutPath. See File -> Preferences to configure custom cut colors.
- Cross Cut: Will cut across the width of the media after a cut job is complete. Also known as a sheet cut.
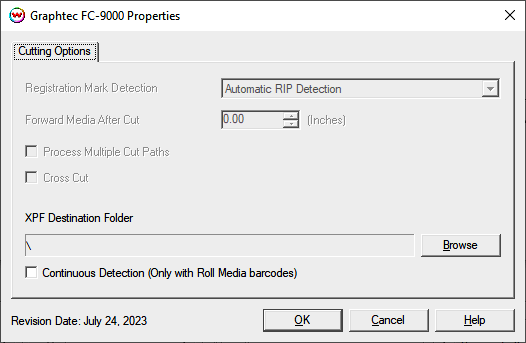
- XPF Destination Folder: When the Physical Connection, on the Print Setup window, is set to Datalink: XPF File, the previously described controls will be disabled. This control and those below will be enabled for use with Graphtec barcode workflows. Click Browse to select the USB flash drive or temporary local folder in which to place these files. After they are placed on a USB flash drive and attached to the Graphtec cutter, then the barcode scanning functionality on the front panel of the cutter can be used to cut the associated prints on the cutter. Please review the Graphtec documentation for more information.

- Continuous Detection (Only with Roll Media and Barcodes): Enable this control when printing onto a takeup reel that will be loaded onto the cutter after. This allows the cutter to detect subsequent jobs on the takeup roll after cutting out the prior job.
Initial Software and Cutter Setup
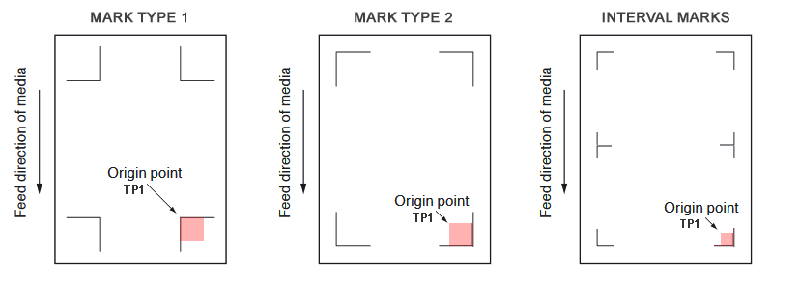
- SoftRIP Registration Mark Setup: Wasatch SoftRIP can print five types of marks for use with this cutter. These marks are selected from the Cutting Registration Marks button inside the Print Setup window. Select Graphtec Type 1, Graphtec Type 2 marks or the Graphtec 1/2 Inch Interval Cut Marks if you intend to use the automatic method of "RIP Detect" (see the "RIP Detect Registration" section below).
After selecting either Graphtec Type 1 or Graphtec Type 2 marks a separate window will open to allow additional options, including the ability to change the size of the cutting marks.

- Use Interval Marks: When enabled, instead of just corner marks, periodic marks are placed down the length of a print if the print length exceeds the entered interval value.
- Mark Density: This can be used to set the printed density for the Black (top slider) and White inks that compose the register marks. It is recommended to start with the same values as set in the selected Imaging Configuration and adjust as needed to be read by the cutter.
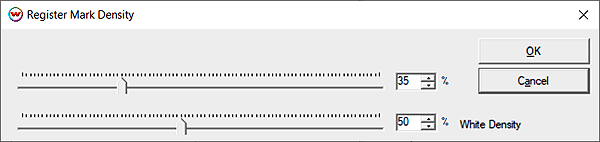
The imaging configuration values can be found by going to Printer Settings > "Edit" > "Color Transforms" > "Calibration". A warning will appear, click okay but do not change any of these values, note the ink reduction levels of the white and black channels then close this window.
- Print White Background: Enable if printing to DTF or similar clear film that requires additional contrast on print in order to read the barcode and register marks from the clear film.
- Background Color Channel: When printing to a HiFi device or one with more than a single unmanaged color channel, this control can be used to set the 'White' ink that will be printed around the black barcode and register marks.
- Barcode Location: Select the type and location of barcode mark to be printed. Choices are: Front Edge, Rear Edge, Both Front and Rear Edges, and Standard (barcode along edge). Select None to disable. Not Available on CE8000
- Barcode Length: Select the size of the printed barcode mark.
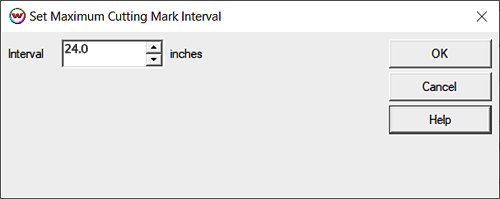
If Graphtec 1/2 Inch Interval Cut Marks are selected then the following window will open, allow the distance between the interval marks to be set. If the length of the print is close to or greater than the maximum cutting mark interval, subdivisions of cutting mark spacing start there. This means that the interval should never exceed that maximum, and may be half of the maximum, as would happen if you had a 24 inch interval, as shown below, and were printing 24.1 inches.
For manual registration, you must select either the 1/2 Inch Register or 1/4 Inch Register marks. To align your job manually (see the "Manual Registration" section below).
Note: When printing any of these marks, you should print with 1" or greater left and right margins, and 2" or greater top and bottom margins. This ensures that the cutter has enough room to properly detect the registration marks.
Print and Cut (RIP Detect Registration):
Note: The print should have been printed with Graphtec Type 1, Graphtec Type 2 or the Graphtec 1/2" Interval Register marks. These marks can be selected from the "Cutting Mark" menu on the Print > Setup window prior to printing.
Loading the media:
- As the print comes off the printer, note the edge that is to the lower right corner of the print. That corner will be referred to hereafter as the Origin (TP1) of the print (see illustration above).
- Insert the media in the same direction that the media came out of the printer. Since the cutter cannot cut beyond the pinch rollers, align the media so that the pinch rollers are outside of the cutting area.
- After setting the pinch rollers,
- Press Sheet or Roll to set paper type.
- Align the knife in the shaded area by the first mark (TP1). Press Origin.
- In SoftRIP, go into properties (Print->Setup->Edit->Properties) and choose RIP Detect
- The cutter is now ready for the cut path to be sent from the queue. See the user manual for further assistance.
Important Note: If you need to cancel the cut job due to the cutter being unable to detect the registration marks, you MUST completely cancel the print spooler on the PC prior to canceling the job on the cutter's front panel. If you do not cancel in this order, the cutter may begin cutting in the incorrect location, damaging your print.
Print and Cut (Manual Registration):
Important Note: This registration method may result in less accurate contour cuts than the RIP Detect registration method.
Note: The print should have been printed with 1/4" or 1/2" Register (Not Graphtec) marks, 1/2" are preferred. Select the appropriate mark type from the Cutting Mark menu on the Print > Setup window.
Loading the media:
- As the print comes off the printer, note the edge that is to the lower right corner of the print. That corner will be referred to hereafter as the Origin (TP1) of the print (see illustration above).
- Insert the media in the same direction that the media came out of the printer. Since the cutter cannot cut beyond the pinch rollers, align the media so that the pinch rollers are outside of the cutting area.
- After setting the pinch rollers,
- Press Sheet or Roll to set paper type.
- Align the knife in the shaded area by the first mark (TP1). Press Origin.
- In SoftRIP, go into properties (Print->Setup->Edit->Properties) and choose Manual Detect
- The cutter is now ready for the cut path to be sent from the queue.
- When the path is sent, an information screen will ask you to align point #1
- Use arrow keys, on the cutter, to make sure the knife is centered on the correct mark then click OK in SoftRIP. Next press the Enter on the cutter's front panel.
- The knife will move to next point. Use arrow keys to fine adjust then click OK in SoftRIP. Next press the Enter on the cutter's front panel.
- The knife will move to the final point. Use arrow keys to fine adjust then click OK in SoftRIP. Next press the Enter on the cutter's front panel.
- Cutting will now proceed.
Cut Only Jobs (No Image, No Registration):
Loading the media:
- Insert the media in the cutter and align the media so that the pinch rollers are outside of the cutting area.
- After setting the pinch rollers, press Sheet or Roll to set paper type.
- Use arrow keys to place the knife over the desired starting point.
- Press Origin.
- In SoftRIP, go into properties (Print->Setup->Edit->Properies) and choose RIP Detect.
- The cutter is now ready for the cut path to be sent from the queue.
Print and Cut (using Barcodes):
Note: The print should have been printed with Graphtec Type 2 Register marks. This is the preferred selection for DTF workflows. These marks can be selected from the Cutting Mark menu on the Print > Setup window prior to printing.
Loading the media:
- As the print comes off the printer, note the edge that is to the lower right corner of the print. That corner will be referred to hereafter as the Origin (TP1) of the print (see illustration above).
- Insert the media in the same direction that the media came out of the printer. Since the cutter cannot cut beyond the pinch rollers, align the media so that the pinch rollers are outside of the cutting area.
- After setting the pinch rollers,
- Press Roll to set paper type.
- Press Barcode.
- Align the knife over the black square when using a Standard location, or below the black bar when using Front Edge, Rear Edge, or Front and Rear Edges. Press Enter.
- Cutting will now proceed.
NOTE: For more information on automated barcode workflows, click HERE
Basic Setup of the Graphtec FC9000 / CE7000:
The following instructions explain how to properly set your plotter up for use with Wasatch SoftRIP.
- Set Mark Type
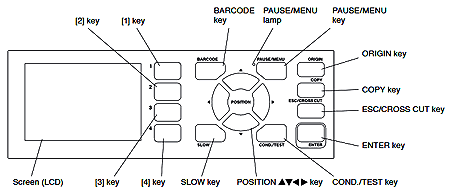
- Press PAUSE/MENU button
- 2 Key (ARMS)
- 3 Key (Mark Line Check)
- Select the Type of mark, Type 1 or 2
- Press ESC CROSSCUT key
- Toggle Mark Automatic Detection
- Press PAUSE/MENU button
- 2 Key (ARMS)
- Press UP arrow (Screen 2/3)
- 2 Key (Mark Auto Scan)
- Select ON(use with RIP detect in SoftRIP) or OFF(use with manual detect in SoftRIP)
- Press ESC CROSSCUT key
- Toggle Crosscut
- Press PAUSE/MENU button
- 2 Key (ARMS)
- Press DOWN arrow (Screen 2/3)
- 1 Key (ARMS Crosscut)
- Select ON(use when enabled in SoftRIP) or OFF
- Press ESC CROSSCUT key