 Mimaki CG-FX Series Cutters
September 08, 2008
The Mimaki CG-FX Series are cut only devices, and are only available if the special registration code, CUTTING, is enabled.
Consult the cutter's user manual for information on setting the cutter's origin point, force, and speed.
Initial Software and Cutter Setup
SoftRIP Registration Mark Setup
The following Mimaki cutting register mark sizes are supported in Wasatch SoftRIP for the cutter's automatic mark registration:
- 1/4" (approximately 6 mm)
- 1/2" (approximately 13 mm)
- 1" (approximately 26 mm)
You can also use SoftRIP's 1/4" or 1/2" registration marks if you want to manually align your cutting job
(see "Device-Specific Instructions for Print now, Cut Later (Manual Registration)" section below).
Select one of these mark types by clicking the Cutting Mark button on the Unit setup screen for your SoftRIP printing unit.
Cutter Mark Detection Setup
The following steps should be followed to set the cutter to detect one of the supported registration mark sizes:
- Power on the cutter and load some media.
- Press the left arrow key if you loaded a Roll, or the right arrow key if you loaded a sheet.
- If TP1 is displayed on the cutter's front panel, press the End key. Otherwise continue to the next step.
- Press the Function key until MARK sensor is displayed.
- Press the Enter/Hold key until SIZE: is displayed.
- Use the up or down arrow keys to set your mark size to 1/4" (6 mm), 1/2" (13 mm), or 1" (26 mm). This must match the mark size set in SoftRIP (see instructions for "SoftRIP Registration Mark Setup" above).
- Press the End key. The cutter is now set to detect marks of the size you specified.
Note: This initial setup needs to be performed only once. The media loading steps in the "Device-Specific" instructions (see below) must be performed before each cut.
Connection: Choose the physical connection from the 'Print->Configuration' window.
- USB: When you first plug an FX cutter into a USB port you will be prompted for a USB driver. The driver is included on the CD labeled "Disk 1 Application" in the folder "Misc/Mimaki USB".
A USB connection option will not appear on the "print/configuration" tab unless the Mimaki cutter is actually connected with the USB cable. The first CG_FX will get the number "00". Each plotter connected will get a new number (i.e. CG-FX-01) and will maintain that number even when disconnected.
- COM: Choose the COM port to which the serial cable is connected.
Loading Media and Cutting Prints
Note: There are three methods to have the cutter detect the Mimaki type registration marks. The first lets the registration come from the RIP. The second two methods register the print at the time the media is inserted into the cutter.
- Device-Specific Instructions for Print now, Cut Later (RIP Detect Registration)
Note:
The print should have been printed with the Mimaki Register marks. Select these marks from the Cutting Mark menu on the Print/Configuration screen (see "SoftRIP Registration Mark Setup" above). If you have not set the cutter to detect the correct registration mark size yet, please do so now (see "Cutter Mark Detection Setup" above). If the cutter is not set to detect the correct size registration mark, it will be unable to detect the registration marks.
Setup:
- Hit Function on the front panel.
- Use the up and down arrow keys until you see SET UP.
- Press Enter/Hold.
- Press the up arrow key until you see MARK DETECT.
- Press Enter/Hold.
- Change the Mark Detect setting to OFF.
- Press Enter/Hold.
- Then press End and then End.
- In SoftRIP, Open the properties page for this device. ("Print"->"Setup"->Next to Imaging Configuration click "Edit" ->"Properties")
- Choose RIP Detect and the number of points to detect.
- Press OK and OK to Save your configuration.
Loading the media:
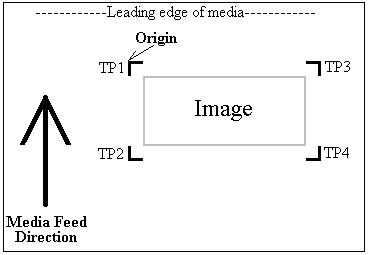
- As the print comes off the printer, note the edge that is to the lower right corner of the print. That corner will be referred to hereafter as the origin (TP1) of the print (see illustration).
- You can insert the media from either the rear of the cutter or the front. If you insert the media from the front, then the media should be inserted with the origin of the print on the left side of the cutter. If you insert the media from the back, so that the origin of the print is on the right side of the cutter. The information below assumes the media was loaded from the rear.
- Insert the media from the rear of the cuter in the same direction as the media originally came out of the printer. Since the cutter cannot cut any media beyond the pinch roller nearest the control panel, align the media so that the pinch roller is over the left margin.
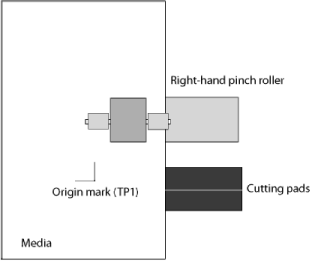
- After lowering the pinch roller, press '>' to load as a "leaf". Press Enter/Hold. Align the knife with the first mark as shown to the right. (Place the knife over or within the TP1 mark) Press Enter/Hold.
- Press Remote to place the unit in Remote mode. The cutter's front panel should display Remote.
- The cutter is now ready for the cut path to be sent from the Cutting Queue. See the user manual for further assistance.
- Device-Specific Instructions for Print now, Cut Later (Full Automatic Registration)
Note: The print should have been printed with Mimaki Register marks. Select these marks from the Cutting Mark menu on the Print/Configuration screen (see "SoftRIP Registration Mark Setup" above).
Setup:
- Hit Function on the front panel.
- Use the up and down arrow keys until you see SET UP.
- Press Enter/Hold.
- Press the up arrow key until you see MARK DETECT.
- Press Enter/Hold.
- Change the Mark Detect setting to the number of marks to be detected.
- Press Enter/Hold.
- Paper Hold to ON, Press Enter/Hold.
- Dist. Comp. to After, Press Enter/Hold.
- Size: This setting should be correct for the marks that were printed. If it is not, change it to the correct size using the up or down arrow keys. Press Enter/Hold.
- OffsetA to 0, Press Enter/Hold.
- OffsetB to 0, Press Enter/Hold.
- MARK FORM to TYPE 2, Press Enter/Hold.
- CopiesA to 1, Press Enter/Hold.
- CopiesB to 1. Press Enter/Hold.
- Then press End and then End.
- Open the properties page for this device. ("Print"->"Setup"->Next to Imaging Configuration click "Edit" ->"Properties")
- Choose Front Panel Setup
- Press OK and OK
Loading the media:
- As the print comes off the printer, note the edge that is to the lower right corner of the print. That corner will be referred to hereafter as the origin of the print (see illustration).
- You can insert the media from either the rear of the cutter or the front. If you insert the media from the front, then the media should be inserted with the origin of the print on the left side of the cutter. If you insert the media from the back, so that the origin of the print is on the right side of the cutter. The information below assumes the media was loaded from the rear.
- Insert the media from the rear of the cutter in the same direction as the media originally came out of the printer. Since the cutter cannot cut any media beyond the pinch roller nearest the control panel, align the media so that the pinch roller is over the left margin, and the cutting mark is about 5 mm to the left of the pinch roller. The cutting mark should also be aligned with the cutting pen.
- After lowering the pinch roller, press Enter/Hold. (The front panels display will ask for sheet/roll type after lowering the pinch roller. There is no need to choose sheet type before pressing Enter/Hold) The cutter should automatically detect the width of the media and the marks. Press Enter/Hold when you see "A:(number) B: (number)" until you are returned to the main console display. See the user manual for further assistance.
- Press Remote/Local to place the unit in Remote mode. The cutter's front panel should display Remote.
- The cutter is now ready for the cut path to be sent from the Cutting Queue.
- Device-Specific Instructions for Print now, Cut Later (Semi-Automatic Registration)
Note: The print should have been printed with Mimaki Register marks. Select these marks from the Cutting Mark menu on the Print/Configuration screen (see "SoftRIP Registration Mark Setup" above).
Setup:
- Hit Function on the front panel.
- Use the up and down arrow keys until you see SET UP.
- Press Enter/Hold.
- Press the up arrow key until you see MARK DETECT.
- Press Enter/Hold.
- Change the Mark Detect setting to the number of marks to be detected.
- Press Enter/Hold.
- Paper Hold to ON, Press Enter/Hold.
- Dist. Comp. to After, Press Enter/Hold.
- Size: This setting should be correct for the marks that were printed. If it is not, change it to the correct size using the up or down arrow keys. Press Enter/Hold.
- OffsetA to 0, Press Enter/Hold.
- OffsetB to 0, Press Enter/Hold.
- MARK FORM to TYPE 2, Press Enter/Hold.
- CopiesA to 1, Press Enter/Hold.
- CopiesB to 1. Press Enter/Hold.
- Then press End and then End.
- Open the properties page for this device. ("Print"->"Setup"->Next to Imaging Configuration click "Edit" ->"Properties")
- Choose Front Panel Setup
- Press OK and OK
Loading the media:
- As the print comes off the printer, note the edge that is to the lower right corner of the print. That corner will be referred to hereafter as the origin (TP1) of the print (see illustration).
- You can insert the media from either the rear of the cutter or the front. If you insert the media from the front, then the media should be inserted with the origin of the print on the left side of the cutter. If you insert the media from the back, so that the origin of the print is on the right side of the cutter. The information below assumes the media was loaded from the rear.
- Insert the media from the rear of the cutter in the same direction as the media originally came out of the printer. Since the cutter cannot cut any media beyond the pinch roller nearest the control panel, align the media so that the pinch roller is over the left margin, and the cutting mark is about 5 mm to the left of the pinch roller. The cutting mark should also be aligned with the cutting pen.
- After lowering the pinch roller, press either '<' for roll or '>' for leaf. The cutter should automatically detect the width of the media. After detecting the media, the front panel should show TP1. Move the red light into the area of the mark as shown to the right. Press Enter/Hold. The cutter will then detect the number of marks chosen in the set up phase. Press Enter/Hold when you see "A:(number) B: (number)" until you are returned to the main console display. See the user manual for further assistance.
- Press Remote/Local to place the unit in Remote mode. The cutter's front panel should display Remote.
- The cutter is now ready for the cut path to be sent from the Cutting Queue.
- Device-Specific Instructions for Print now, Cut Later (Manual Registration)
Note: The print should have been printed with 1/4" or 1/2" Register (Not Mimaki) marks (1/2" are preferred). Select these marks from the Cutting Mark menu on the Print/Configuration screen (see "SoftRIP Registration Mark Setup" above).
Setup:
- Hit Function on the front panel.
- Use the up and down arrow keys until you see SET UP.
- Press Enter/Hold.
- Press the up arrow key until you see MARK DETECT.
- Press Enter/Hold.
- Set the Mark Detect to OFF
- Press Enter/Hold.
- Then press End and then End.
- Open the properties page for this device. ("Print"->"Setup"->Next to Imaging Configuration click "Edit" ->"Properties")
- Choose Front Panel Setup
- Press OK and OK
Loading the media:
- Insert the media from the rear of the cutter in the same direction as the media originally came out of the printer. Since the cutter cannot cut any media beyond the pinch roller nearest the control panel, align the media so that the pinch roller is over the left margin, but not over the any part of the print that is to be cut.
- You can insert the media from either the rear of the cutter or the front. If you insert the media from the front, then the media should be inserted with the cutting registration marks #1 and #2 on the edge of the print that is closest to the rear of the cutter. If you insert the media from the back, then the media should be inserted with the cutting registration marks #1 and #2 on the edge of the print closest to the front of the cutter. The information below assumes the media was loaded from the rear.
- After lowering the pinch roller, press either '<' for roll or '>' for leaf loaded from the back. Press either '^' or 'v' for loading from the front (We recommend all ways loading from the rear.) The cutter should automatically detect the width of the media.
- Use the arrow keys to move the knife over registration mark #1. Press Enter/Hold.
- Using the arrow keys as above, move the knife over the cutting registration mark #2. Press Data Clear. A small p should be displayed on the right side of the cutter's display.
- Using the arrow keys as above, move the knife over the cutting registration mark #3. Press Data Clear. The cutter should return to the origin point.
- Press End, the cutter will return to a ready state
- Press Remote/Local to place the unit in Remote mode. The cutter's front panel should display Remote.
- The cutter is now ready for the cut path to be sent from the Cutting Queue.
- Device-Specific Instructions for Cut Only
Loading the media:
- Insert the media from the rear of the cutter in the same direction as the media originally came out of the printer. Since the cutter cannot cut any media beyond the pinch roller nearest the control panel, align the media so that the pinch roller is over the left margin, but not over the any part of the media that is to be cut.
- After lowering the pinch roller, press either '<' for roll or '>' for leaf loaded from the back. Press either '^' or 'v' for loading from the front (We recommend all ways loading from the rear.) The cutter should automatically detect the width of the media.
- Use the arrow keys to move the knife over the desired starting point. Press Enter/Hold.
- If a previous set up used registration marks the front panel will display TP1, press End to return to a ready state.
- Press Remote/Local to place the unit in Remote mode. The cutter's front panel should display Remote.
- The cutter is now ready for the cut path to be sent from the Cutting Queue.
Clearing ERROR36 MARKdetect
ERROR36 MARKdetect indicates that the printer failed to detect the registration marks. This error must be cleared before any images may be cut. Follow the steps below to reset the cutter.
- Front Panel
- Press Enter/Hold
- End
- Load the page
- Use the arrows and adjust the LED to the correct spot (#3 above)
- Enter/Hold and Enter/Hold
- Remote
- RIP Detect
- Press Data Clear
- Enter/Hold
- Adjust the knife to the correct spot (#1 above)
- Enter/Hold and Enter/Hold
- Remote
Die Cut/Kiss Cut
The Mimaki CG-FX series of cutters supports a second type of cut known as Die Cut or Kiss Cut. By default, the cutter will cut all cut paths in one pass. To use this type of cut, a spot color named DieCut must be defined in the image. This spot color must be added to Cutting Colors tab in the Preferences section also. To do this you will need to do the following:
Select File from the main screen of Wasatch SoftRIP.
Select Preferences/ and then select the Cutting Colors
Click Add and type DieCut into the box and click OK and then click OK again to finish.
To process this second cut path, the option Process Die Cut In a Second Pass must be checked in the Properties for the cutter. Selecting this option will process all normal cut paths in a first pass. Once the all other cut paths have been cut, the cutter will pause and Wasatch will prompt the user to process the DieCut path.
During this pause, you can exit the remote mode on the cutter by pressing the Remote key on the front panel of the cutter. Once the cutter is no longer in remote mode, you can change the cutting blade, speed, and pressure from the front panel of the cutter and the position of the cutter blade in the cutter. When any settings you want to change are set to the new settings, press the Remote key on the front panel of the cutter and press the yes button in the Wasatch SoftRIP dialogue box. The DieCut cut path will be processed. Before processing further cut paths, the front panel of the cutter will need to have the correct settings entered and the cutting blade moved to the correct position for the type of cut to be processed.