 Mutoh Valuecut
September 24, 2014
The Mutoh Valuecut is a cut only device, and is only available if the special registration code, "CUTTING", is enabled.
Physical Connection Setup:
- USB:
- When you first connect the cutter into a USB port, you will be prompted for a USB driver. This driver is included on the CD provided by Mutoh. Please refer to the Mutoh Valuecut documentation for assistance with installing the USB driver.
- Enter the SoftRIP Print Setup window and select the Mutoh Valuecut as the 'Printer Model'.
- Next to the Physical Connection selection control, click on the Setup button and choose 'Scan USB'.
- 'USB connections found' should be reported. If so, USB_0 (or USB_1, etc.) will be on the list of physical connections. Choose this option.
- Serial: RS-232 connections are not supported by SoftRIP.
Mutoh Valuecut Properties
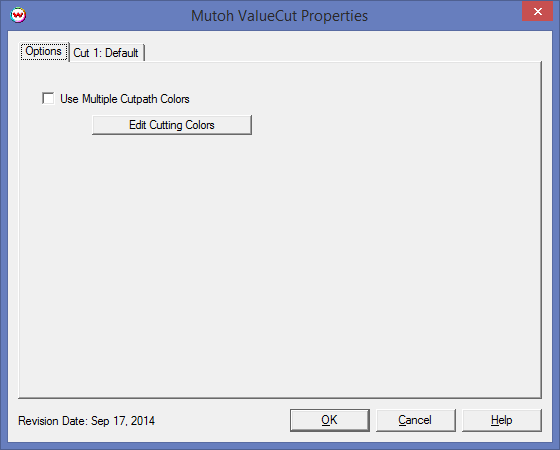
Pressing the Properties button next to the Printer Model window on the Imaging Configuration screen will launch a control panel for this cutting device.

- Use Multiple Cutpath Colors: Allows the use of different colors to be defined with different cut options.
- Edit Cutting Colors: Opens the Cutting Colors window for editing the colors list that Wasatch SoftRIP will use for cutting. This window can also be opened from the File menu by selecting Preferences.
Cut Options
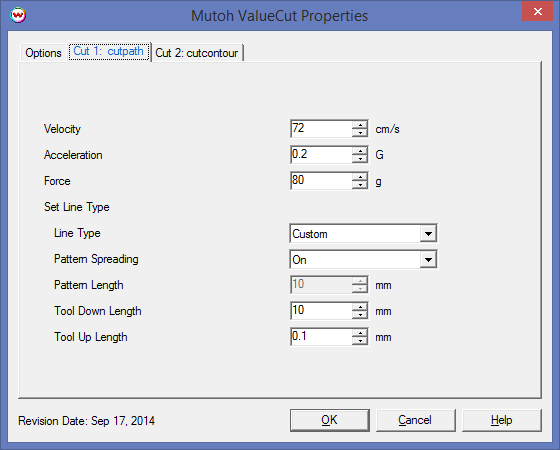
Checking the 'Use Different Setting for Each Cutpath Color' control will enable additional tabs at the top of the window for each additional cut path color, otherwise, 'Cut 1: Default' will be the only available tab.

- Velocity: Sets the speed of the cutting tool in cm/s.
- Acceleration: Sets the acceleration of the cutting tool.
- Force: Controls the force (in grams) that the cut path is processed with. If the cutting blade/tool is not cutting through the media, increasing the force or extending the cutting tool can resolve this.
- Set Line Type: When enabled, allows a cut path to be processed as a perforated cut, allowing some of the material to remain uncut and attached to the surrounding media.
- Line Type: Select a specific, pre-defined pattern of perforated cuts to be performed by the cutter. For more information regarding 'Line Type' specifications, please refer to the HPGL2 documentation. At the time of release of this driver, this documentation can be found online with the name of 'HPGL2-RTL_ReferenceGuide_5961-3526_540pages_Sep96.pdf' and Line Types are defined on page 216.
- Pattern Spreading: Ensures that the corner point of a cut line is always cut.
Note: Using 'Pattern Spreading' for cut jobs with curves is not recommended, as this can significantly increase the time required to cut the job.
- Pattern Length: Sets the length of the Line Type pattern (in mm).
- Tool Down Length: Available when Line Type is set to 'Custom'. Can be used, along with Tool Up Length, to define a custom line type.
- Tool Up Length: Available when Line Type is set to 'Custom'. Can be used, along with Tool Down Length, to define a custom line type.
Device-Specific Instructions for Print now, Cut later (RIP Detect Registration)
The print should have been printed with "Mutoh Valuecut" Registation or Interval cut marks. Select these marks from the "Cutting Mark" menu on the Print/Setup screen.
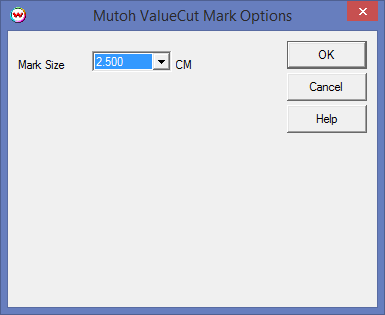
When selecting registration marks, a prompt for mark size will be shown.

Smaller marks can be used when space on the media is limited. However, if the cutter has difficulty detecting smaller marks, it is recommended to use a larger mark size to make mark detection easier.
Note: The Mutoh Valuecut uses asymetrical registration marks to allow the media to be loaded on the cutter in the same orientation as it was printed, or rotated 180 and loaded 'backwards'. When the cutter detects the registration marks, it will automatically determine the print orientation and adjust the cut path as necessary.
Loading the media:
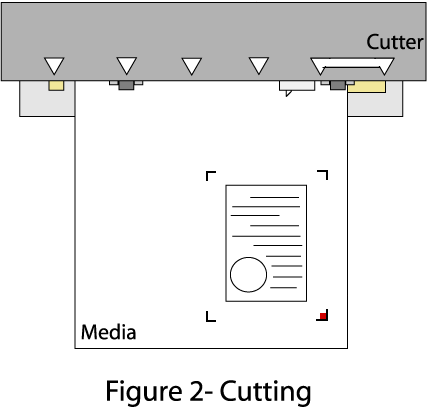
- The outer-most pinch rollers need to be positioned outside the registation marks before lowering the pinch rollers.
- Move the point of the cutting blade within the mark nearest the right-most side of the cutter (as shown in red below) and press 'Enter' to set the origin.

- The cutter is now ready for the cut path to be sent from the SoftRIP Cutting Queue.
- See the user manual for further assistance.
Device-Specific Instructions for Cut Only
Loading the media:
- Insert the media in the cutter and place the outermost pinch rollers outside the portion of the media that will be cut.
- Move the cutting blade to the point you wish the cut job to begin and press 'Enter'.
- The cutter is now ready for the cut path to be sent from the queue.
- See the user manual for further assistance.
 Mutoh Valuecut
 Mutoh Valuecut


