NuCUT F2436C Help
December 8, 2023
Important Note:
- For more information on automated barcode workflows, click HERE
Properties
The properties menu can be accessed by selecting the unit assigned to the cutter and going to Print menu and into Setup (blue gears button) then Edit followed by Properties.
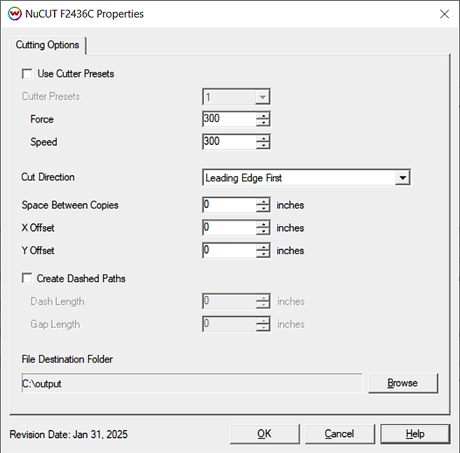
- Use Cutter Presets: Check to select settings created using the front panel of the cutter, or uncheck to set Speed and Force values to be saved within the SoftRIP imaging configuration.
- Cutter Presets: When selected, above, choose the preset that was defined on the cutter's front panel.
- Force: Set the amount of force applied to the media with the cutting tool (0 - 600). Set blade depth on blade tool to that of your media, then adjust force as needed.
- Speed: Set the speed at which the cutter operates (0 - 800).
- Cut Direction/Output File Type:
- Leading Edge First: For use when cutting sheets or smaller lengths of media. Marked with "Leading Edge" on the print.
- Trailing Edge First: When loading media from a reversed roll. Marked with "Trailing Edge" on the print.
- Create Both Files: With physical connection set to PLT, Wasatch will output files for both Leading and Trailing edge.
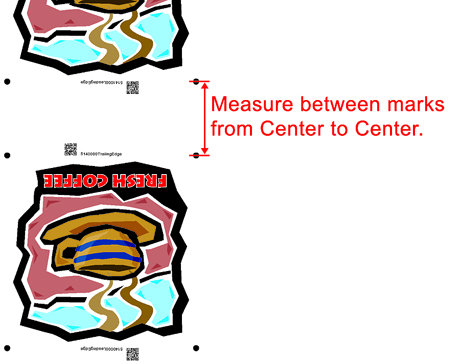
- Space Between Copies: The space between the trailing marks of an image and the leading marks of the next image. Measurement is used to determine distance to next QR code. NOTE: When measuring distance, measure from the center of the marks.
- X Offset & Y Offset: These controls allow for adjustment of the cut, in inches, along the x or y axis.
- Mirror Path: For use when printed output is mirrored, the cut path will be mirrored when checked.
- Create Dashed Paths: When checked, a dashed or "perforated" cut pattern will be used. This is useful when printing to film or other media where removing the cut item by hand at a later time is preferred.
- Dash Length: When "Create Dashed Paths" is checked, this control sets the length(in inches) of the cut.
- Gap Length: When "Create Dashed Paths" is checked, this control sets the length(in inches) of the gap.
- File Destination Folder: When the Physical Connection for the cutter is set to "To PLT File", this setting allows you to set the destination for output of the cut file. Using this method, a USB drive can be loaded with multiple PLT files then inserted into the cutter.
Register Marks
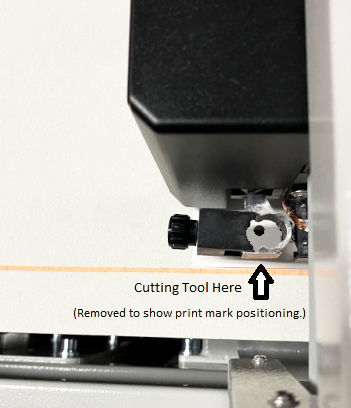
When aligning your media to be cut, the upper left registration mark is positioned at the lower left side of the belt, as seen from the control panel.
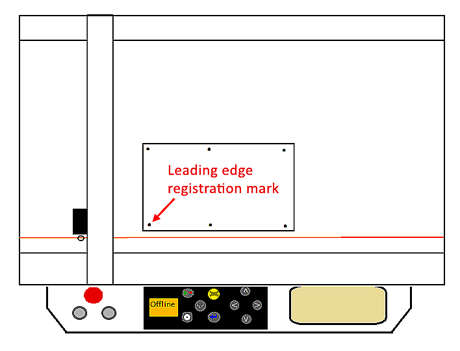
Position your registration mark centered below the location of the blade to properly line up the cutter with the mark.
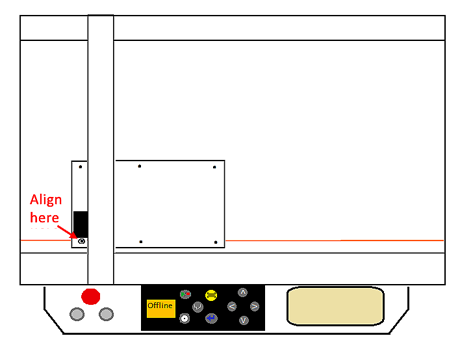
Once the cutters eye is lined up with the registration mark, press the play button to bring the cutter online. Either navigate to the correct .plt file on your jump drive or print the file from SoftRIP's print queue (found under the queue unit assigned to your cutter). The cutter will then find and confirm the registration marks and begin cutting.
Note: All cutting between the first registration mark and the first interval mark will complete before the cutter advances the media and cuts the remaining sections of the cut job.
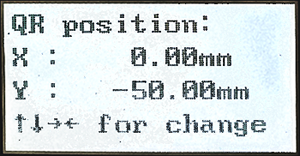
Cutter Settings
The cutter needs the offset changed from the default value before being able to read the QR codes printed by Wasatch SoftRIP.
From the front panel of the cutter, press SET then use the left/right arrow keys to move to the QROffset. Press SET to enter the offset value of -50.00 for the cutter to properly locate the QR code from Wasatch SoftRIP.