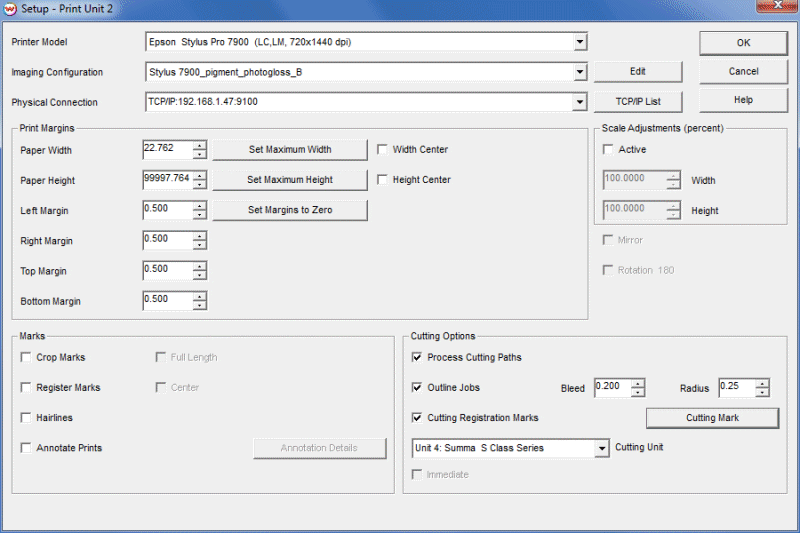
Setup Menu with Cutting Registration Marks and Cutting Unit Selected
With self-contained print-and-cut devices, processing is handled in the device driver. After the image is printed, the media is automatically rolled back and cut out. There is nothing else to do.
A more complex process involves printing on a color printer then taking the print to a separate cutting device where it is registered and cut out. To support this activity, SoftRIP allows users to define a cutting device as a "Print Unit", and real printers can be set up to automatically forward cutting work to those devices, also called "Cutting Units".
Follow these steps when printing on one device and cutting on another:
Select the print unit that corresponds to the cutting plotter. In our example, this will be Unit 3. Click on Print, then Setup.
Select your cutter and the appropriate Physical Connection.
Set the Left Margin, Top Margin, Bottom Margin to 0.
Click on OK to return to the main screen.
Select the print unit that corresponds to the color printer. In our example, this will be Unit 1. Click on Print, the Setup. The screen shown in Illustration 1 will be displayed.

Setup Menu with Cutting Registration Marks and Cutting Unit Selected
Select your Printer Model, Imaging Configuration, and the appropriate Physical Connection.
The parameters you select in the Setup screen will depend on the requirements of the cutter. For instance, most cutters can't cut to the left edge of the paper. They can only cut to the leftmost pinch roller. The value in the Left Margin window should correspond to the distance from the left edge of the print media to the inner side of the pinch roller (in this example, 1 inch).
Most cutters are also sensitive to the leader space on the print media. This is the area of the media from the leading edge to the print image. This physical measurement corresponds to the Top Margin setting on this menu. Set this number to the value required by the cutter (in this example, 3 inches).
Since cutters cannot cut sheet-fed media all the way to the trailing edge of the print, you need to add a bottom margin (in this example, 4 inches).
Enable Cutting Registration Marks by clicking in the box. These marks are necessary to manually align the print in the cutter. Since these marks are printed in the printable area outside of the cuttable area, you must specify a value for top, left, and bottom margin or these marks will not be printed.
Finally, select the Cutting Unit that will be used for cut jobs from this printer. In our example, this is Unit 3.
The Immediate selection is available for cutting drivers that perform output to file. It causes one copy to be output immediately, so that no other intervention from the user is needed. It is useful with most table cutting systems.
Click OK to return to the Main Screen.
Select the print unit that is configured as your color printer. In our example, this is Unit 1.
In order to work with cut paths from incoming files, check Process Cutting Paths in the Cutting Options section of the Setup screen. This is one of two major methods of production, the other being the Wasatch Tracer. Cut paths generated with the Wasatch Tracer will replace the cut paths from incoming files and are handled identically for output.
If you want the outlines of each job to be cut out, in addition to the contour cut path or trace, make sure that Outline Jobs is checked in the Setup menu.
Open the file(s) to be cut and click the RIP and Print button.
After the print has finished, an entry will be made in the Print Queue of the Cutting Unit. In our example, this is Unit 3.
Place the printed media into the cutter. Ensure that the media is inserted as straight as possible.
Refer to your User's Guide for information on manual registration. In general, you must choose an Origin Point (which should be registration mark #1 on the print), and an Align Point (which differs depending on your printer).
Find the appropriate cut job int the Print Queue for the Cutting Unit, and "print" (cut in this case).