DTP-32 Wizard ñ Window 1
DTP-32 Wizard ñ Window 1
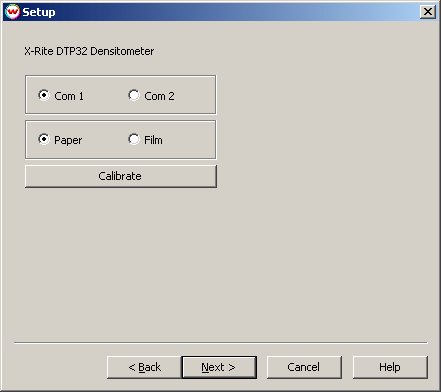
The Setup screen is used to select the port and data type for your device. Note that both the reflective and transmissive modes of this device are selectable. Selecting the Paper radio button will measure reflective values; Film will measure transmissive values. The Calibrate button will begin the calibration sequence for the dtp32. It is not necessary to calibrate the device using this button, it merely provides a convenient way to do so. Calibration is not necessary to begin reading values; however, the accuracy of these measurements can be greatly affected by a mis-calibrated device. To proceed to the next step, click on the Next button.
DTP-32 Wizard ñ Window 1
X-Rite DTP-32 Settings: You will need to ensure that the dtp32 is configured with the following settings. (Refer to instrument documentation for details.)
| Page1: | TYPE: 232 | ||
| Page2: | BAUD: 9600 | HAND: off | AXMT: on |
| Page3: | DPT: on | ||
| Page4: | DEF: off | X10: on | |
| Page5: | M/M: off |
Calibration Wizard ñ Window 2
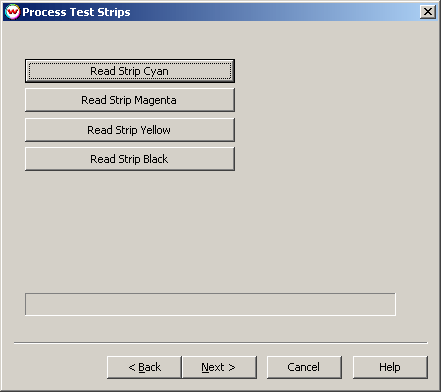
The Process Test Strips screen begins the strip reading process. To begin reading a strip, click on the button associated with the color you wish to read. Then follow the instructions presented in the message box directly below the Read Black Strip button. This interface is "hard-wired" to except the 17 data points used in the 'dtp32.ps' file, which is located in your 'X:\PSFiles' folder (X: being the letter of the drive on which Wasatch SoftRIP was installed). This is the only test pattern that will give you a correct result.
Calibration Wizard ñ Window 2
After the densitometer has returned the strip values, the 'Done' message will appear next to the color that you selected. After each strip has been read, the Next button will change to Finish. You may select Finish after reading any number strips; this will apply curves only from colors you have measured. Colors that you did not measure will not be overwritten should curves already exist.