Using the Macintosh Desktop Printer (LPR Client)
To install a Wasatch PPD under Mac OS 9, for OS 9 native applications, you must copy the PPDs for the Macintosh into your
System Folder\Extentions\Printer Descriptions These PPDs can be found on the SoftRIP Application CD-ROM in \PPDs\Mac
Setup
Should you have any problems setting up LPR on the Macintosh contact Wasatch Customer Service.
- Make sure your network services are running in SoftRIP by clicking on Server, then ImageNET, and Write down your IP address as it is shown on the window for later entry. The number will appear in ###.###.###.### format.
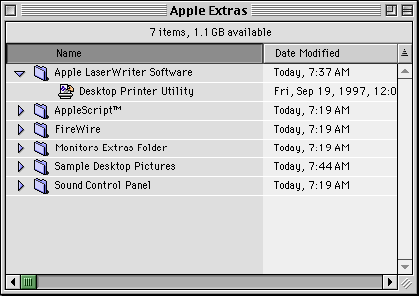
- Launch the Desktop Printer Utility. (This is usually found by going to the Apple Laserwriter Software folder in the Apple Extras folder in the Applications folder on the Macintosh HD; however its location can vary depending on the version and configuration of the Macintosh OS you are running).
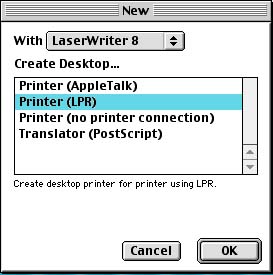
- Select Printer (LPR) and click OK.
- In the PostScript Printer Description (PPD) File section, click on Change....

- Select your PPD from the list.
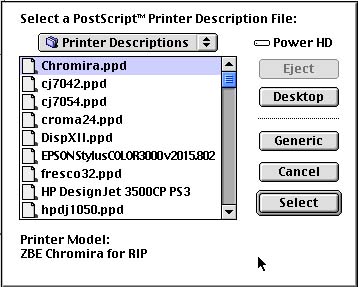
Once you select your PPD it will be saved.
- In the Internet Printer section, click on Change....
- Enter the RIP station's IP address or domain name for Printer Address this is the IP address that you wrote down in step 1.
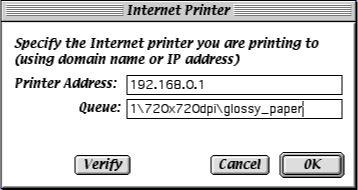
- In the Queue window, you may enter 1, 2, 3, or 4 to identify a root directory hot folder. These numbers correspond to the root "hot folder" designated for whatever Unit number you are setting up. For sub-directories, enter the number of the Unit, then a " \ " followed by the name of the sub-directory. For example, if you have a root folder on Unit 1 named "incoming" and a sub-directory named "sub-directory 1", the destination folder would be designated as:
- "1/sub-directory 1"
IMPORTANT:
Avoid using special characters (*?, etc) or foreign characters and accents when you specify folders and sub-directories. In general, avoid using
characters not normally found in the English language.
|
- Click on Verify to verify that the printer was found.
- Click OK.
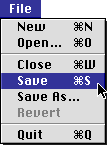
- Go to the File menu and select Save.
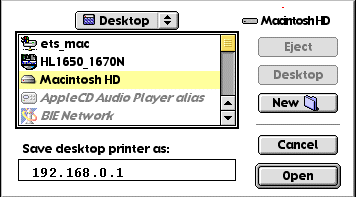
- Enter a name and location for the desktop printer icon and click OK. The default name is the RIP Station's IP address, and the default location is on the desktop.
- To close the LPR dialog box, go to File, and Quit.
You are now ready to use your LPR Printer like you would any other desktop printer on your Macintosh, either by dragging an image file onto it's icon or by selecting it as a printer from any application.