 Epson SureColor F6400 and F6400H
April 11, 2023
Important:
One or more of the following Epson components must be installed before SoftRIP can print to the F6400 series printer:
- EpsonNet Utility
- Windows Communication Driver
- Epson Control Dashboard
For more information about installing the proper components, click here.
After all components are installed, make sure the Epson dashboard is running and registered to your printer before attempting to print. Note that a printer can only be registered to one dashboard at a time.
Print Mode
- Use Epson Dashboard: When enabled, the selected "Media Name" downloaded from the printer will set the available options for the other controls. Leaving this control unchecked allows different settings to be chosen regardless of the selected "Media Name".
- Installed Ink Type: Select the inkset installed in the printer.
- Inkset: Select the set of inks that will be printed from the installed inkset.
- Media Name: If "Use Epson Dashboard" is enabled, medias loaded on the front panel of the printer can be selected with this control. Otherwise a general list of default media types is displayed.
- Print Mode: Set the resolution and pass count.
- Custom Inkset Controls: When "Custom" is selected for Inkset these controls can be used to create, edit, and delete non-standard inksets. (See below for more details)
- Print Direction: Print in one direction (Unidirectional) for the best quality or in both directions (Bidirectional) for higher speed.
- Auto-Cut: A sheet cut will be performed at the end of each print job when this control is enabled.
- Download ICC: When "Use Epson Dashboard" is enabled and the selected Media Name has an associated ICC profile, this button will download and apply the ICC profile from Epson Dashboard as the output ICC profile in Color Transforms. For Wasatch SoftRIP to have the correct color settings, this must be used every time the media type (Media Name) is changed.
- Print Confidence Strip - Left/Right: Prints a small strip of each color along the edge of the print. It can be useful to determine whether jets have clogged, and to keep unused heads running throughout a long print.
Custom Inkset Setup
- The Custom Inkset Creator does not control the channels with White and Varnish Ink. These Unmanaged Ink Channels are controlled by the "White/Varnish" control along with the Auto-Generation tab controls.
- When setting up a custom inkset, the default ink order is shown above. It can be used to determine slot assignments if a different ink is swapped into the place of one of those pictured.
- For more information on creating custom inksets and using the Passes control, click here.
Ink Density Factor
- Lock: This control will lock all slider controls below to allow for adjusting all the sliders at once.
- Default (Clear All): Reset ink reduction sliders to default positions.
- Ink Reduction Sliders: Increase or reduce the amount of ink for each of the channels.
Additional note on downloading media settings with Epson Edge Dashboard:
You can download F6400H media settings using the Epson Dashboard.
- From the Dashboard's home screen, select the F6400H printer (see illustration 1).
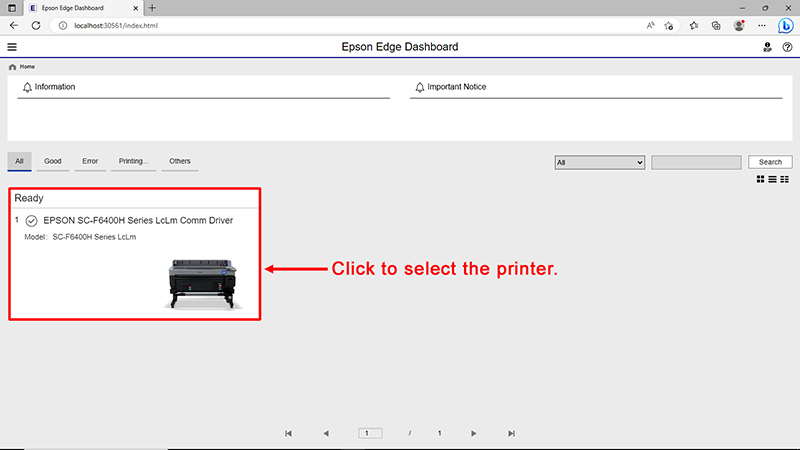
illustration 1
- The steps below are for selecting and installing downloaded media settings onto the Epson F6400H printer (see illustration 2).
Step 1: Switch to the Media tab.
Step 2: Click the Cloud icon to search for available media settings, and download.
Step 3: Select the appropriate settings.
Step 4: Choose the slot to copy the media settings into. If the slot selected already contains media settings then they will be overwritten by the new settings.
Step 5: Click the arrow icon to transfer the media settings into the target slot.
Step 6: Click Apply to accept(save) the media settings transfer.
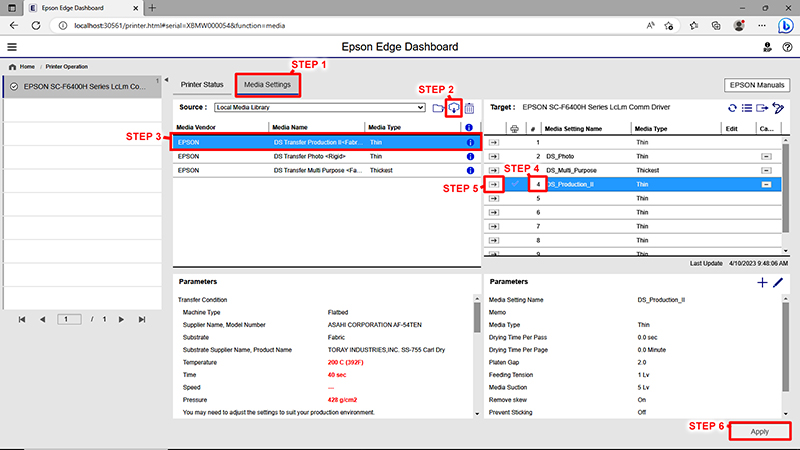
illustration 2