 Epson Stylus Pro 7890/9890 Help Page
January 5, 2011
This document covers the following printers:
- Epson Stylus Pro 7890
- Epson Stylus Pro 9890
Print Mode
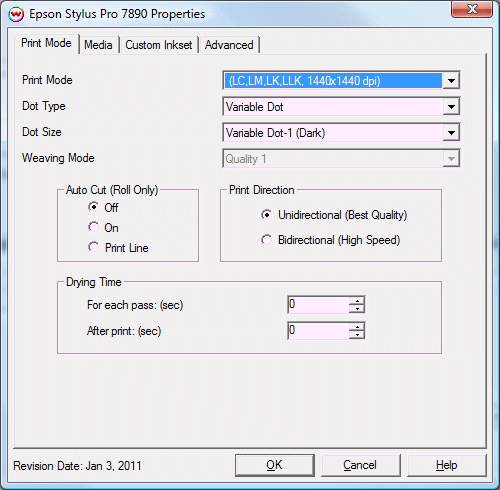
Pressing the Properties button next to the Printer Model window on the Imaging Configurations screen will launch a control panel for this printer.

This page of the properties sheet allows you to select a print mode, the dot size, the print direction, passes, and time between passes.
- Print Mode: Select the inks and printing resolution
- Dot Type: Select from Fixed or Variable dot types. When the print mode is changed this selection will default to the suggested dot type (usually variable)
- Dot Size: The following sizes are available in all print modes except 2880x1440 and 2880x2880, which have limited dot sizes.
- Fixed modes:
- Fixed - 3.5pl
- Fixed - 5.2pl
- Fixed - 8.2pl
- Fixed - 11.4pl
- Fixed - 12.8pl
- Fixed - 21.8pl
- Fixed 1-bit modes:
- Fixed - 3.5pl (1-bit) Available in 2880x2880, 2880x1440, and 1440 x 1440 resoultion
- Fixed - 5.2pl (1-bit) Available in 2880x2880, 2880x1440, and 1440 x 1440 resoultion
Variable modes:
- Variable Dot-1 (Dark)
- Variable Dot-3 (Light)
- Weaving Mode: Select Quality Mode or Fast Mode weaving.
- Auto Cut: Select whether to cut the image or print a line in order to cut by hand later on.
- Print Direction: Print in one direction for the best quality (Unidirectional) or in both directions for higher speed (Bidirectional)
- Drying Time:
- For each pass: Time Between Passes allows you to set a drying time between each pass. This is especially useful when printing on film.
- After print: Set a drying time after the print has completed. Cutting will commence after the set drying time.
Media
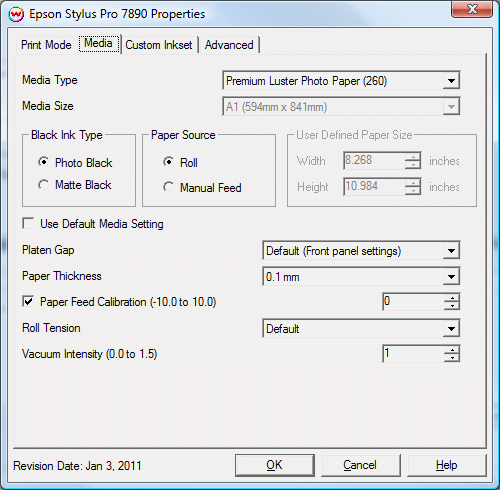
When you click on Media, the following properties page will be displayed:

The Media page controls media type, media size, the feed source and allows you to select options to fine tune the type of media installed.
- Media Type: Choose from a list of approved Epson media. If your media is not in the list, choose the closest match. If there is nothing close, choose "Third Party Media" and the Media Settings will be available to fine tune the parameters
- Media Size: Choose from a list of media sizes. If nothing matches, choose "User Defined" and set the size in the "User Defined Paper Size" box.
- Black Ink Type:
- Photo Black supports the most general use and is best for glossy papers or film.
- Matte Black Not recommended for glossy/semi-glossy media.
- Paper Source: Select the feed source for the media.
- Use Default Media Settings: Uncheck to have full control over media settings
- Platen Gap
- Paper Thickness
- Paper Feed Calibration
To find the Paper Feed Calibration Value:
- Print a line that is 1000 mm long in the paper feed direction
- Measure the actual printed distance
- Enter the difference in millimeters. For example, enter -5 if a measurement of the print is a value of 995 mm
- Roll Paper Tension Sets the tension for roll feed media
- Vacuum Intensity Sets the suction intensity of the vacuum from 0 to 1.5.
Custom Inkset
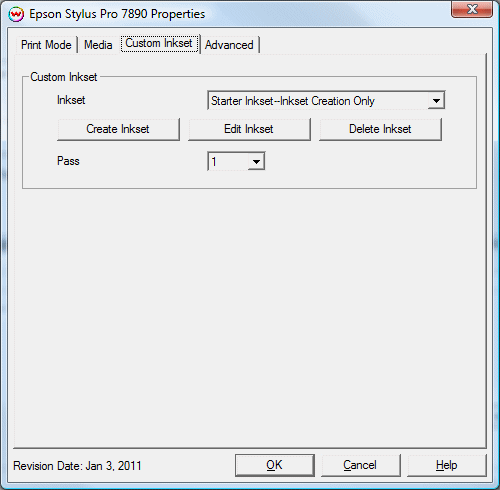
When you click on Custom Inkset, the following properties page will be displayed:

For more information on creating custom inksets and using the Passes control, click here.
NOTE: The Epson 7890/9890 will not print from both black cartridges at the same time. The control 'Black Ink Type' on the Media tab will determine whether slot 4 (Matte) or 5 (Photo) will be used. When configuring the Slot Assignments in the inkset creator for the ink slots labeled 6-9 you should shift to the left one position when using Matte Black ink. Example Slot 6 on the printer would be assigned to Slot 5 in Inkset Creator.
Advanced
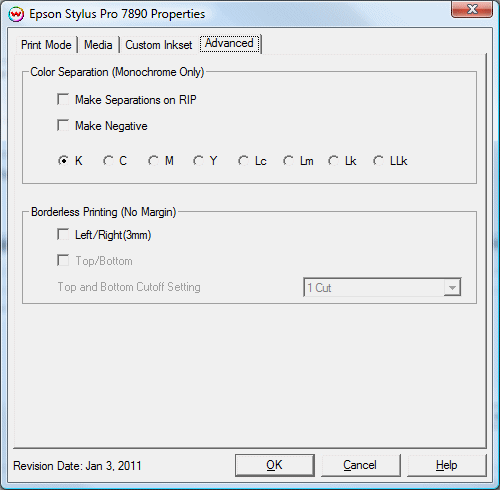
When you click on Advanced, the following Properties page will be displayed:

The Advanced page controls color separation options and borderless printing.
Color Separations: The Color Separations controls become active when a Monochrome Mode is selected.
- The Make Separations on RIP option will create CMYK separations when the file is ripped.
- If the Make Negative option is selected then all color separations will be printed inversed, making a film negative instead of a film positive.
- K, C, M, Y, Lc, Lm, Lk, Llk: This allows you to print monochrome images to any of the heads in the printer. This is especially useful to eliminate overuse of a single printhead when printing only monochrome.
Borderless Printing: This option allows you to output prints without any margins or borders. This is done by overprinting and then cutting into the print for the top and bottom, and overprinting into pads inside the printer for the left and right sides.
- Marginless printing is only valid for the following media widths:
- 10", 11.875", 13", 16", 17", 20.375", 23.5", 24", 28.75", 36", 44"
- 254mm, 300mm ,329mm, 406.4mm, 431.8mm, 515mm, 594mm, 610mm, 728mm, 914mm, 1118mm
- User should make the horizontal width of the image 3mm wider on both the right and left edges (6mm total) of the image to avoid white area caused by media skew. These areas are printed off the edge of the paper on the absorbing pad on the platen. No automatic scaling or magnification is done by either SoftRIP or the printer.
Note: You should have the paper width set to 6mm (.235") greater than the width of the paper. This may require first selecting the borderless printing option in the properties and secondly setting the paper width (or selecting Set Maximum Width) in the setup screen.
- Top and Bottom cut off setting: Select the type of cut desired.
- 1-Cut: Performs a quick cut with minimum waste between pages, but it may be slightly off of horizontal.
- 2-Cut: Cuts the image perfectly, but wastes space between pages.
 Epson Stylus Pro 7890/9890 Help Page
 Epson Stylus Pro 7890/9890 Help Page


