 Epson SureColor P7500/9500 Help Page
June 22, 2020
This document covers the following printers:
- Epson SureColor P7500
- Epson SureColor P9500
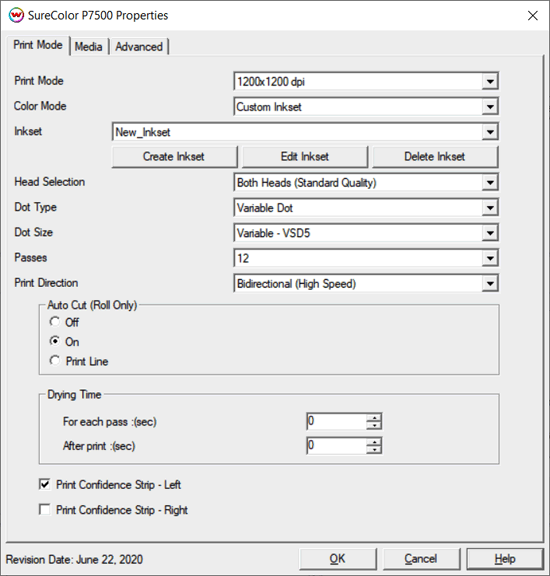
Print Mode:
Pressing the Properties button next to the Printer Model window on the Imaging Configurations screen will launch a control panel for this printer.

- Print Mode: Select printing resolution.
- Color Mode: Select the inkset to print with. Choices include: CMYK, LcLmLkLlk, LcLmLkLlkViOrGr, Monochrome, and Custom Inkset.
- Inkset: When Custom Inkset is selected as the Color Mode, the following controls are available:
- Create Inkset: Create a new custom inkset.
- Edit Inkset: Edit an existing custom inkset.
- Delete Inkset: Delete an existing custom inkset.
- Head Selection: Because the two print heads are staggered vertically, image quality may change along the top or bottom edges. If the quality is poor near the top or bottom edges, the following choices may help.
NOTE: Control is only available when the "Print Mode" is set to "1200x1200 dpi" or "2400x1200 dpi":
- Both Heads (Standard Quality): Print speed is normal, but quality may be less along the top of the image where only one head is used.
- Both Heads (High Edge Quality - Increased Margins): Top margin is increased to allow both heads to be used to increase edge quality. Bottom margin will also be increased if sheet media is used.
- Single Head (High Edge Quality - Reduced Speed): Margins are not increased but print speed is reduced because only a single head is used to improve the edge quality.
- If the "Print Mode" is set to either "300x300 dpi", "300x600 dpi", or "600x600 dpi", the "Head Selection" is set to "Both Heads (Standard Quality)".
- When the "Print Mode" is set to "2400x2400 dpi", the "Head Selection" is set to "Single Head (High Edge Quality - Reduced Speed)".
- Dot Type: Select from Fixed or Variable dot types.
- Dot Size: Select from the available dot sizes.
- Passes: Select the number of passes used during printing.
- Print Direction: Print in one direction for the best quality (Unidirectional) or in both directions for higher speed prints (Bidirectional).
- Auto Cut: Select whether to cut the media after the image is printed or print a line, to cut the media by hand later on.
- Drying Time:
- For each pass: Time Between Passes allows you to set a drying time between each pass.
- After print: Set a drying time after the print has completed. Cutting will commence after drying time has elapsed.
- Print Confidence Strip - Left: Select to print a confidence strip on the left side of the print.
- Print Confidence Strip - Right: Select to print a confidence strip on the right side of the print.
Media:
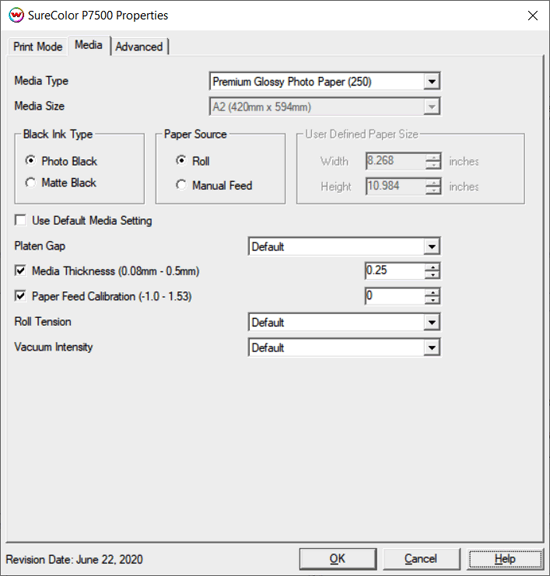
When you click on Media, the following properties page will be displayed:

The Media page controls media type, media size, the feed source and allows you to select options to fine tune the type of media installed.
- Media Type: Choose from a list of approved Epson medias, and if your media is not listed, choose the closest match.
- Media Size: When the "Paper Source" is set to "Manual Feed", a list of media sizes will be available to choose from. If the size of media does not matche any listed, choose "User Defined Size" and set the size in the "User Defined Paper Size" box.
- Black Ink Type:
- Photo Black Supports the most general use and is best for glossy papers or film.
- Matte Black Not recommended for glossy/semi-glossy media.
- Paper Source: Select the feed source for the media. Choose Manual Feed for printing on sheet media.
- Use Default Media Settings: Uncheck to have full control over media settings.
- Platen Gap: Set distance between print head and platen.
- Paper Thickness: Set the thickness of media. The type of media selected on the "Media Type" control will set a default value for the "Paper Thickness", that can then be fine tuned.
- Paper Feed Calibration: Set from -1.0 to 1.53%.
- Roll Paper Tension: Sets the tension for roll feed media. Available choices are: Default, Standard, High, and Highest.
- Vacuum Intensity: Sets the suction intensity of the vacuum from 1% to 168%.
Advanced:
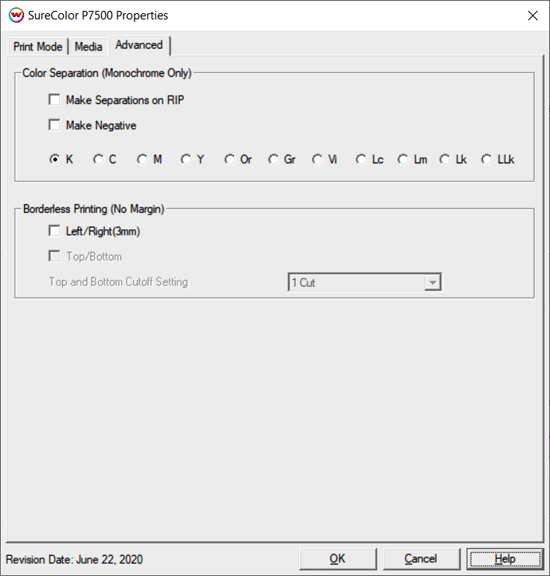
When you click on Advanced, the following Properties page will be displayed:

The Advanced page contains color separation options and borderless printing options.
Color Separations: The Color Separations controls become active when a Monochrome Mode is selected.
- The Make Separations on RIP option will create CMYK separations when the file is ripped.
- If the Make Negative option is selected then all color separations will be printed inversed, making a film negative instead of a film positive.
- K, C, M, Y, Or, Gr, Vi, Lc, Lm, Lk, Llk: This allows you to print monochrome images to any of the print-heads in the printer. This is especially useful to eliminate overuse of a single printhead when printing only monochrome.
Borderless Printing (No Margin): This option allows you to output prints without any margins or borders. This is done by overprinting and then cutting into the print for the top and bottom, and overprinting into pads inside the printer along the left and right sides of the media.
Marginless printing is only valid for the following media widths:
- 10", 11.81", 13", 16", 17", 20", 20.28", 23.39", 24", 28.66", 33.11", 36", 40.55", 44"
- 254mm, 300mm ,329mm, 406.4mm, 431.8mm, 508mm, 515mm, 594mm, 610mm, 728mm, 841mm, 914mm, 1030mm, 1118mm
Note: User should make the horizontal width of the image 3mm wider on both the right and left edges (6mm total) of the image to avoid white area caused by media skew. These areas are printed off the edge of the paper on the absorbing pad on the platen. No automatic scaling or magnification is done by either SoftRIP or the printer. You should have the paper width set to 6mm (.235") greater than the width of the paper. This may require first selecting the borderless printing option in the properties and secondly setting the paper width (or selecting Set Maximum Width) in the setup screen.
Top and Bottom Cutoff Setting: Select the type of cut desired for a top/bottom borderless print.
- 1-Cut: Performs a quick cut with minimum waste between pages, but it may be slightly off of horizontal.
- 2-Cut: Cuts the image perfectly, but wastes space between pages.
Auto-Generation Options:
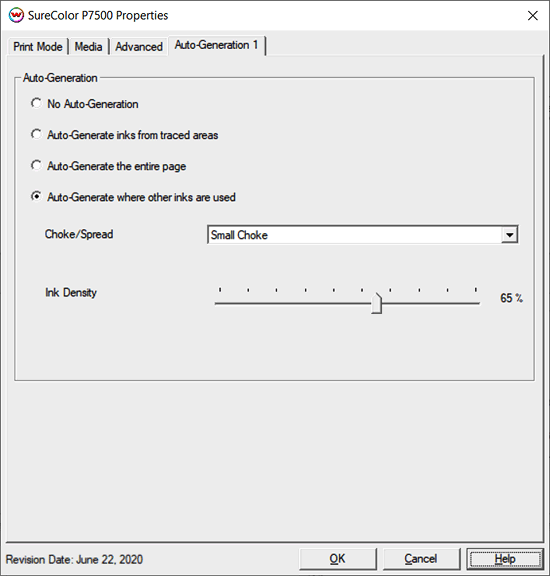
The Auto-Generation tabs are available when a custom inkset has been selected, and the inkset includes at least one unmanaged color channel.

- No Auto-Generation: Unmanaged channel is not printed unless specified through spot color replacement or as an Alpha/Spot channel.
- Auto-Generate inks from traced areas: The unmanaged channel will be applied only to the traced areas that have been set using the Trace tab in the main Softrip interface.
- Auto-Generate the entire page: Prints the unmanaged channel behind the entire page.
- Auto-Generate where other inks are used: Prints the unmanged channel on all non-zero pixels (marked areas). In addition, a "choke" or "spread" may be selected.
Note: A choke shrinks the unmanaged channel plate in relation to the printed area.
Note: A spread expands the unmanaged channel in relation to the printed area.
- Ink Density: Controls the density percentage for the unmanaged channel. Available range is 10%-100%.
 Epson SureColor P7500/9500 Help Page
 Epson SureColor P7500/9500 Help Page


