 Epson ColorWorks C7500-series Help Page
July 19, 2018
Special notes:
- For specific notes regarding Label Edition click here
- This driver requires firmware revision WAI32000 or later.
- TCP/IP is the only physical connection supported. USB is not supported.
- Internal Roll is the only media source method supported.
- Crop Marks, Register Marks, Hairlines, and Annotate Prints are not supported.
- Print origin for this device is rotated 180 degrees from typical SoftRIP drivers. See Illustration #1 below.
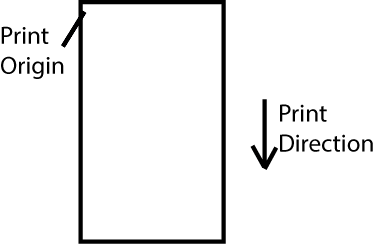
Illustration #1
Print Mode Options:
To launch the printer properties for this driver, choose 'Setup' from the 'Print' menu, then click on the 'Edit' button, and then click on 'Properties'.
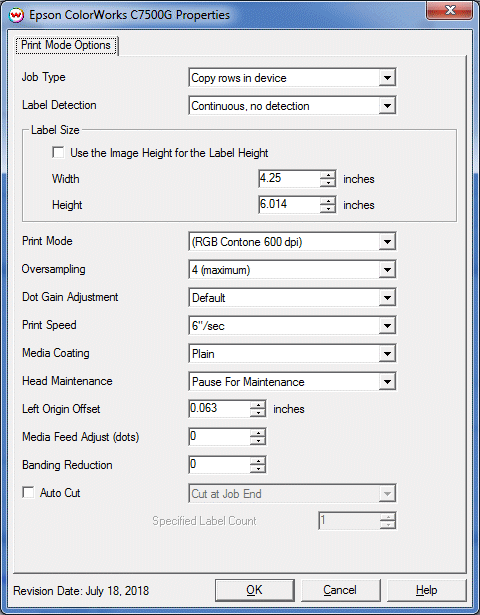
- Job Type: Choose how data will be spooled to the printer, 'Copy rows in device' or 'Send all rows'. 'Copy rows in device' will send the first row and the printer will duplicate the data the selected number of times. 'Send all rows' will spool data for all rows. Variable Data jobs must use 'Send all rows'.
- Label Detection: Select the label detection mode, options include 'Continuous, no detection', 'Die-cut with Gap', 'Die-cut with Black Mark', and 'Continuous with Black Mark'.
- Use the Image Height for the Label Height: Check 'Use the Image Height for the Label Height' to automatically set the label height to the height of the image being printed.
- Label Size: Enter Width and Height of the physical label. Note, the width entered must be +/- 0.07" of the actual media. If the value entered is out of this range a front panel error will occur after the first label prints. When loading media the media guides must be placed flush against both edges of the media. If the guides are not placed correctly a front panel error message can occur reporting MEDIA SIZE ERROR W.
- Print Mode: Select the Print Mode to be used, either RGB Contone 600dpi, or CMYK Contone 600dpi. Before printing you must set the resolution on the front panel of the printer, Menu -> Printer Setup1 -> Resolution and select 600dpi
- Print Speed: Select the Print Speed, either 6"/sec or 12"/sec.
- Media Coating: Select the media coating installed in the printer: Plain, Synthetic, Matte1, Matte2, Glossy. Glossy is only available for the C7500G models.
- Head Maintenance: Select the head maintenance behavior: Continuous Printing (fast), Pause For Maintenance (fine). When Pause For Maintenance is selected print speeds will be reduced due to additional head maintenance.
- Left Origin Offset: Adjust the print origin to avoid printing on the exposed liner of pre-converted media.
- Media Feed Adjust (dots): This control allows for adjusting media feed. This control will be required if the alignment of CMYK inks are out of sync down the length of the print. Please refer to Epson documentation for details about when and how to adjust this control.
- Banding Reduction: This control is used to reduce verical banding on output. If you see a dark verical lines enter a negative value. For lighter lines enter a positive value. The range of values is -2 to +2.
- Auto Cut: Select the behavior of the media cutter: Cut at Job End, Cut After Specified Label Count, and Cut/Pause After Specified Label Count Note, leaving the Auto Cut control uncheck will suppress any cutting of the media.
- Specified Label Count: Enter the number of labels to print before the media is cut.
Notes on printing full bleed
In order to print full bleed on die cut media the following steps should be followed to adjust print location. Use the 'Left Origin Offset' control to set the horizontal print origin. To adjust the vertical print origin use the front panel control V. Position. To access this control press Menu -> Printer Setup1 -> V. Position. It may be necessary to adjust the Label Size and image source dimensions to print full bleed. This can be done on the Properties page and in your design software.
Notes on printer margins
The printer firmware requires a minimum of 3mm white space between printed jobs. When calculating the label height to correctly position pages you must account for this 3mm.
Notes on use with SoftRIP Label Edition
On the Labels tab certain controls require specific settings on the Printer Properties window.
- Rotary Cut Mark is only active when Label Detection is set to 'Continuous, no detection'.
- Width Center is not active when 'Rotary Cut Mark' is enabled.
- The Vertical Gap control is only active when 'Use Image Height for Label Height' control is enabled. If 'Use the Image Height for the Label Height' control is not enabled the 'Vertical Gap' control will be automatically calculated by subtracting the current image height from the value entered for Label Height.
- Height Center is not active when Label Detection is set to 'Continuous, no detection'.
Minimum label size are set to 1.8" width and 1" height for die cut media. Minimum label size for continuous media is 1.968" width and 1" height, for continuous media with black mark detection the minimum height is 1.118". The Vertical Gap when printing on continuous media must be 0.118" or greater.