 Mutoh Falcon-II Outdoor / Rockhopper II / Agfa Grand Sherpa Universal
March 3, 2004
Print Mode:
Pressing the Properties button next to the Printer Model window on the
Imaging Configurations screen will launch a control panel for this printer.

This page of the properties sheet allows you to select a print mode, the
print direction, the number of passes, the dot size, control the cutter, overprint, and time
between passes.
- Print Mode: Select the ink type and printing resolution
- Printer Model: Select the size of the printer
- Pass Count: Select pass count / Overlap
- Dot Size: Select the size of the dot
- Print Direction: Print in both directions (bi) or one direction (uni)
- Cutter: Enable or disable paper cutting after the print
- Overprint: Overprint controls the number of times the printer prints over the
same area. A setting of 2 will double the amount of ink laid down.
- Time Between Passes: Time Between Passes allows you to set a drying time between
each pass. This is especially useful when printing on film
Advanced Settings:
When you click on Advanced Settings, the following properties page will be displayed:

The Advanced page controls saving images to the hard drive and allows you to select options to
fine tune the type of media installed.
- Save Image on printer hard drive: Choose whether to enable the hard drive save feature
- Note: There will be a prompt for a file name when the job is spooled to the printer
The file name may only contain capitol letters (A-Z) and/or numbers (0-9)
- Save and print: Saves the image to the hard drive while the image is being spooled to
the printer
- Save then print: Saves the image to the hard drive and then immediately proceeds to print
the saved image off of the hard drive (See note below: uses the same front panel settings as "Save only")
- Save only: Saves the image to the hard drive. Printing will be done off of the front panel
- Note: The front panel control for the following commands will have precedence over
the driver control when printing from the hard drive
- Ink Dry Time (On "Heating / Dry Time" tab)
- Media Thickness and Head Height (On "Advanced Settings" tab)
- Media Stiffness (On "Advanced Settings" tab)
- Heater Temperatures (On "Heating / Dry Time" tab)
- Media Feed Correction (On "Advanced Settings" tab)
- Media Cut (On "Print Mode" tab)
- Use Advanced Settings: Choose whether to disable the advanced settings
- Media Stiffness: Will adjust the power of the media vacuum
- Media Thickness: Select thickness of the media in mm
- Head Height: Set the gap between the platen and the head
- Send Feed Correction: Check to send a value
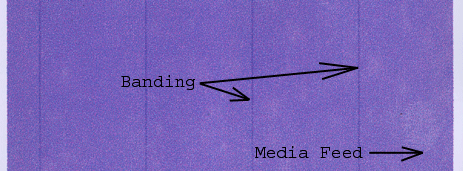
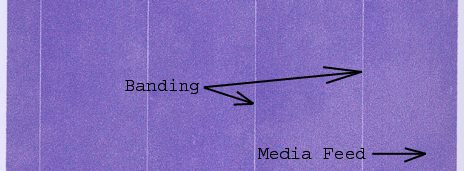
- Media Feed Correction: Adjust the amount of feed correction necessary to eliminate
micro-banding
Adjusting media feed to reduce banding
- Print PurplePatch.ps (found in the psfiles folder located on the root of the Wasatch
SoftRIP installation drive) with the following settings:
- Print Mode: 360dpi
- Print Direction: Unidirectional
- Pass Count: "Overlap Off"
- Click on Advanced Settings tab
- Check Use Advanced Settings
- Check Send Feed Correction
- For Dark Banding, increase Media Feed Correction by tenths (0.1) adjust by hundredths if further fine tuning is needed

- For Light Banding, reduce Media Feed Correction by tenths (0.1) adjust by hundredths if further fine tuning is needed

Color Separations:
When you click on Color Separations, the following Properties page will be displayed:

If a Monochrome mode is selected, this page allows you to make Color Separations.
Heating / Dry Time
When you click on Heating / Dry Time, the following Properties page will be displayed:

The Heating / Dry Time page allows you to adjust the heater settings.
- Drying Time: Sets up ink dry time in units of one second
- Check boxes on individual heaters allow one to turn each heater on or off
- Adjust heater temperature in degrees centigrade
Using heater controls with Falcon II Outdoor:
- Start with the heaters set to the following:
- Heater A: 38
A is a preparatory heater and should always be cooler than the other heaters. Reduce the
heat if roller marks are getting pressed into the media.
- Heater B: 40
B is under the platen and should be as hot as possible without the media buckling. Setting
this heater above 58° may cause nozzle failure.
- Heater C: 40
C is located immediately after the platen. Heater C may be slightly hotter than Heater B
if no artifacts are present. Wasatch recommends setting heater C and heater B to the same
temp when possible.
- Heater D: 50
D is a drying heater and will need to be as hot as possible to speed drying (almost always 50).

- Send PurplePatch.ps (found in the psfiles folder located on the root of the Wasatch SoftRIP
installation drive) with the above settings for the heaters. Watch for buckling of the media (apparent
with head strikes or print defects), this means the settings are too hot. If this is the case, reduce
both heater B and heater C in increments of 2 degrees, reprinting until the buckling is no longer apparent.
- If little or no buckling is apparent using the beginning heater settings, increase the heat of
both heater B and heater C in increments of 2 degrees, reprinting until buckling is apparent (see above).
For best results, run your heaters at the temperature settings just before this buckling occurs.
Note: If you are profiling a media type and if the ink still runs or bleeds after setting up
the heaters, refer to step three in the online help about color calibration
(Help->Help Subjects, Wasatch SoftRIP, Color Controls, Color Calibration)
 Mutoh Falcon-II Outdoor / Rockhopper II / Agfa Grand Sherpa Universal
 Mutoh Falcon-II Outdoor / Rockhopper II / Agfa Grand Sherpa Universal


