 Roland SolJet Pro III XC-540
May 21, 2008
Print Mode:
If you click on the Properties button next to the Printer Model window on the Imaging Configuration screen, the following control panel for this printer will be displayed:
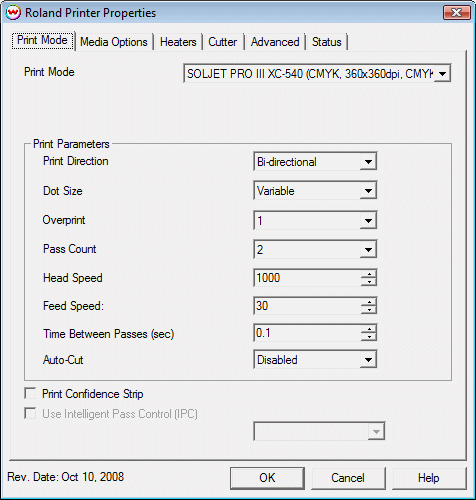
- Print Mode: Choose resolution and ink sets.
- Print Direction: The head printing direction can be unidirectional or bidirectional.
- Dot Size: Various dot sizes can be selected. Not all dot sizes are available
for every resolution.
- Variable: Uses variable dots (the dot size varies dependent on required ink density),
and generally gives the best quality.
- Variable Dry: Similar to 'Variable', but lays down less ink. This is useful for
medias with ink retention problems.
- Fixed: Dot size held constant.
- Fixed Light, Medium, Dark: Print with the dot size held constant, but at various ink densities.
- Dot Sizes for Higher Resolutions: The default dot size for 1080 dpi is 'Fixed Medium'.
The default dot size for 1440 dpi is 'Fixed Light'. Changing the dot size from 'Light' to 'Medium'
doubles the amount of ink, and increasing from Medium to Dark again doubles the amount of ink.
Unless your particular media can hold (or needs to hold, such as for printing on some films or
textiles) this much ink, it is recommended that you leave this control at the default setting.
- Overprint: The number of times each area is printed over. A setting of 2 would double the ink.
- Pass Count: Allows you to specify the number of passes the head will make over a particular line.
A higher pass count has a better quality but a slower print speed.
- Head Speed: The head speed control allows you to slow down the head for higher-quality prints.
This is also useful if the media has ink-drying problems. The Head Speed is dependant on pass count.
A low pass count will need to limit the head speed to avoid damaging the printer.
- Feed Speed: The feed speed control allows you to control the speed of the media as it is fed between passes.
- Time Between Passes: Allows you to specify the minimum time that a printhead pass will take.
This may be necessary to slow down the printhead when there are excessive drying problems, or when
printing separations onto film. For example, it may be necessary to increase the dot size to a larger
dot to increase the maximum density. If that higher dot size does not dry quickly enough on the media,
lowering the head speed and increasing the time between passes may slow down the printer enough for the ink to dry.
- Autocut: If enabled, the sheet will be cut off at the end of the print.
- Print Confidence Strip: Prints a small strip of each head along the right edge of the printer. It can
be useful to determine whether jets have clogged, and also to keep unused heads running throughout a long print.
- Use Intelligent Pass Control: When checked, this option uses Roland's Intelligent Pass Control feature and whether to print using the additional overlap (+PASS modes)
Media Options:
When you click on the Media Options tab, the following properties control panel will be displayed:
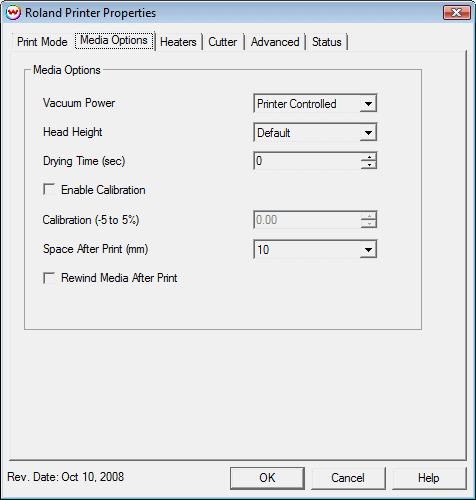
- Vacuum Power: Controls the suction on the media when printing. Media that tends to curl up
when printing may require the 'Strong' setting.
- Head Height: This specifies what the head height should be when printing on the loaded media.
If the physical head height is too low, a warning to change the head height will be displayed on the
front panel of the printer before printing, and the user MUST physically change the head height on the printer.
If the head height is higher than the software specifies, no warning will be given.
- Drying Time: The number of seconds the printer waits at the end of the print.
- Enable Calibration: If enabled, this compensates for slippage of the media when feeding the media forward.
- Space After Print: Set the space after print. This value is in addition to any margins that are set.
- Rewind Media After Print: Will return the head to the top of the print and not trim the media. This is
useful if one would like to over print an image.
Cutter:
When you click on the Cutter tab, the following properties control panel will be displayed:
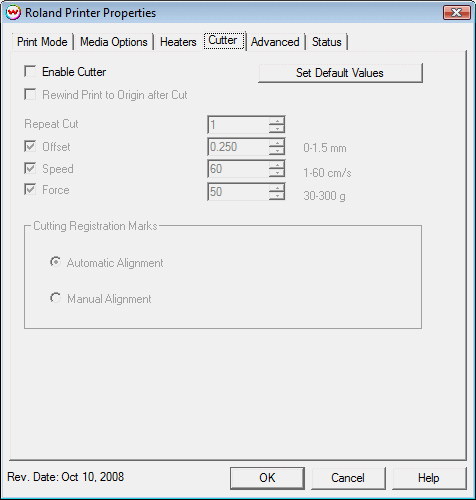
On this page, you can turn on and off the cutter and change cutting options. The options are:
- Enable Cutter: When enabled, the device will cut out the cut path at the end of the print. When
disabled, the cut path will show up in the Cutting Queue at the end of the print.
- Rewind Print to Origin after Cut: After the cut path has been cut out, the print will be rewound
to the print's origin point, and the cut can be resent, if necessary.
- Repeat Cut: Defines the number of times the cutter will cut over the same area.
- Offset: Set the appropriate value for the blade in use. Inappropriate values in this field can
lead to poor cut quality or unfinished cut lines. The default value is 0.250.
- Speed: Set the cutting speed. Usually setting a lower speed will result in longer cut times, but
will produce higher quality results.
- Force: Set the blade pressure for cutting. When the values set here are too small, the blade will
not have enough pressure to cut the sheet. Similarly, if the pressure is too high, not only it will not
work properly, but also it can cut through the back of the media and may cause damage to printer. Be careful
to set the correct value for the thickness and the hardness of the material you are using.
- Set Default Values: This option resets the settings to their defaults.
Heater Controls:
When you click on the Heater Controls tab, the following properties control panel will be displayed:
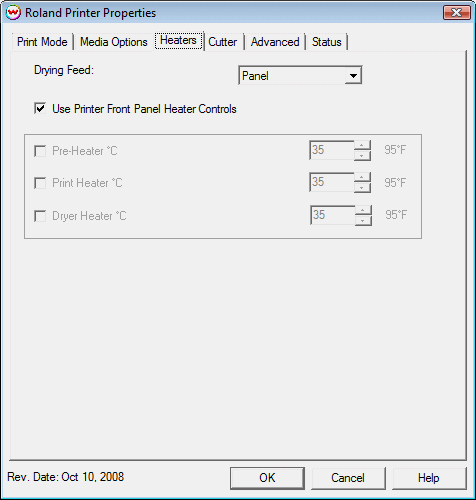
- Use Printer Front Panel Heater Controls: When enabled, all heater control is performed on the front
panel. When disabled, the following controls will be active.
- Pre-Heater: Warms the media before is passes over the platen.
- Print Heater: Warms the media under the print heads
- Dryer: When checked, sends the dryer command to enable the dryer
Advanced:
When you click on the Advanced tab, the following properties control panel will be displayed:
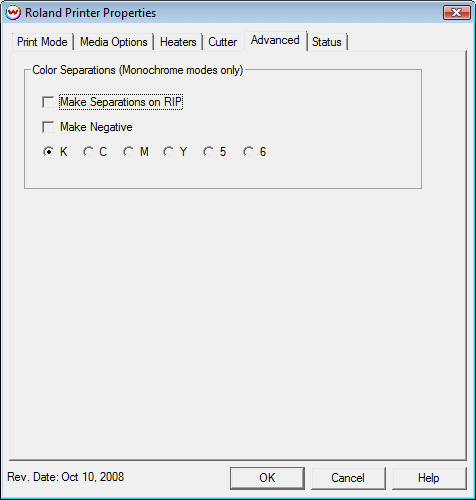
- The Color Separations controls are the same as those of other printers, and are only available
if a monochrome mode has been selected on the Print Mode tab.
- Separations on RIP: This will cause the RIP to separate the image into CMYK plates.
- Make Negative: This inverts monochrome images when printed.
- KCMY56: This allows you to print monochrome images to any of the heads in the printer.
This is especially useful to eliminate overuse of a single printhead when printing only monochrome.
Printer Status:
When you click on the Printer Status tab, the following properties control panel will be displayed:
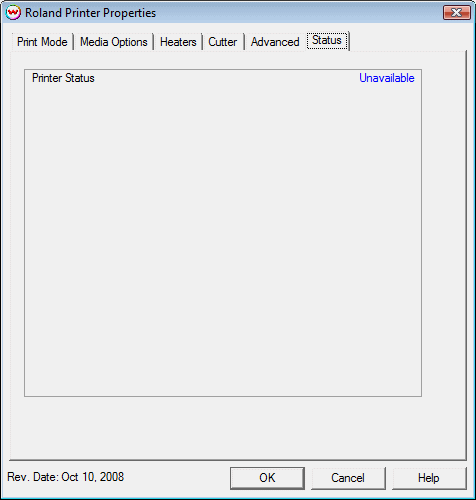
This window queries the TCP/IP address that is on the Set Up window, and returns its status, if available. If
a non-TCP/IP physical connection is selected, or if there is a problem connecting to that IP address, this
window will show the status as unavailable.
Selecting a cutting registration mark for 'Print now, Cut Later' workflows
If you would like to use the automatic registration feature of this printer, select the 'Generated by printer'
option from the Cutting Mark area of the Set Up screen.
If you would like to do manual registration, choose the '1/4 Register' option in the Cutting Mark section.
Device-Specific Instructions for Print now, Cut Later (automatic registration)
Insert the media from the rear of the cutter in the same direction as the media originally came out of the printer.
Since the cutter cannot cut any media beyond the pinch roller nearest the control panel, align the media so that
the pinch roller is over the left margin, but not over the any part of the print that is to be cut.
After lowering the pinch roller, select 'Piece' (for sheet-fed media), then press 'Setup'. The cutter will determine
the width and height of the sheet.
Using the arrow keys on the front panel, move the knife (or pen) over the registration mark closest to the leading edge
of the media and closest to the control panel of the printer. Press 'Auto Align', and press Enter on the printer's
control panel. The printer will search out the marks.
The cutter is now ready for the cut path to be sent from the Cutting Queue.
Device-Specific Instructions for Print now, Cut Later (manual registration--when Wasatch Marks have been selected)
When using manual registration, you can print on any printer and then cut on the Roland.
Insert the media from the rear of the cutter in the same direction as the media originally came out of the printer.
(The cutting registration marks #1 and #2 should be on the leading edge.) Since the cutter cannot cut any media beyond
the pinch roller nearest the control panel, align the media so that the pinch roller is over the left margin, but not over
any part of the print that is to be cut.
After lowering the pinch roller, select 'Piece' (for sheet-fed media), then press 'Setup'. The cutter will determine the
width and height of the sheet.
Using the arrow keys on the front panel, move the knife (or pen) over the cutting registration mark #1. By pressing
'Tool Up/Down', you can more easily see what point the knife (or pen) is over. Press 'Base Point'.
Using the arrow keys as above, move the knife over the cutting registration mark #2. Press 'Align Point"'.
Move the knife over the cutting registration mark #3. Press 'Align Point'.
Move the knife over the cutting registration mark #4. Press 'Align Point'.
The cutter is now ready for the cut path to be sent from the Cutting Queue.
 Roland SolJet Pro III XC-540
 Roland SolJet Pro III XC-540


