 Epson Surepress L-6034
November 14, 2022
Print Mode Options:
Pressing the Properties button next to the Printer Model window on the
Imaging Configurations screen will launch a control panel for this printer.
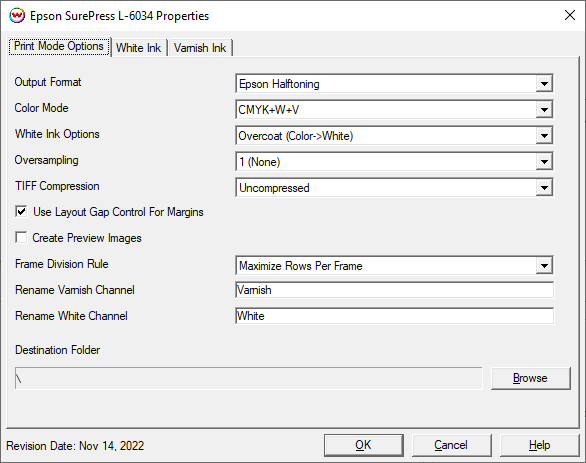
- Output Format: Select the halftoning method, available options are Wasatch 16bit Halftoning or Epson Halftoning.
- Color Mode: Select the desired inkset.
- Oversampling: Select the level of oversampling. 1 set to no oversampling, 4 is the maximum amount of oversampling. This control is useful for controlling dot gain for fine text. This control can increase rip times. If you encounter performance related issues experiment with reducing the level of oversampling.
- TIFF Compression: Choose whether or not to use a TIFF compression method to reduce output file size.
- Use Layout Gap Control For Margins: With this option checked, top and bottom margins in the "Print Setup" window will be ignored, and the gap unit in the layout unit options will be used instead.
- Create Preview Images: Select whether a preview image will be created in the destination folder.
- Frame Division Rule
- Maximize Rows Per Frame: This Frame Division Rule will include as many image files in one frame as possible. Frames will be separated as close to the 39.37" limit as possible. NOTE: This rule requires that all jobs in a layout are of identical dimensions and each file are evenly spaced both on the X and Y axis. This option is recommended when Fast Layouts will be used to queue up print jobs.
- One Row Per Frame: This Frame Division Rule will include one row of images. This rule will allow for layouts that include files of different dimensions.
- Single Frame (39.37"): This Frame Division Rule will behave as the current shipping SurePress driver. This rule will allow for files of different dimensions and different gaps. When configured with Single Frame a user cannot create a layout with a length greater than 39.37".
- Rename White Channel: Can be used to change the Spot Color name used in file design to address the White ink channel.
- Rename Varnish Channel: Can be used to change the Spot Color name used in file design to address the Varnish ink channel.
- Destination Folder: Select the destination folder that all SoftRIP output for the SurePress will be written out to. It is recommended to use Windows Networking to map a drive letter to the shared folder on the SurePress. Once a drive letter has been mapped, then browse to '..\HotFolder\T00x' to write the output from SoftRIP to the appropriate location on the SurePress to assure proper processing and printing of RIP output.
White / Varnish Ink:
The White / Varnish Ink controls are located on the second and third tab.
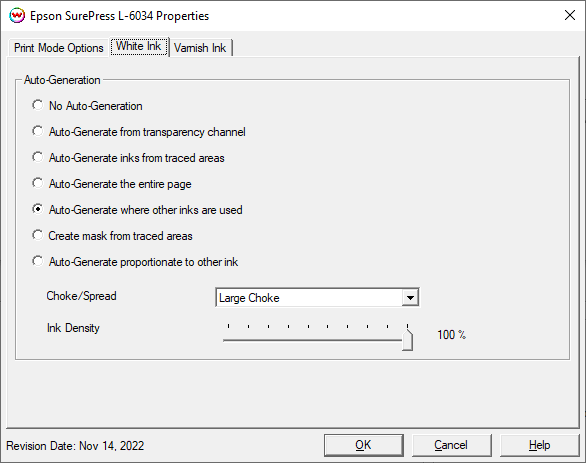
- No Auto-Generation: White or Varnish channel is not printed unless specified through spot color replacement or as an Alpha or Spot channel.
- Auto-Generate from transparency channel: White or Varnish will print as an inverse of the transparency channel.
- Auto-Generate ink from traced areas: White or Varnish ink will be printed only to the traced areas that have been set using the Trace tab in the main SoftRIP interface.
- Auto-Generate the entire page: White or Varnish ink will be printed over the entire image.
- Auto-Generate where other inks are used: White or Varnish ink will be printed on all non-zero pixels(marked areas). In addition, a "choke" or "spread" may be selected.
- Create mask from traced areas: Using the Trace tab a user can create a mask to determine what image data on the Job tab will print. Any image data outside of the mask will not be printed. This control is useful
for printing on dark shirts when printing raster image files or vector files with background colors that are not a solid fill.
- Auto-Generate proportionate to other ink: Generates the unmanaged ink based on a negative of the total amount of all managed inks. For example, if CMYK channels are each equal 100% ink (for a total of 400% ink), the unmanaged channel with be 0%. If CM are 100% and YK are 0% (for a total of 200% ink) the unmanaged channel will be 50%, and if CMYK inks equal 0%, the unmanaged channel will equal 100%. You can adjust the transforms for the unmanaged ink by using the Calibration and Press curves in the Color Transforms window. In addition, a "choke" may be applied to the area.
Note: A choke shrinks the White or Varnish ink channel in relation to the printed area.
Note: A spread expands the White or Varnish ink channel in relation to the printed area.
- Ink Density: Set percentage of White or Varnish ink to be used. Can be set from 10% to 100%.
[ Wasatch Home ]