 Allen Datagraph CYPHER Help
March 7, 2017
Special notes:
- The USB connection is the preferred connection type. Due to slower data transfer rates, the TCP/IP connection is not recommended.
- When using wide media we recommend lowering the 'Max Print Speed' to 14 inches per second (or less), otherwise 'data underrun' errors will occur.
- This driver requires firmware revision SNP1CN1652AR or later.
Printer Properties:
Pressing the Properties button next to the Printer Model window on the Imaging Configurations screen will launch the control panel for this printer.
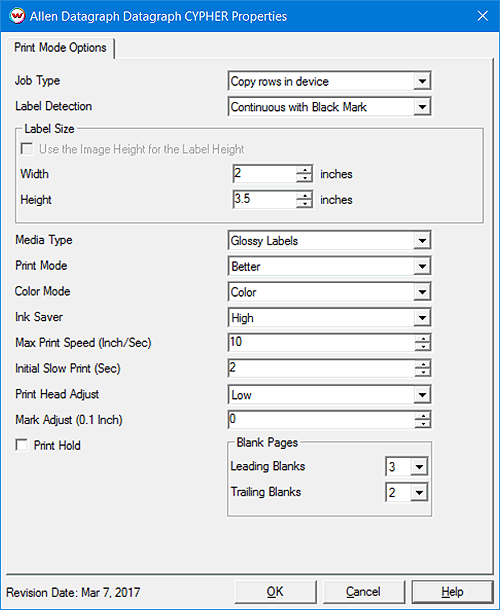
- Job Type: Choose how data will be spooled to the printer, 'Copy rows in device' or 'Send all rows'. Using 'Copy rows in device' will send the first row and the printer will duplicate the data the specified number of times, while 'Send all rows' will spool unique data for all rows. NOTE: Variable Data jobs must use 'Send all rows'.
- Label Detection: Select the label detection mode. Options include 'Continuous, no detection', 'Continuous with Black Mark', 'Cut sheet Tray 1', and 'Cut sheet Tray 2'. NOTE: When using marked media or cut sheets only one row will be printed per page. Also, when using Rotary Marks on marked or cut sheet media the Rotary Marks are limited to '1 Row Per Mark'.
- Label Size: Enter Width and Height of the physical label, or choose to use the 'Image Height for the Label Height' option.
- Media Type: Select the type of media installed in the printer: Plain Paper, Synthetic Labels, Matte Labels, Glossy Labels, Photo Inkjet Papers, Matte Inkjet Papers, or Glossy Inkjet Papers.
- Print Mode: Choose the quality of the printing. Select from Draft, Normal, Better, or Best.
- Color Mode: Select the appropriate printing option for color. Choices are: Color, Composite Black & White (CMYK ink is used to create grayscale), or Black & White (mono printing).
- Ink Saver: Set the amount of ink reduction to apply to the printing. Choices are: OFF (No Reduction), Very Low, Low, Medium, and High. NOTE: A selection of 'High' will lower the amount of ink by approximately 25%.
- Max Print Speed: Set the fastest possible speed of the printer. Media width, job size, and the physical connection may lower the actual print speed. NOTE: Printing on wide media (6"-8.5") it is recommended to lower the speed to 14 inches per second (or less), otherwise 'data underrun' errors will occur. With the Job Type set to 'Copy rows in device' a higher value may be used.
- Initial Slow Speed: Set the number of seconds that the slower start up speed (3 inches per second) will last when the printing begins, before the printer increases to the 'Max Print Speed'.
- Print Head Adjust: Set the distance between the print head and the media. Choose from Auto, Low, Medium, or High. Selecting Auto will use what is currently set on the printer's front panel.
- Mark Adjust: Enter an appropriate value (-300 to 300) to adjust the placement of the printed image to the black mark. The beginning of the printable area is at the bottom of the black mark. NOTE: To
move the printed image down the page decrease the value, or to move the printed image up, increase the value.
- Print Hold: Select to have the printer pause until the user releases the job through the front panel of the printer.
- Blank Pages: Set the number of leading or trailing blank pages. Acceptable values are 0 to 20. When using continuous media with no black marks, the Blank Page size is defined by the Label Size control.
[ Wasatch Home ]