 Canon ImagePROGRAF iPF6400SE/8400SE
June 13, 2014
Note: There is a default printer margin size difference between these models of printers. The iPF6400SE margin size is 3mm, the iPF8400SE margin size is 5mm.
Print Mode:
Pressing the Properties button next to the Printer Model window on the Imaging Configurations screen will launch a control panel for this printer.
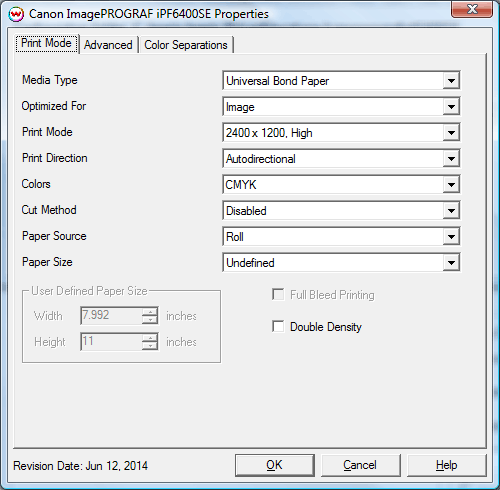
- Media Type: You should select the Media Type before configuring the rest of your settings. The Media Type you select will determine the Print Mode choices that are available. If your media type is not listed select the closest match. This setting must be the same setting as on the front panel of the printer.
- Optimized For: Select either Image or Proof. Image mode is designed for normal printing conditions. Proof mode gives priority to accuracy of dot placement when printing. This is obtained by a slower carriage speed and lower head height. Caution: When using Proof mode make sure you have determined that this mode and the media are compatiable prior to use, or the print head may rub against the paper surface.
- Print Mode: Select the print mode (resolution and quality) that you would like to print at. Modes listed with two resolutions are the rip resolution and the pixel-replicated printing resolution. These print modes can provide significantly faster processing times, but in some cases there may be a reduction in image quality. This reduced quality may not be noticeable in all images, depending on the image content.
- Print Direction: Print unidirectional (one direction) for best quality. The autodirectional option prints faster but may produce unpredictable results.
- Colors: Select the inkset that you would like the printer to use.
- Cut Method: Select Disabled (printer will not cut after print), Enabled (printer will cut after print), or Draw Line (a dashed line will appear where the printer would have cut). Certain media types, with these models, require the user to press 'ok' on the front panel of the printer before it will cut.
- Paper Source: Select whether you are using roll or sheet media. Certain media types may not be available with manual feed.
- Paper Size: Select the paper size that you are using.
- Full Bleed Printing: This control is only available when a 'Media Type' that supports 'Borderless Printing' is selected and a supported Roll 'Paper Size' is selected. When enabled, this option allows you to print 3 mm outside of the margin of the printer on each side of the media. When you select this option, increase the size of your print so that it is 3 mm larger than the media width on each side.
- Double Density: This mode causes the print head to drop double the amount of ink per droplet. Available in 1200x1200 resolutions only.
- User Defined Paper Size (Custom): This control is only available when the Paper Source is set to Sheet and the Paper Size is set to 'Custom (Cassette/Manual)'. This control allows you to set a custom sheet size.
Advanced Settings:
When you click on Advanced Settings, the following properties page will be displayed:
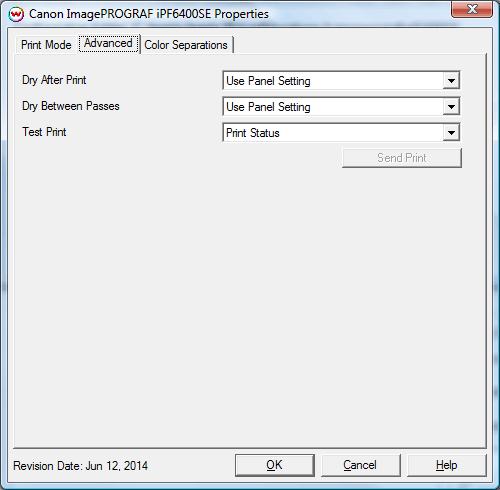
- Dry After Print: Select the amount of time you would like the printer to wait at the end of the print before cutting or continuing.
- Dry Between Passes: If you are having ink drying problems on a media, you can add pausing between each pass to allow the ink to dry.
- Test Print: This control can print several different test reports directly from the this driver, such as nozzle print, printed jobs report, compatible media lists, etc.
Color Separations:
When you click on Color Separations, the following Properties page will be displayed:
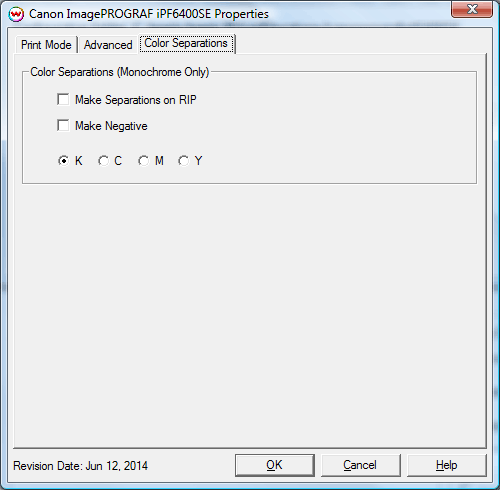
These controls are only available if a monochrome mode has been selected as the Ink Type.
- Separations on RIP: This will cause the RIP to separate the image into CMYK plates.
- Make Negative: This inverts monochrome images when printed.
- K, C, M, Y: This allows you to print monochrome images to any of the heads in the printer. This is especially useful to eliminate overuse of a single printhead when printing only monochrome.