 Gulmen R2R Label 210
November 28, 2016
Print Mode Options:
Pressing the Properties button next to the Printer Model window on the Imaging Configurations screen will launch the control panel for this printer.
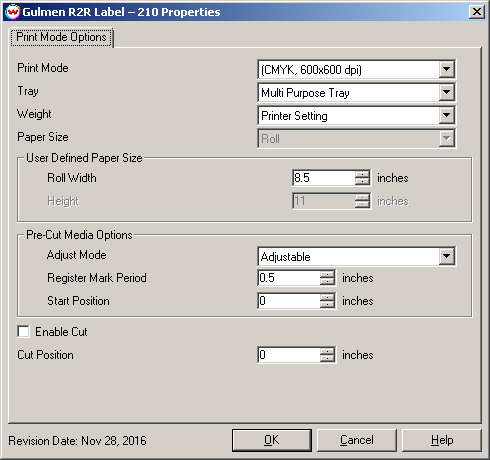
- Print Mode: Select the inkset and printing resolution.
- Tray: Choose the tray in which media will be used to print jobs.
- Weight: Set the media weight. Setting changes speed of printing and toner fusing temperature.
- Paper Size: Choose a pre-defined sheet size, 'Roll', or 'Custom'.
- Width: Control only available when 'Custom' or 'Roll' is selected for Paper Size. Place the physical width of the media here.
- Height: Control only available when 'Custom' is selected for Paper Size. Place the physical height of the sheet here.
- Adjust Mode: Allows control of the printer's Adjust controls when printing with marked media. NOTE: See sections below for more information about how to setup and use Adjust Mode.
- Register Mark Period: When using Adjustable, measure the distance from the top of one mark to the top of the next mark on the marked media. Place this measurement here before printing.
- Start Position: Used to fine tune position of printed label relative to marked media.
- Enable Cut / Cut Position: Change the offset where media will be cut.
Copy Count Important Notes
When multiple copies of identical image data is to be printed, SoftRIP can spool a small sub-set of this data to the printer and instruct it to print this data the number of requested times; decreasing the total amount of data sent to the printer for the print job. For large print jobs, this can significantly decrease the time it takes to spool the print job, allowing the job to start printing sooner. We call this logic "Copy Count".
When using Copy Count, use the Bottom Margin control on the Print Setup window to set the space between each copy.
When using the Layout tab, to set the space between individual images, use the gap controls on the Unit Options tab. To keep spacing consistent, be sure that the value for Bottom Margin matches the value used for the vertical gap.
Adjust Mode Important Notes
When using Adjust Mode and/or "Copy Count" logic, print data is formatted into "frames" before being sent to the printer. The size of each frame is dependent upon the height of a single image.
Here are the frame rules:
Image Height (Inches) - Number Of Connected Images
0 - 0.49" - Invalid
0.5 - 1.99" - 20 pages
2 - 4.99" - 5 pages
5 - 9.99" - 2 pages
>= 10" - 1 page
When using Adjust Mode, it will be important to understand these "frame rules". Adjustments to the position of printed data can only occur after each frame. For example, if I'm printing a 3" tall image 30 times, this data will be formatted into frames of 5 images, with six frames sent to the printer. Adjustment of position, if necessary, will happen after the end of a five image frame.
Adjust Mode can be used with or without Copy Count. When printing labels that contain unique elements, such as barcodes, names, etc. do not use Copy Count. Instead, create a large layout and send only a single copy.
When using Adjust Mode with Copy Count, Layouts are restricted to a single row. Layouts that have more than a single row will not be printed and a warning message will be displayed. This is a consequence of the frame rules above.
When Adjust Mode is enabled, the Bottom Margin on the Print Setup window is ignored and the Top Margin is restricted from use. Space between images is determined by SoftRIP automatically. The Image Height is subtracted from the value entered for Register Mark Period. The resulting value will be sent to the printer as the gap between images.
Adjust Mode Setup
When setting up SoftRIP for an Adjust Mode print job, here are the steps we recommend:
- Load media and train sensor: When loading media on the printer, be sure to use the sensor controls to set the mark reading sensitivity. This will assure that the sensor is able to reliably and accurately sense the marks (or weeded gap) relative to the unmarked material. Refer to the manufacturer's documentation for more information on how to train the sensor sensitivity.
- Measure material: Using a precise measuring tool, measure the marked (or weeded material) from the top of one mark to the top of the next mark. Place this value into the field for Register Mark Period.
- Determine Start Position: Setup and send a two frame job to the printer. Once printed, measure the distance from the place the first image is printed to the place on the marked material where the image should be printed. If the printed image needs to be moved down the media in the print direction, the measured value placed in Start Position should be a positive value. If the printed image needs to be moved up the media toward the leading edge of the material, the value placed in Start Position should be a negative value.
- Send Print Job: Once the steps above are complete and you're confident that all settings are accurate, you're now ready to send the full print job to the printer.
Notes on use with SoftRIP Label Edition
On the Labels tab certain controls require specific settings on the Printer Properties window.
- Rotary Cut Mark is only active when Label Detection is set to 'Continuous, no detection'.
- Width Center is not active when 'Rotary Cut Mark' is enabled.
- The Vertical Gap control is only active when 'Use Image Height for Label Height' control is enabled. If 'Use the Image Height for the Label Height' control is not enabled the 'Vertical Gap' control will be automatically calculated by subtracting the current image height from the valued entered for Label Height.
- Height Center is not active when Label Detection is set to 'Continuous, no detection'.