HP DesignJet 8000
May 2, 2007
Important Note:
- This device is supported via USB 2.0 only. If you attempt to print using USB 1.1, your results will likely be incorrect or unreliable.
- When recovering from non-fatal errors. After recovering the printer from its error state, then it may be required to press the online button before allowing SoftRIP to continue printing.
Usage
Pressing the Properties button on the Imaging Configuration window will launch a control panel with three tabs for this printer.
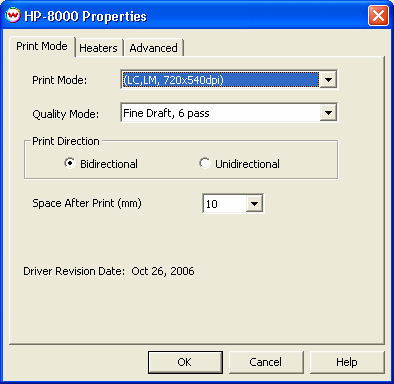
Print Mode Tab

-
Print Mode: Allows you to select the resolution (360x360, 540x720, or 720x720 dpi), and the mode
(CMYK, CMYK + Lc/Lm or Monochrome).
-
Quality Mode: Allows you to specify the number of passes the printheads will make over a particular line. A higher pass count provides better quality but longer printing time. This driver also offers 'High Density' Quality Modes, where more ink will be laid down than other Quality Modes of the same number of passes. Because of this, color profiles created with a non-high density Quality Mode will not be valid for high-density Quality Modes. Different Quality Modes are available based on your selection of resolution.
-
Print Direction: Choose unidirectional for printing in one direction. Choose bidirectional to
make the printheads print in both directions (each head pass).
- Space After Print: Set the space after print. This value is in addition to any margins that are set.
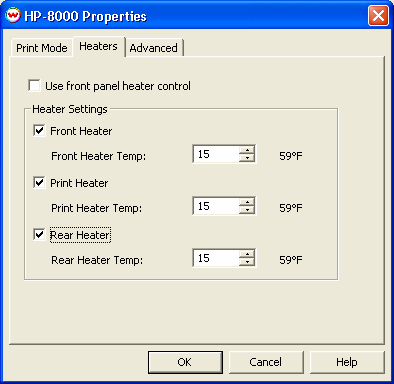
Heaters Tab

-
Heater Settings:
- Front Heater: Send Front Heater Temp. will override the front panel setting
for the front heater and set the temperature to the chosen value.
- Print Heater: Send Print Heater Temp. will override the front panel setting
for the print heater and set the temperature to the chosen value.
- Rear Heater: Send Rear Heater Temp. will override the front panel setting
for the rear heater and set the temperature to the chosen value.
Note: When using the software driver's heater controls, any unchecked heaters will be turned off during printing.
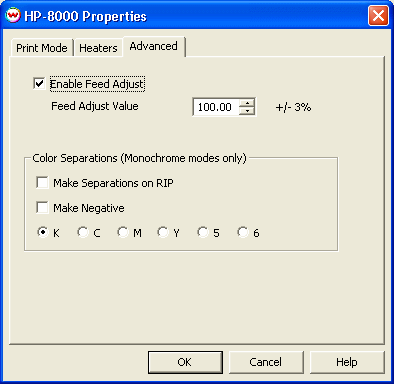
Advanced Tab

-
Enable Feed Adjust: Allows you to fine tune the media feed to reduce banding between passes.
Valid range is from 97.00% to 103.00%.
- Color Separations: The Color Separations controls are the same as those of other printers, and are only
available if a monochrome mode has been selected on the Print Mode tab.
- Separations on RIP: This will cause the RIP to separate the image into
CMYK plates.
- Make Negative: This inverts monochrome images when printed.
- KCMY56: This allows you to print monochrome images to any of the printheads.
This is especially useful to eliminate overuse of a single printhead when printing
only monochrome.
HP USB Driver Installation
Windows XP:
- Plug your printer's USB cable into a USB 2.0 port on your computer. A 'Found New Hardware' window should launch.
- If you are asked to connect to the internet, choose one of the options that allows you to skip this step and click "Next".
(One option skips connecting to the internet for all future hardware installations, and the other skips it for only this hardware installation. This option will only appear on Windows XP Service Pack 2).
- Click "Install from a list or specific location (Advanced)", and click "Next".
- Click "Search for the best driver in these locations" and check "Include this location in the search:". Browse to the temporary location of the extracted files, click "OK" and then click "Next". The wizard should now show that it is copying files.
- If you receive a message about "Unsigned Drivers" during this process, please click the "Continue Anyway" option. When this is done, click "Finish". Installation should now be complete.
Windows 2000:
- Plug your printer's USB cable into a USB 2.0 port on your computer. A 'Found New Hardware' window should launch. Click 'Next'.
- Place a check in 'Search for a suitable driver for my device', and click 'Next'.
- Place a check in 'Specify a location', and click 'Next'.
- Browse to the temporary location of your extracted files, select 'ECHO10000S.INF' and click 'Open' and then 'OK'.
- The wizard should find a driver successfully, and you should be able to click 'Next' or 'Finish' until the 'New Hardware' wizard completes.
- Installation should now be complete.
Technical Footnote - Components of a Wasatch/HP DesignJet 8000 Installation
All components must be assumed to be revision-date critical.
Although the required files for this installation will be placed
into the correct location automatically during the installation
of SoftRIP, please make sure that you do not have different
versions of these files located anywhere else on your system
(for example, from a pre-existing HP installation, or
from another software that utilizes any of these components).
The following is a list of the required components and their
proper locations. Remember, having any version of these files
on your system other than those found on your SoftRIP Installation
CD will cause unreliable operation. You can find the required
version of these components on your SoftRIP installation CD,
inside the "WWRIP\printers\hpComponants\" folder.
- In "/(Wasatch installation folder)/printers":
- hpDesignjet8000USB.dll (created by Wasatch)
- Additional run time components provided by HP:
Placed in "/(Wasatch installation folder)/printers/hpComponents":
- ECHOUSB.DLL
- ECHOUSBENTRY.DLL
IMPORTANT NOTE: These files must appear nowhere else on the
system to avoid any risk of revision-date mixing.
Also pre-required at run time:
Installation of HP USB Driver (provided by HP) from:
This installation is done in the Windows XP or 2000 "New Hardware
Wizard" or "Device Management" window. The files required can be
found in the "Misc\HP USB" folder of the SoftRIP installation CD.
Remember, don't mix components with different or incompatible
revision dates and strictly avoid running any installation
software from either HP or Wasatch that might cause
such mixing.
Implicit Linking of DLL Components
Wasatch SoftRIP sets the PATH environment variable to support
searching for implicitly linked dll files. This makes it
important that only one copy of any implicitly linked dll
exist on the system, as discussed in the following.
Reproduced from Microsoft documentation:
With both implicit and explicit linking, Windows first searches the set of pre-installed DLLs such as the
performance library (KERNEL32.DLL) and the security library (USER32.DLL). Windows then
searches for the DLLs in the following sequence:
- The directory where the executable module for the current process is located.
- The current directory.
- The Windows system directory. The GetSystemDirectory function retrieves the path of this directory.
- The Windows directory. The GetWindowsDirectory function retrieves the path of this directory.
- The directories listed in the PATH environment variable.


