 HP Latex 700/800 W
December 17, 2021
Print Mode:
Pressing the Properties button next to the Printer Model window on the
Imaging Configurations screen will launch a control panel for this printer.
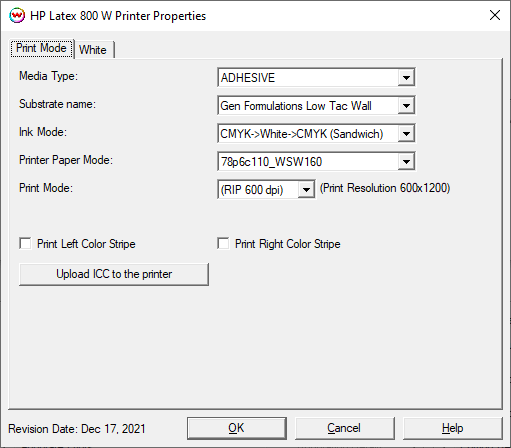
- Media Type: Media presets are stored on the printer in several categories. Select the media type loaded on the printer.
- Substrate name: Select the media type currently loaded on the printer.
- Ink Mode: Depending on the selected substrate and Printer Paper Mode, there may be further choices for which inks will be printed.
- Printer Paper Mode: Select the Paper Mode created on the front panel of the printer or downloaded from HP's site. When selecting a Paper Mode that has an ICC profile loaded on the printer a message will appear asking whether the ICC should be applied to the current Imaging configuration. See Illustration #1 below.
- Print Mode: Select the desired resolution for the printing process. Note: both the rip resolution and the print resolution will be displayed.
- Continuous Printing: Checking this control will group consecutive jobs together, delaying the ink drying phase until the print run is complete. This feature will result in faster output of print jobs.
- Print Color Stripe/s: Select one or both controls to print a Color Stripe on the Left, Right or both edges of the print. When printing Color Stripes you must reduce your Paper Width in SotrRIP's Print -> Setup window by 15mm or 0.6" for each Color Stripe checked. If both are checked reduce the Paper Width by 30mm or 1.2".
- Upload ICC to the printer: This control will upload an ICC profile to the printer. The ICC profile will be associated with the currently selected Printer Paper Mode. Uploading a custom ICC profile will allow for easy sharing of printer settings to multiple locations or printers. On the web interface of the printer select 'Setup' and 'Substrate presets management'. This control will allow a user to Import/Export the Printer Paper Modes as an .OMS file. Note: When the ICC profile is uploaded to the printer the ICC will be renamed with the currently selected 'Paper Printer Mode' name.
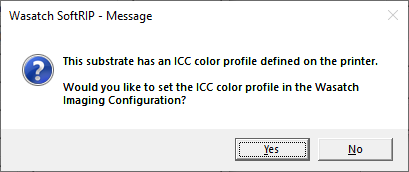
Illustration #1
Auto-Generation
The Auto-Generation controls are located on the third tab when 'CMYKW' is selected.
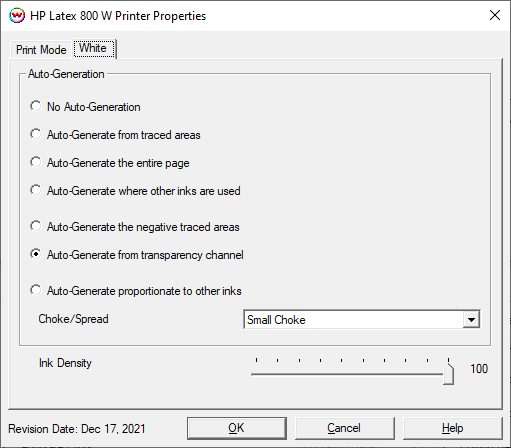
- No Auto-Generation: White channel is not printed unless specified through spot color replacement or as an Alpha or Spot channel.
- Auto-Generate ink from traced areas: White ink will be printed only to the traced areas that have been set using the Trace tab in the main SoftRIP interface.
- Auto-Generate the entire page: White ink will be printed over the entire image.
- Auto-Generate where other inks are used: White ink will be printed on all non-zero pixels (marked areas). In addition, a "choke" or "spread" may be selected.
- Auto-Generate the negative traced areas: Using the Trace tab a user can create a mask to determine what image data on the Job tab will print. Any image data outside of the mask will not be printed. This control is useful
for printing on dark shirts when printing raster image files or vector files with background colors that are not a solid fill.
- Auto-Generate from transparency channel: White ink will print based on the artwork's transparency channel. Opaque pixels will print white while partially transparent pixels will print as an inverse of the transparency setting.
Note: A choke shrinks the White ink channel in relation to the printed area.
Note: A spread expands the White ink channel in relation to the printed area.
- Ink Density: Set percentage of White ink to be used. Can be set from 10% to 100%.