 Mimaki CJV-300 Help
February 1, 2021
Print Mode Options:
Pressing the Properties button next to the Printer Model
window on the Imaging Configurations screen will launch the control
panel for this printer.

This page allows you to select from the following parameters:
- Print Mode: Set the resolution for printing.
- Color Mode: Select the inkset to use during printing. If using a custom inkset is to be used, then the inkset the printer was set up with needs to be selected.
- Inkset: When the Color Mode is set to one of the 'Custom Inkset' choices, then a custom inkset can be created or used for printing.
- Create Inkset: Create a new custom inkset.
- Edit Inkset: Edit an existing custom inkset.
- Delete Inkset: Delete an existing custom inkset.
- Layering: Shows the layering order for the White ink channel. Currently not supported.
- Ink Type: Select the type of ink loaded in the printer. This option will adjust the wave forms that are available.
- Head Unit: Select to print with Head 1, Head 2, or both Heads 1 and 2.
- Head Speed: Choose to have the head travel at a high speed or low speed. This option is not available in all pass counts.
- Pass Count: Allows you to specify the number of passes the head will make over a particular line. A higher pass count has a better quality but a slower print speed.
- Dot Type: Choose either a variable dot or fixed dot for printing.
- Direction: Select to print with either Unidirectional or Bidirectional.
- Over Print: Prints over the printed area the selected number of times. For example, if 2 is selected, the amount of ink laid down is doubled. The maximum value is 9.
- Vacuum: Set the strength of the media vacuum on the printer to Weak, Standard, or Strong.
- Logical Seek: Turn on option for print head to move the width of the image or turn off for print head to move the entire width of the printer, with each printing pass.
- Wave Form: Choose which wave form to use. Adjusting the wave form may help with certain banding issues.
- Auto-Cut: When selected, the media will be cut off after the print.
- Left / Right Confidence Strips: Choose whether to print color strips along the left or right edges of the output.
Heater:
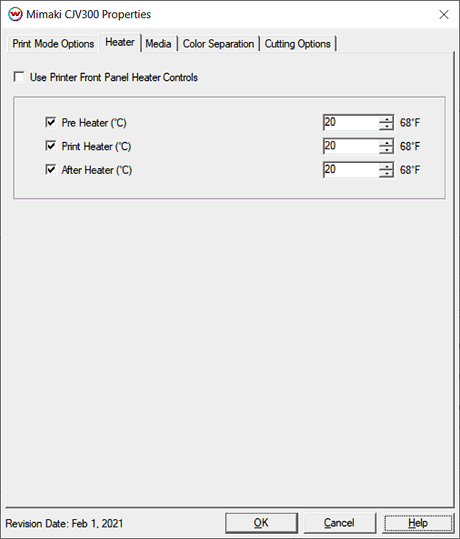
- Use Printer Front Panel Heat Control: If enabled the printer will use the settings from the front panel of the printer, otherwise the controls below can be used.
- Pre Heater: Warms the media before is passes over the platen.
- Print Heater: Warms the media under the print heads
- After Heater: Warms the media after printing
Media:

- Drying Time Per Pass (1/10 sec): Add additional drying to each head pass.
- Drying Time After Print (sec): Set the number of seconds the printer waits at the end of the print.
- Use Media Feed Speed (10-200): When selected, the front panel setting for the speed that the media is advanced will be ignored and the new value will be used.
- Use Media Feed Adjustment: When selected, a value from -9999 to 9999 can be entered to adjust the distance between head passes. A value of 60 is approximately equivelant to 0.1 mm.
Color Separation:
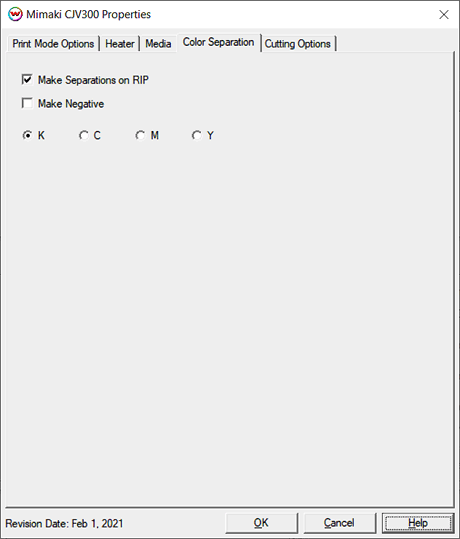
The Color Separations controls are the same as those of other printers, and are only available if a monochrome mode has been selected on the Print Mode Options tab.
- Make Separations on RIP: This will cause the RIP to separate the image into CMYK plates.
- Make Negative: This inverts the monochrome images when printed.
- K, C, M, Y: Select the ink channel to use for printing.
Cutting Options:
When you click on the Cutting Options tab, or if using the Cut Only driver, the following properties will be displayed:
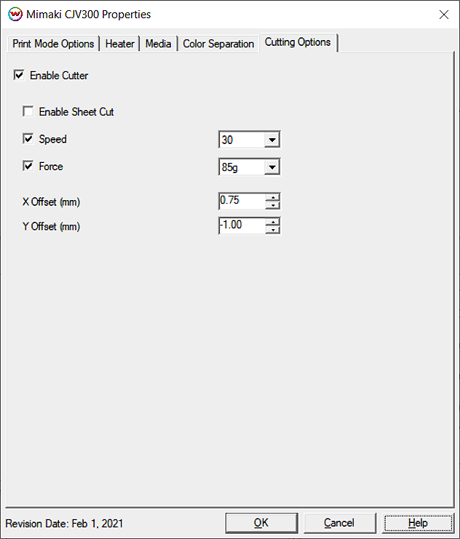
- Enable Cutter: When enabled, the device will cut out the cut path after the print has finished. When disabled, the cut path will go to the Queue that has been set on the Print > Setup window.
- Enable Sheet Cut: When enabled, after the contour cutpath is cut, sheet will be cut from the printer. Similar to Auto Cut on Print Mode tab. Used in place of Auto Cut if 'Enable Cutter' is checked.
- Speed: Set the cutting speed. Usually setting a lower speed will result in longer cut times, but will produce higher quality results.
- Force: Set the blade pressure for cutting. When the values set here are too small, the blade will not have enough pressure to cut the sheet. Similarly, if the pressure is too high, not only it will not
work properly, but also it can cut through the back of the media and may cause damage to printer. Be careful to set the correct value for the thickness and the hardness of the material you are using.
- X Offset: An X Offset value can be entered if the cut is off in the head scan direction. Values range from -5.00mm to 5.00mm.
- Y Offset: A Y Offset value can be entered if the cut is off in the media feed direction. Values range from -5.00mm to 5.00mm.

Print and Cut Workflows:
Mimaki CJV30 Front Panel Cutter Settings
- Mark Detection Number:
4 or OFF. Set to 4 for Auto Registration workflows. Set to OFF for all other workflows
- Mark Size:
Mimaki 1/4" = 6mm, Mimaki 1/2" = 13mm, Mimaki 1" = 25mm
- Mark Type:
Type 2
Print with Cut Workflow (With Auto Registration)
Enable the Mimaki cutting registration marks (1/4", 1/2" or 1") on the Print Setup window, check 'Enable Cutter' on the Cutter tab in the Printer Properties and uncheck 'Disable Automatic Registration of Cutting Marks' on the Cutter tab.
After printing (with the appropriate Mimaki cutting registration marks - 1/4", 1/2", or 1"), the printer will automatically switch from 'Print Mode' to 'Cut Mode'. The print head will separate to allow the cutting head to become active. Depending on the front panel settings for the pinch rollers, the cutting head may adjust the tension for each of the pinch rollers.
Once the pinch rollers are set, the head will move to allow the sensor to detect the cutting registration marks. The number of marks (points) can be set on the front panel.
After the marks are detected, the printer will proceed to cut.
Print with Cut Workflow (Without Auto Registration)
NOTE: While faster due to mark detection being disabled, this workflow may be less accurate. It is critical to have the media loaded as straight as possible to assure accurate cutting.
Do NOT enable printing of the Mimaki cutting registration marks. Check 'Enable Cutter' on the Cutter tab in the Printer Properties and also check 'Disable Automatic Registration of Cutting Marks'. Set the number of marks to be detected on the front panel of the printer to zero. Set all margins in Print Setup to '0'.
After printing is complete, the printer will automatically switch from 'Print Mode' to 'Cut Mode'. The print head will separate to allow the cutting head to become active. Depending on the front panel settings for the pinch rollers, the cutting head may adjust the tension for each of the pinch rollers.
Once the pinch rollers are set, the printer will proceed to cut without detecting the registration marks.
Print Now, Cut Later Workflow (With Auto Registration)
While in 'Local', use the front panel to change the mode into the 'Cut Mode'. This will allow the printer to perform the cutting operation.
Insert the media from the rear of the cutter in the same direction as the media originally came out of the printer. Since the cutter cannot cut any media beyond the pinch rollers, align the media so that the pinch rollers are not over any part of the print that is to be cut.
Press 'End' on the front panel of the printer and use the arrow keys to move cutting head to the lower right mark (typically referred to as TP1). Align the red light to the inside area of the cut mark. Press 'Enter' to save the new origin. The printer will now search out the marks.
After the marks are detected, switch the printer into 'Remote'. Now the cut path is ready to be sent from the Cutting Queue of Wasatch SoftRIP.
Print Now, Cut Later Workflow (Manual Registration)
While in 'Local', use the front panel to change the mode into the 'Cut Mode'. This will allow the printer to perform the cutting operation.
Insert the media from the rear of the cutter in the same direction as the media originally came out of the printer. Since the cutter cannot cut any media beyond the pinch rollers, align the media so that the pinch rollers are not over any part of the print that is to be cut.
Once media is loaded, set Origin with the cutting blade directly over the center of Mark 1.
Switch the printer into 'Remote'. Now the cut path is ready to be sent from the Cutting Queue of Wasatch SoftRIP.