 Mimaki TS300P
April 17, 2020
Note: When using TCP/IP connections, the use of 1000Base T (Gigabit) hardware is necessary. Cat 6 or better cables are recommended.
Note: Use port 11110, when setting up the TCP/IP connection in SoftRIP.
Print Mode:
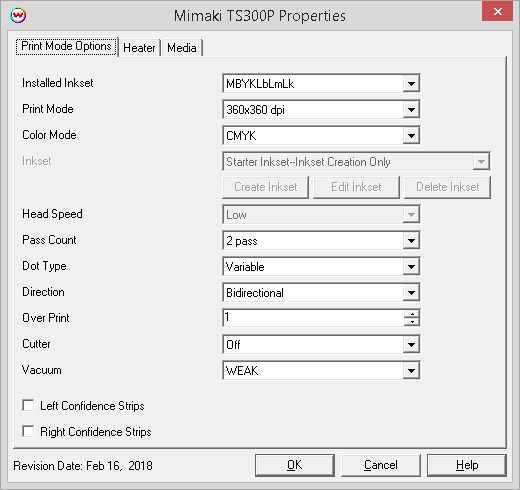
- Installed Inkset: Select the inkset installed in the printer. This should match what was selected on the front panel of the printer when the ink was initially installed.
- Print Mode: Set the resolution for printing.
- Color Mode: Select the inkset to use during printing.
- Inkset: When the Color Mode is set to 'Custom Inkset' then a previously created custom inkset can be selected to use for printing.
- Create Inkset: Create a new custom inkset.
- Edit Inkset: Edit an existing custom inkset.
- Delete Inkset: Delete an existing custom inkset.
- Head Speed: Choose to have the head travel at a high speed or low speed. This option is not available in all pass counts.
- Pass Count: Allows you to specify the number of passes the head will make over a particular line. A higher pass count has a better quality but a slower print speed.
- Dot Type: Choose either a variable dot or fixed dot for printing.
- Direction: Select to print with either Unidirectional or Bidirectional.
- Over Print: Prints over the printed area the selected number of times. For example, if 2 is selected, the amount of ink laid down is doubled. The maximum value is 9.
- Cutter: When selected the media will be cut off after the print.
- Vacuum: Set the strength that the vacuum in the printer's platen will place on the media.
- Left / Right Confidence Strips: Choose whether to print color strips along the left or right edges of the output.
Heater:
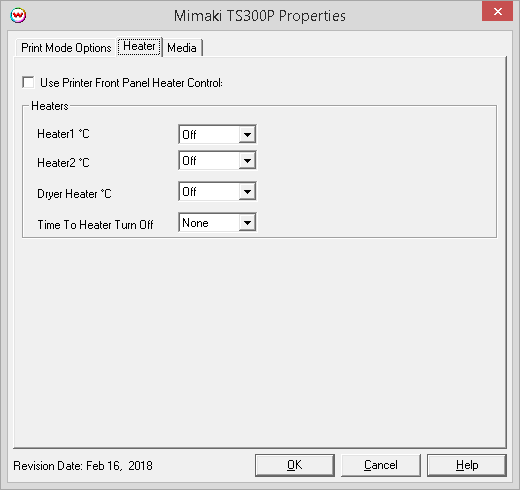
- Use Printer Front Panel Heater Controls: When enabled, all heater control is performed on the front panel. When disabled, the following controls will be active.
- Heater1 / Heater2: Warms the media before and during printing.
- Dryer Heater: Warms the media after printing to allow for additional drying.
- Time to Heater Turn Off: Set the amount of minutes to wait after current print before having the heaters turn off. This can be helpful for printing the last print of the day.
Media:
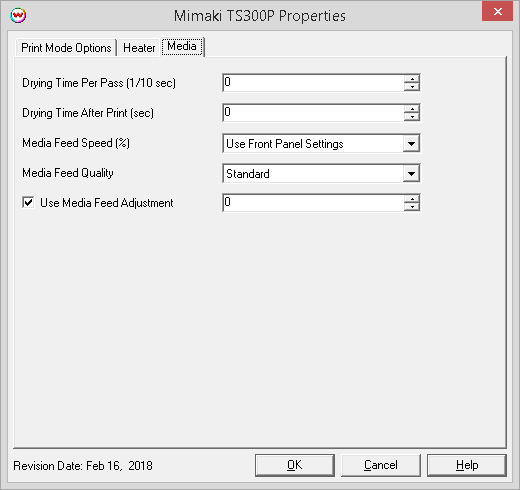
- Drying Time Per Pass (1/10 sec): Add additional drying to each head pass.
- Drying Time After Print (sec): Set the number of seconds the printer waits at the end of the print.
- Media Feed Speed (%): When selected, the front panel setting for the speed that the media is advanced will be ignored and the new value will be used.
- Media Feed Quality: Set the quality of media feed.
- Use Media Feed Adjustment: When selected, a value from -9999 to 9999 can be entered to adjust the distance between head passes.