 Mimaki TS330-1600
May 5, 2023
NOTE: In order for the following controls to work in the SoftRIP TS330 driver, the settings on the front panel need to be set to "HOST" or "AUTO". If a specific value is entered on the front panel instead of being set to HOST / AUTO, the front panel value is used instead of the one set in the driver:
- Vacuum Fan (Vacuum)
- Feed Speed (Media Feed Speed)
- Top Blower
- Drying Time Scan (Drying Time Per Pass)
- Drying Time Print End (Drying Time After Print)
Physical Connection Setup
Before connecting the printer to the PC, the Mimaki Driver needs to be downloaded and installed. It can be obtained from the Mimaki web site here.
It is highly recommended to review the Operation Manual, which can be obtained from the same link as the Mimaki Driver. Section 1.3, "Connecting a PC to the Product" starts on page 36. There are special notes for both USB and ethernet connections that must be followed when setting up the printer for successful communication.
The Mimaki Communication Driver is required for USB and Ethernet connections. When setting up the network connection in the SoftRIP TCP/IP Spoolers, change the standard port 9100 to be port 11110 instead.
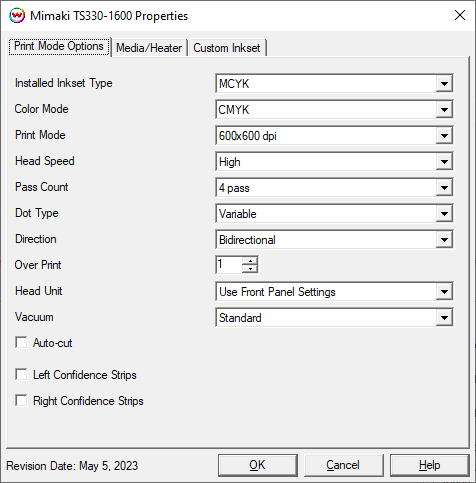
Print Mode Options
To launch the printer properties for this driver, choose 'Setup' from the 'Print' menu, then click on the 'Edit' button, and then click on 'Properties'.

- Installed Inkset: Select the inkset installed in the printer. This should match what was selected on the front panel of the printer when the ink was installed.
- Color Mode: Select the inkset to use for printing.
- Print Mode: Choose the resolution.
- Head Speed: Controls the 'High Speed' option available in certain resolutions.
- Pass Count: Allows you to specify the number of passes the head will make over a particular line. A higher pass count has a better quality but a slower print speed.
- Dot Type: Select the dot type: Fixed Dot or Variable Dot.
- Direction: Print in both directions (bidirectional) or one direction (unidirectional).
- Over Print: Prints over the printed area the selected number of times. For example, if 2 is selected, the amount of ink laid down is doubled. The maximum value is 9.
- Head Unit: This control toggles between which print heads to use to print ink.
- Vacuum: Controls the strength of the vacuum. See note above when using this control.
- Auto-cut: If enabled, this control will cut the print after printing.
- Confidence Strips: Enable the printing of confidence strips on one or both sides of the print.
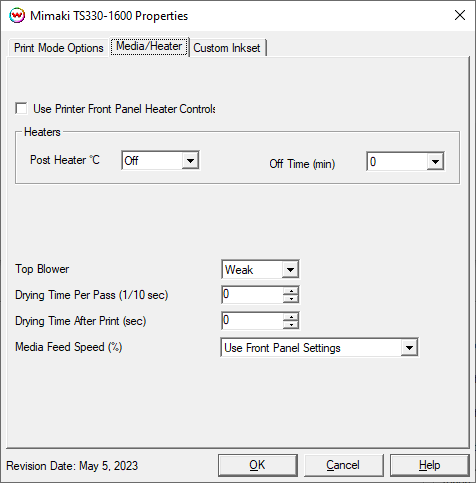
Media/Heater

- Use Printer Front Panel Heater Controls: When enabled, all heater control is performed on the front panel. When disabled, the following controls will be active.
- Post Heater: Warms the media after printing to allow for additional drying of the ink.
- Off Time: Set the amount of minutes to wait, after the current print finishes, before the heaters turn off. This can be helpful for printing the last print of the day.
- Top Blower: Sets the strength of the top blower. See note above when using this control.
- Drying Time Per Pass: Specify dry time between each pass. (in 1/10 seconds). See note above when using this control.
- Drying Time After Print: Specify dry time after printing is complete. (in seconds). See note above when using this control.
- Media Feed Speed: Set the speed the media is fed through the printer as a percentage of the normal speed. See note above when using this control.
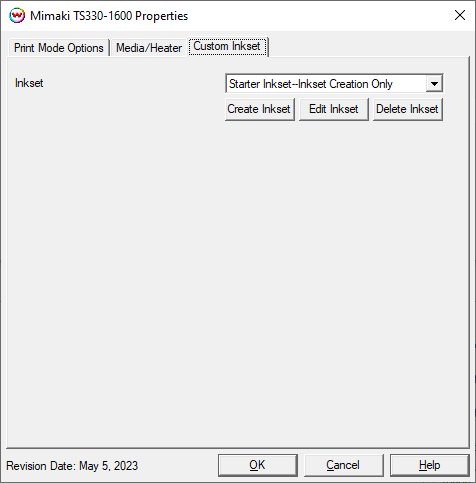
Custom Inkset

When Custom Inkset is selected in Color Mode, the following controls are available:
- Create Inkset: Create a new custom inkset.
- Edit Inkset: Edit an existing custom inkset.
- Delete Inkset: Delete an existing custom inkset.
 Mimaki TS330-1600
 Mimaki TS330-1600

