October 3, 2016
Print Mode:
Pressing the Properties button next to the Printer Model window on the Imaging Configurations screen will launch the control panel for this printer.

- Print Mode: Choose resolution for printing.
- Pass Count: Select pass count. Will vary depending on Print Mode selected.
- Quality Mode: Select the quality mode to use for printing. Some of the print modes only offer one quality mode.
- Dot Size: Select the size of the dot to print with.
- Carriage Speed: Specify the carriage speed.
- Wave Effect: Select the wave pattern to print with. Adjusting the wave effect can help with banding issues.
- Scan Width: Choose if the print head should travel the width of the image, the width of the media, or the width of the printer.
- Print Direction: Print in Unidirection (one direction) or Bidirection (both directions).
- Overprint (Color Ink): Select the number of times the printer prints over the colored area. For example, if 2 is selected, the amount of ink laid down is double. The maximum value is 9.
- Media Cut: The sheet cutting option can be set to Off, or to use the front panel settings, or to one of the options listed below.
- If the cut is set to double cut, after the cut operation is executed once, the cutting blade returns to the same position and execute the cut again.
- If the cut is set to 2 steps, the cut will be completed in two motions.
- If the cut is set to 3 steps, the cut will be completed in three motions.
- Time Between Passes (sec): Allows you to specify the minimum time that a printhead pass will take. This may be necessary to slow down the printhead when there are excessive drying problems, or when printing separations onto film. For example, it may be necessary to increase the dot size to a larger dot to increase the maximum density.
- Drying Time After Print (sec): Use this control to add time to allow the print to dry before the next job is printed.
- Send Feed Correction: Use this control to adjust for media feed slipppage (-5% to 5%).
- Use Front Panel Media Settings: Media Selection: Use this control to choose a custom media profile (1-15).
Custom Inkset:
When you click on Custom Inkset, the following properties page will be displayed:
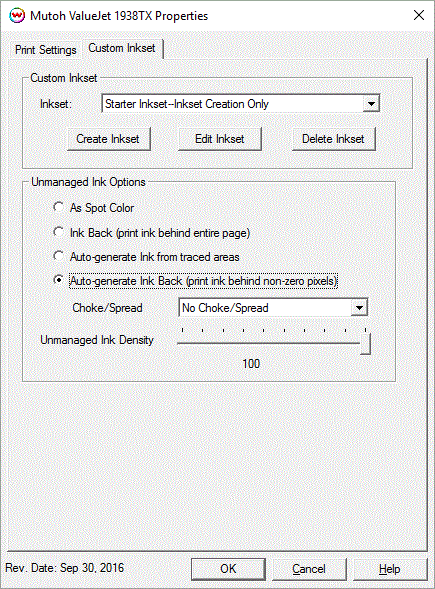
- Inkset: When Custom Inkset is selected in Color Mode, the following controls are available:
- Create Inkset: Create a new custom inkset.
- Edit Inkset: Edit an existing custom inkset.
- Delete Inkset: Delete an existing custom inkset.
Additional Notes for Custom Inksets:
For printers configured as 8-color KCMYLcLm Red Blue use the chart below.
Assignment Slot
in custom inkset creator |
Printer Ink
Slot # |
| 1.
|
1. K
|
| 2.
|
3. M
|
| 3.
|
6. Lm
|
| 4.
|
5. Lc
|
| 5.
|
2. C
|
| 6.
|
4. Y
|
| 7.
|
7. Red
|
8.
|
8. Blue
|
For printers configured as 7-color KCMY Orange Green Blue use the chart below.
Assignment Slot
in custom inkset creator |
Printer Ink
Slot # |
| 1.
|
1. M
|
| 2.
|
3. C
|
| 3.
|
6. K
|
| 4.
|
5. Y
|
| 5.
|
2. Green
|
| 6.
|
4. Orange
|
| 7.
|
Unused
|
8.
|
8. Blue
|
- Unmanaged Ink Options: Available with an Custom inkset that includes a unmanaged channel.
- As Spot Color: White/Varnish is not printed unless specified through a spot color replacement.
- Ink Back (print ink behind entire page): Prints the unmanaged channel on the entire image.
- Auto-Generate ink from traced areas: The unmanaged channel will be applied only to the traced areas that have been created using the Trace tab in the main SoftRIP interface.
- Auto-Generate Ink Back (print ink behind non-zero pixels): Prints White/Varnish on all non-zero pixels(marked areas). In addition, a "choke" or "spread" may be applied to the area.
Note: A choke shrinks the White/Varnish in relation to the printed area.
Note: A spread expands the White/Varnish in relation to the printed area.
- Unmanaged Ink Density: Set percentage of ink to be used for the unmanaged channel. Can be set from 10% to 100%.