November 10, 2014
Print Mode:
Pressing the Properties button next to the Printer Model window on the Imaging Configurations screen will launch the control panel for this printer.
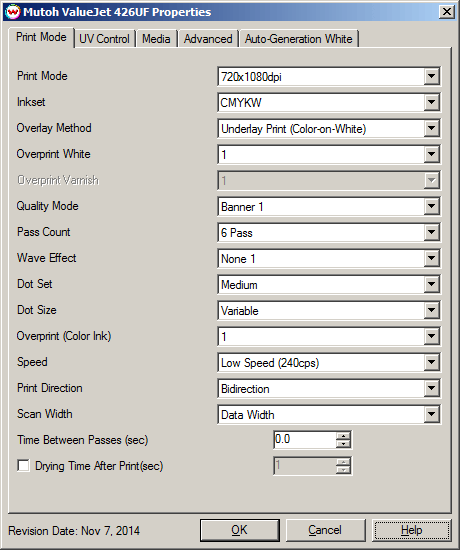
- Print Mode: Choose resolution for printing.
- Inkset: Select the desired inkset to use.
- Overlay Method: Select the appropriate white/varnish layering method.
- Off (color Ink Only): White ink will not be printed.
- Underlay Print (Color-on-White): White ink will print at the same time as the CMYK, but the white will print first. Color will be on top of white.
- Overlay Print (White-on-Color): White ink will print at the same time as the CMYK, but the CMYK will print first. White will be on top of the colors.
- Three Layer (Color-White-Color): White ink and the CMYK ink will print at the same time. A layer of white will be printed between the top and bottom layers of color.
- Multi_Layer CMYKW (W->C): White ink will be printed first, then the printer will rewind the media and print CMYK on top of the white.
- Multi_Layer CMYKW (C->W): CMYK ink will be printed first, then the printer will rewind the media and print white on top of the colors.
- Multi_Layer CMYKW (C->W->C): The CMYK ink will be printed first, then the printer will rewind the media and print white on top of the colors. The media will rewind again to allow for the CMYK layer to be printed again.
- Overprint White: Select the number of times the printer prints over the white area. For example, if 2 is selected, the amount of white ink laid down is double. The maximum value is 9.
- Overprint Varnish: Select the number of times the printer prints over the varnish area. For example, if 2 is selected, the amount of varnish ink laid down is double. The maximum value is 9.
- Quality Mode: Select the quality mode to use for printing. Some of the print modes only offer one quality mode.
- Pass Count: Select pass count. Will vary depending on Print Mode selected.
- Wave Effect: Select the wave pattern to print with.
- Dot Set: Choose to print with the Small, Medium, or Large dot set.
- Dot Size: Select the size of the dot to print with when using the above selected dot set.
- Overprint (Color Ink): Select the number of times the printer prints over the colored area. For example, if 2 is selected, the amount of ink laid down is double. The maximum value is 9.
- Speed: Choose the desired speed for printing.
- Print Direction: Print in Unidirection (one direction) or Bidirection (both directions).
- Scan Width: Choose if the print head should travel the width of the image, the width of the media, or the width of the printer.
- Time Between Passes (sec): Allows you to specify the minimum time that a printhead pass will take. This may be necessary to slow down the printhead when there are excessive drying problems, or when printing separations onto film. For example, it may be necessary to increase the dot size to a larger dot to increase the maximum density.
- Drying Time After Print (sec): Set an additional amount of time for the printer to pause, this may be necessary when extra drying is needed or when printing separations onto film. For example, it may be necessary to increase the dot size to a larger dot to increase the maximum density.
UV Control:
When you click on UV Control, the following properties page will be displayed:
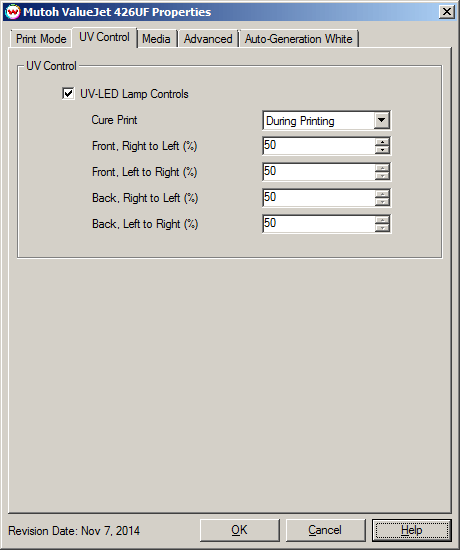
UV-LED Lamp Controls:
- Cure Print: Select whether to use the UV lamps to cure the ink during the printing process, or to rewind the media and have the UV lamps cure the ink after the printing has been completed.
- Front, Right To Left (%): Enter the lamp illumination value for the front lamp when the head travels right to left.
- Front, Left To Right (%): Enter the lamp illumination value for the front lamp when the head travels left to right.
- Back, Right To Left (%): Enter the lamp illumination value for the back lamp when the head travels right to left.
- Back, Left To Right (%): Enter the lamp illumination value for the back lamp when the head travels left to right.
Media:
When you click on Media, the following properties page will be displayed:
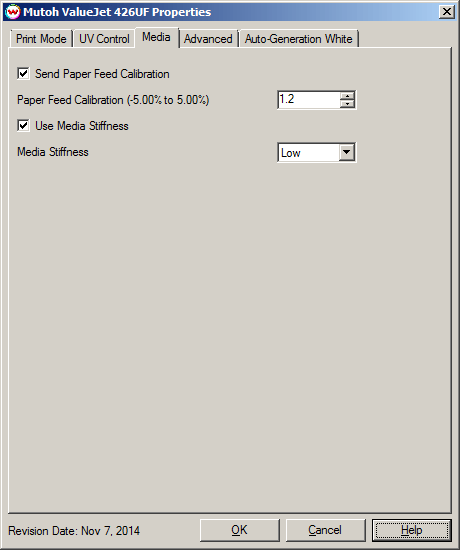
Send Paper Feed Calibration:
- Paper Feed Calibration (-5.00% to 5.00%): Enter calibration value for adjusting the paper feed.
To find the Paper Feed Calibration Value:
- Print a line that is 1000 mm long in the paper feed direction
- Measure the actual printed distance
- Enter the difference in millimeters. For example, enter -5 if a measurement of the print is a value of 995 mm
- Use Media Stiffness: Select the stiffness of the media, so the vacuum can be adjusted accordingly.
Advanced:
When you click on Advanced, the following properties page will be displayed:
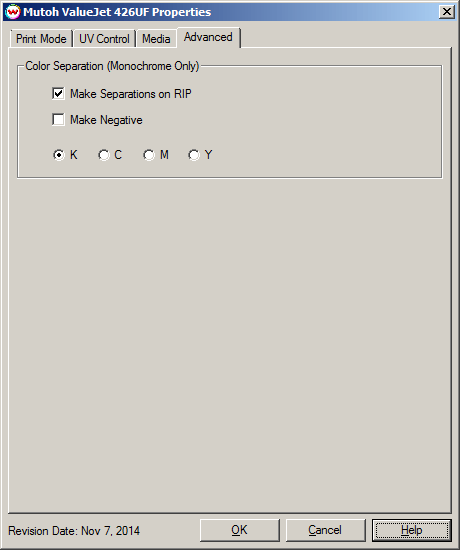
The Color Separations controls are only available if a monochrome mode has been selected on the Print Mode tab.
- Make Separations on RIP: This will cause the RIP to separate the image into CMYK plates.
- Make Negative: This inverts monochrome images when printed.
- KCMY: This allows you to print monochrome images directly to any one of the printheads. This is especially useful to eliminate overuse of a single printhead when printing only monochrome.
Auto-Generate White/Varnish:
When you click on Auto-Generate White or Auto-Generate Varnish, the following properties page will be displayed:
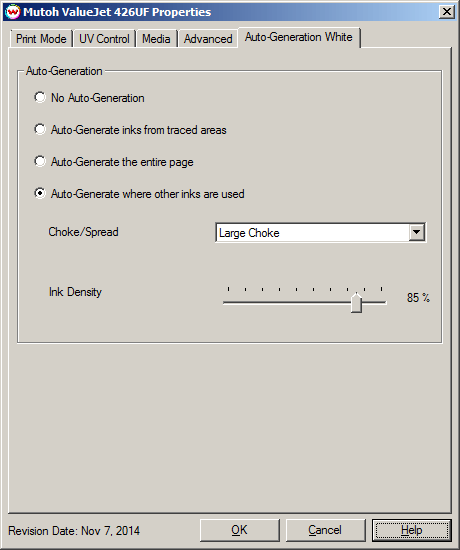
- Auto-Generation: Available with an inkset that includes a White or Varnish ink channel.
- No Auto-Generation: White/Varnish is not printed unless specified through a spot color replacement.
- Auto-Generate ink from traced areas: The White/Varnish will be applied only to the traced areas that have been created using the Trace tab in the main SoftRIP interface.
- Auto-Generate the entire page: Prints White/Varnish on the entire image.
- Auto-Generate where other inks are used: Prints White/Varnish on all non-zero pixels(marked areas). In addition, a "choke" or "spread" may be applied to the area.
Note: A choke shrinks the White/Varnish in relation to the printed area.
Note: A spread expands the White/Varnish in relation to the printed area.
- Ink Density: Set percentage of ink to be used for the White or Varnish. Can be set from 10% to 100%.