July 15, 2024
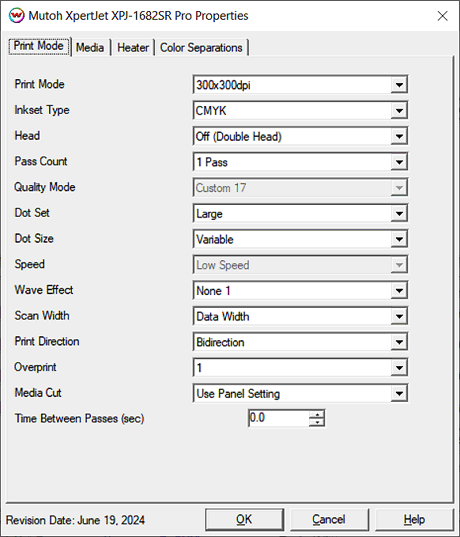
Print Mode:
Pressing the Properties button next to the Printer Model window on the Imaging Configurations screen will launch the control panel for this printer.

- Print Mode: Choose resolution for printing.
- Inkset Type: Select the desired inkset to use. Choices are CMYK, CMYKCMYK, Monochrome, or Custom.
- Custom Inkset: When Custom Inkset is selected in Color Mode, the following controls are available:
- Create Inkset: Create a new custom inkset.
- Edit Inkset: Edit an existing custom inkset.
- Delete Inkset: Delete an existing custom inkset.
NOTE: For more information on creating custom inksets, click here.
- Head: Select to use Head 1, Head 2, or both Heads.
- Pass Count: Select pass count. Will vary depending on Print Mode selected.
- Quality Mode: Select the quality mode to use for printing. Some of the print modes only offer one quality mode.
- Dot Set: Choose to print with the Small, Medium, or Large dot set.
- Dot Size: Select the size of the dot to print with, when using the above selected dot set.
- Speed: Set the speed that the head travels at during printing.
- Wave Effect: Select the wave pattern to print with. NOTE: The ripping time may increase when using a higher wave effect.
- Scan Width: Choose if the print head should travel the width of the image, the width of the media, or the width of the printer.
- Print Direction: Print in Unidirection (one direction) or Bidirection (both directions).
- Overprint: Choose the number of times each area is printed over. A setting of 2 would double the amount of ink that is printed.
- Media Cut: The sheet cutting option can be set to Off, or to use the front panel settings, or to perform a single cut or double cut. See below.
- If the cut is set to double cut, after the cut operation is executed once, the cutting blade returns to the same position and execute the cut again.
- If the cut is set to 2 steps, the cut will be completed in two motions.
- If the cut is set to 3 steps, the cut will be completed in three motions.
- If the cut is set to the high pressure, the cut operation will be executed with high pressure.
- If the cut is set to the low pressure, the cut operation will be executed with low pressure.
- Time Between Passes (sec): Allows you to specify the minimum time that a printhead pass will take. This may be necessary to slow down the printhead when there are excessive drying problems, or when printing separations onto film.
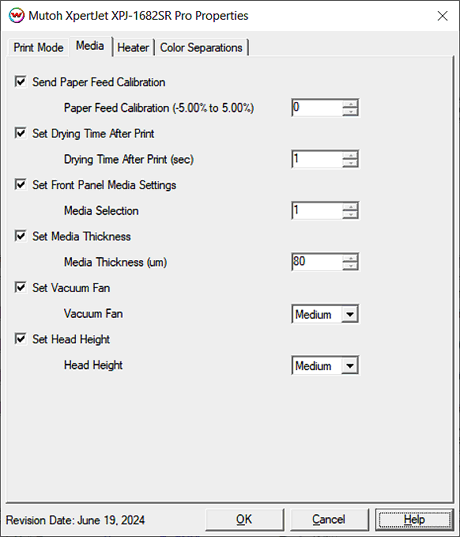
Media:
When you click on Media, the following properties page will be displayed:

- Send Paper Feed Calibration (-5.00% to 5.00%): Enter calibration value for adjusting the paper feed.
- Print a line that is 1000 mm long in the paper feed direction. (ie. c:\psfiles\1000mm.ps)
- Measure the actual printed distance.
- Enter the difference in millimeters. For example, enter -0.5% if a measurement of the print is a value of 995 mm.
- Set Drying Time After Print: Additional drying time, in seconds, can be set after the print is completed.
- Set Front Panel Media Settings: Allows one of the printers predefined front panel Media Settings to be selected, without having to switch the front panel over to this media setting.
- Set Media Thickness: Set the appropriate media thickness in microns. The conversion of microns to millimeters is: 80 microns = 0.08 mm
- Set Vacuum Fan: Select the suction power of the media vacuum fan to hold media onto the platen.
- Set Head Height: Specify the head height for the print job. Choices are low, medium, or high.
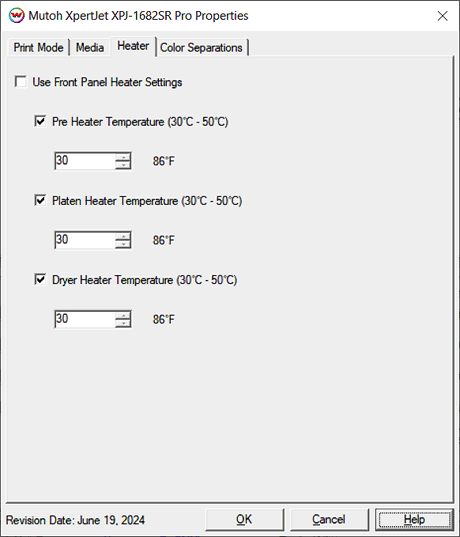
Heater:
When you click on Heater, the following properties page will be displayed:

The Heater page allows you to adjust the heater settings.
- Checking 'Use Front Panel Heater Settings' disables driver heater controls and uses the printer's front panel settings.
- Checking 'Pre Heater Temperature' will activate the control, allowing a temperature to be set.
- Checking 'Platen Heater Temperature' will activate the control, allowing a temperature to be set.
- Checking 'Dryer Heater Temperature' will activate the control, allowing a temperature to be set.
- Adjust heater temperature in degrees centigrade. Temperature in Fahrenheit is displayed to the right of the control.
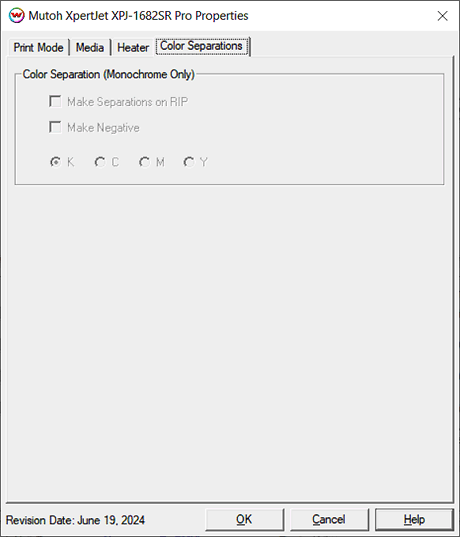
Color Separations:
When you click on Color Separations, the following properties page will be displayed:

The Color Separations controls are only available if Monochrome has been selected on the Print Mode tab.
- Make Separations on RIP: This will cause the RIP to separate the image into CMYK plates.
- Make Negative: This inverts monochrome images when printed.
- KCMY: This allows you to print monochrome images directly to any of the printheads. This is especially useful to eliminate overuse of a single printhead when printing only monochrome.
[ Wasatch Home ]


