 Mimaki GP-604
To launch the printer properties for this driver, choose 'Setup' from the 'Print' menu, then select
Mimaki GP-604 in the 'Printer Model' list, click on the 'Edit' button, and then click on 'Properties'.
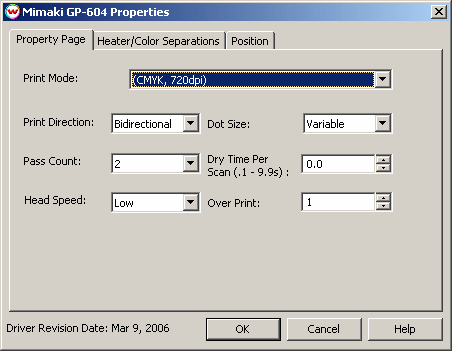
- Print Mode: Select the ink type and printing resolution. This will generally match the inkset
that is installed in the printer.
- Print Direction: Print in both directions (bi) or one direction (uni). Bidirectional is faster
than unidirectional. Unidirectional is a better quality than bidirectional.
- Pass Count: Select pass count. Pass count options are dependent on resolution.
- Head Speed: This controls the scan speed of the printhead assembly. Select either High or Low
head speed. High is only available at certain print resolutions and pass counts.
- Dot Size: Choose from variable or fixed. Available options are dependent on print resolution.
- Dry Time Per Scan: feature allows you to set the amount of time (in seconds) between each pass.
- Over Print: Prints over the printed area the selected number of times. For example,
if 2 is selected, the amount of ink laid down is double. The maximum value is 9.
The heater and color separation controls are located on the second tab. The separations controls
are only available when using Monochrome modes.
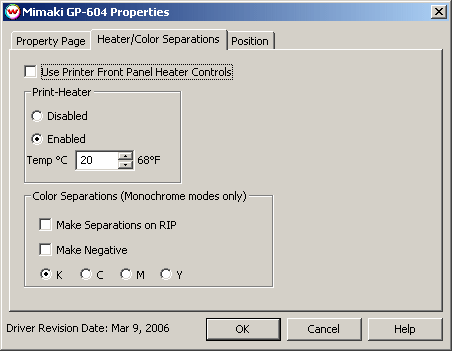
The heater controls are used to shorten dry time. If you have Use Printer Front Panel Heater
Controls checked, the software does not control the heaters. If it is unchecked, you have the
option to disable, or enable the heater at a certain temperature. If the heater is enabled, the
heater will not be turned off at the end of the print, so that the heater remains at a constant
temperature for the following print.
If the heater controls are enabled, and the current temperature of the heaters is less (or more) than
the temperature setting, the printer will wait before sending the print until the set constant temperature
is achieved. (This may take some time.)
The Color Separations controls are the same as those of other printers, and are only
available if a monochrome mode has been selected on the Print Mode tab.
- Separations on RIP: This will cause the RIP to separate the image into
CMYK plates.
- Make Negative: This inverts monochrome images when printed.
- K, C, M, Y: This allows you to print monochrome images to any of the printheads.
This is especially useful to eliminate overuse of a single printhead when printing
only monochrome.
The position controls are located on the third tab. The position controls are only available when using a IEEE1394 physical connection.
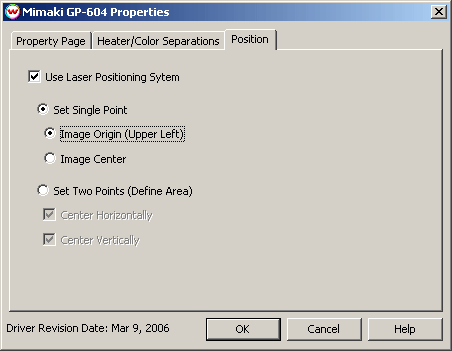
Use Laser Positioning System: Check this option to enable the laser positioning system.
Set Single Point: Use this setting when the LED POINT setting on the printer front panel is set to POINT. Prior to sending the print from SoftRIP, points P0 and P1 will need to be entered into the console of the printer (please refer to your Mimaki user manual for information on setting position with the LED pointer). Point P1 will determine the origin or placement of the image sent from SoftRIP as based on the settings below. (Point P0 is not utilized by SoftRIP)
- Image Origin (Upper Left): Defines the print area by designating the upper left point of the print area. All print jobs will be left aligned from this point.
- Image Center: Defines the print area by designating the center point of the print area. All print jobs will be center aligned (horizontally & vertically) from this point.
Set Two Points (Define Area): Use this setting when the LED POINT setting on the printer front panel is set to AREA. Prior to sending the print from SoftRIP, points P0, P1, and P2 will need to be entered into the console of the printer (please refer to your Mimaki user manual for information on setting position with the LED pointer). Point P1 defines the upper left point of the print area. Point P2 defines the bottom right point of the print area. (Point P0 is not utilized by SoftRIP)
- Center Horizontally: Centers print jobs horizontally within the defined print area.
- Center Vertically: Centers print jobs vertically within the defined print area.
IEEE 1394 is recommended to ensure an adequate data rate for this printer. Mimaki
distributes their own driver component for IEEE 1394, that must be installed in
Windows. This driver can also be found on the Wasatch SofRIP CD-ROM. Note that
Mimaki's driver is for Windows 2000 or XP only.
Steps on installing Mimaki Firewire
- Run the setup.exe from the Wasatch SoftRIP CD-ROM in the "\Misc\Mimaki IEEE1394", and follow
the prompts, and reboot when complete
- Plug the Mimaki printer into the firewire slot on the computer.
- You will be prompted for drivers for "Printer Port" and "Status Port". Choose the option of
"Install the software automatically". The drivers should be automatically located and installed
After installing the Mimaki IEEE1394 drivers, go to the Print Setup window in SoftRIP. From the Printer
Model menu, select your Mimaki printer. After selecting the Printer Model, select IEEE1394-x in the
Physical Connection list (where x is the order that the Mimaki Device was detected, see notes below on
Connecting to Multiple Mimaki IEEE 1394 Devices).
The following IEEE 1394 FireWire PCI Adapter cards have been tested at Wasatch
and found to work well (every card we've tested thus far works fine):
- SIIG inc. 3-port 1394 (FireWire) DV kit Model: NN2628
- Western Digital 1394 Adapter WDAD002-RNW
- Bedienungsanleitung (German) 2external port 1 internal port IEEE 1394 FireWireAdapter ETC-6501
- D-Link FireWire Adapter Card DFW-500
- Macsense FireWire PCI Adapeter FW-100
- Orange Micro inc. OrangeLink FireWire 1394 PCI 70htl13943
Note on connecting to multiple Mimaki IEEE 1394 devices:
In order to print over IEEE 1394 to
multiple Mimaki print devices simultaneously, the Mimaki IEEE 1394 driver v2.00 (or later) is required.
To make use of this functionality, each Mimaki device must be connected to a separate IEEE 1394 (FireWire)
PCI Adapter (up to a max of 4). Do not attempt to plug in multiple Mimaki devices into different ports on
the same card, as hardware misdetection and other unexpected results may occur. Also, printing to multiple
devices simultaneously may reduce communication speed somewhat due to the additional access time on your
computers hard disc.
In addition please be aware of the following precautions provided by Mimaki:
- Do not connect to Printer or Printers through an IEEE 1394 Hub
- Do not network/connect PC to PC through IEEE 1394
- Do not connect another (non-Mimaki) IEEE 1394 device to computer.
- Do not use a IEEE 1394 cable with a length of over 4.5m (about 15ft).
- Do not remove/insert the IEEE 1394 cable when spooling data to the printer.
- Do not turn off the printer while installing the driver.
- Do not remove/insert the IEEE 1394 cable many times in rapid succession.
- Do not Shutdown, Restart, Send to Standby, or Hibernate while spooling data to the printer.
- Avoid connecting multiple printers to a Notebook PC, as the possibility of causing a 1394 communication
error will become higher.
- If the PC is equipped with built-in IEEE 1394 ports on the main body/motherboard of the PC only one
printer can be connected unless a separate IEEE 1394 PCI Adapter is added. Even in the event when the
built-in IEEE 1394 ports are positioned dividedly in the front and back faces of the PC, more than one
printer cannot be connected.