 Mimaki JV2
The Mimaki JV2 is a special printer due to its seven separate channels for ink. Wasatch SoftRIP supports this printer in several modes of operation:
CMYK
CMYK plus Light Cyan and Light Magenta
CMYK plus Orange and Green
Monochrome using the 1st head as a 'monochrome imagesetter'
2 sets of CMYK (see "Installing Pigment and Dye Inks at the Same Time" below)
Hi-Fi Modes (CMYK + 2 or 3 special colors) (see "Hi-Fi Printing" below)
Pressing the Properties button next to the Printer Model window on the Imaging Configurations screen will launch a control panel for this printer.
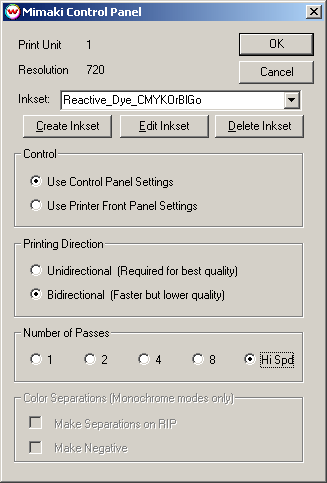
This window allows you to change the print direction from unidirectional to
bidirectional, or set the number of passes on the printer.
If you click on the Use Printer Front Panel Settings radio button, all settings will be controlled from the front panel of the printer and settings on this window will be ignored.
You can make color separations from this window in the Monochrome modes only.
Hi-Fi Printing
To print using combinations of ink other than CMYK, CMYKLcLm, or CMYKOrGr,
select 'Mimaki JV2 HiFi Modes' from the Printer Model window. You must then
select the appropriate ink combination from the control panel.
If you would like to create a new inkset with a colorimeter, click on 'Create
Inkset'. If you would like to edit an existing inkset, click on 'Edit Inkset'.
If you would like to delete an existing inkset, click on 'Delete Inkset'. For
more information on this, see Creating Hi-Fi Ink Modes
After you select an ink set on the Control Panel and click OK, the selection on the Printer Model window will be changed to reflect your selection. To change your selection for Hi-Fi modes, simply return to the Control Panel and make your selection.
Installing Pigment and Dye Inks at the Same Time
To install both Pigment and Dye inks into the Mimaki JV-2 simultaneously, you must install the inks into the following order from left to right:
Pigment K, C, M, Y, Dye C, M, B
When inks are installed in this manner, the only modes that will work are
those with 'Dual Ink-Set' in the name of the print mode. (For example, Mimaki JV2
(Dual Ink-Set (Dye), 720 dpi) will print using the dye inks in slots 5, 6, and
7, and the pigment black ink in slot 1.) Since you are using dye inks in the
machine, take note of the procedure described below:
The following important information is from Mimaki. When you use Dye Inks in the JV2 machine, take note of the following:
1) It is necessary to change the output voltage of the head before using the dye inks.
Since the dye inks will be installed on head 3 (the furthest right three ink
slots), you must change system parameters 53 and 54 to 0. To do this, select the
Remote/Local button, and change it to Local. Hit the Function button, and
then the UP button until the screen displays '#PARAMETER'. Press ENTER. Press the UP button until the screen shows 'SYSTEM PM'. Press ENTER. Press DOWN until you reach parameter 54. Write down the current setting of this
parameter-this will need to be changed back when you use pigment inks again! Change the parameter to 0, for dye ink. Press DOWN until you reach parameter 53.
Change the parameter to 0, for dye ink.
2) Since the ink cartridges will be inserted into slots other than those they
are intended for, you will need to cut the is-insertion prevention pins.
3) When you change from pigment ink to dye ink, clean the damper and the cap.
4) Do not mix both pigment and dye inks on one head (slot 1 is head 1; slots
2, 3, and 4 are head 2; slots 5, 6, and 7 are head 3).
5) It is recommended to clean the wiper frequently, due to the mixture of both types of ink.
Please contact Mimaki for further information about this procedure.