 Mimaki UJF-605R/CII
December 29, 2009
To launch the printer properties for this driver, choose 'Setup' from the 'Print' menu, then select Mimaki UJF-605R in the 'Printer Model' list. Click on the 'Edit' button, and then click on 'Properties'.
Print Mode:
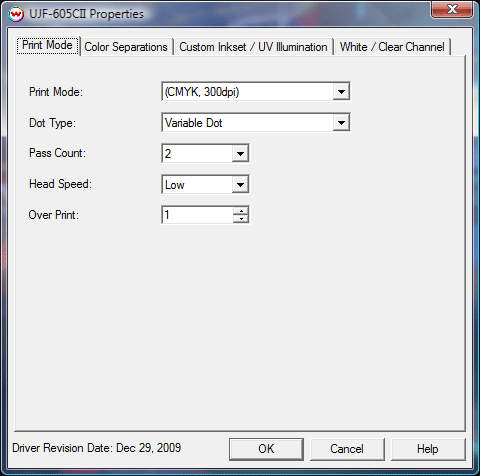
Print Mode: Select the ink type and printing resolution. This will generally match the inkset that is installed in the printer.
Dot Type: Select the type of dot type: Fixed Dot, Variable Dot, or Variable Dot (Custom).
Pass Count: Select pass count / Overlap.
Head Speed: This controls the scan speed of the printhead assembly. Select either High, or Low.
Overprint: Prints over the printed area the selected number of times. For example,
if 2 is selected, the amount of ink laid down is doubled. The maximum value is 9.
Return to origin after print*: After printing, the media will return to the origin point after printing is completed.
*NOTE: Control only available for UJF-605R
Color Separations:
The color separations controls are located on the second tab.
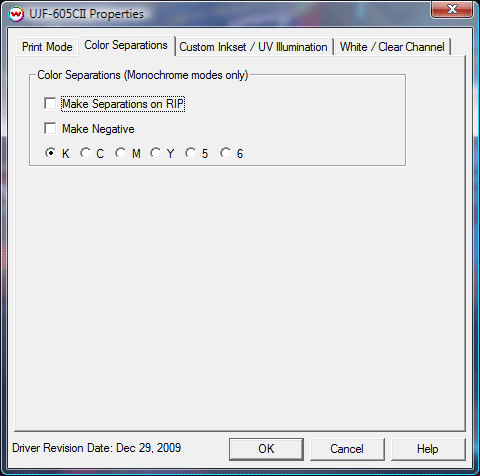 The Color Separations controls are the same as those of other printers, and are only
available if a monochrome mode has been selected on the Print Mode tab.
The Color Separations controls are the same as those of other printers, and are only
available if a monochrome mode has been selected on the Print Mode tab.
- Separations on RIP: This will cause the RIP to separate the image into CMYK plates.
- Make Negative: This inverts monochrome images when printed.
- K, C, M, Y, 5, 6: This allows you to print monochrome images to any of the printheads. This is especially useful to eliminate overuse of a single printhead when printing only monochrome.
Custom Inkset / UV Illumination:
The Custom Inkset / UV Illumination controls are located on the third tab.
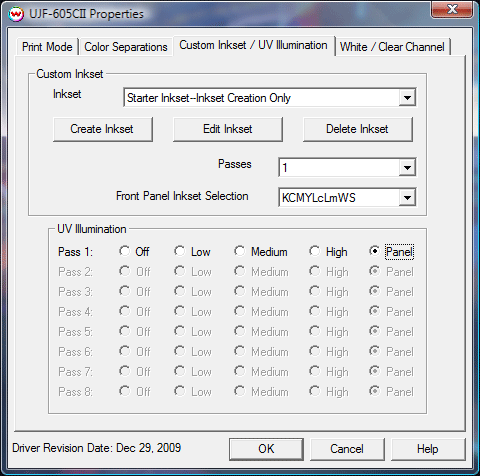
- Custom Inkset: Create, Edit, and Delete custom inksets
- Passes: Set the number of passes to be printed
- Front Panel Inkset Selection: Choose the inkset configured on the front panel, either KCMYLcLmWS or KCMYLcLmSs
- UV Illumination: Select the UV Illumination strength for each pass being printed.
For more information on creating custom inksets and using the Passes control, click here.
White Channel:
The white channel controls are located on the fourth tab.
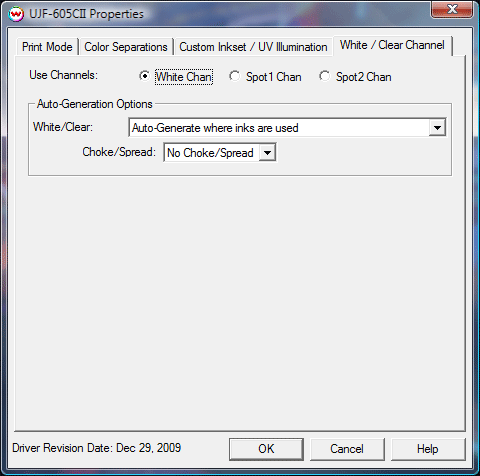
- Use White Channels/Clear Channels: Use either channel individually or both together.
- Auto-Generation Options: - Usable only when using Custom inkset with an unmanaged channel, or the White/Clear inkset.
- No Auto-Generation: Use this setting when placement of white ink is already defined and no
auto-generation is required.
- Auto-Generate where inks are used: White ink is placed at any point that is not CMYK 0,0,0,0.
Further adjustments can be made to the size of the plate generated by choosing a choke or
spread setting.
- Auto-Generate the entire page: Generates a white plate for the whole print.
White will be printed everywhere.
- Auto-Generate ink from traced areas: The unmanaged color will be applied only to the traced areas that have been set using the Trace tab in the main SoftRIP interface.
Note on White Ink Spot Color Replacement
When printing with CMYK + White or LcLm + White, the white ink is printed at the same time, so it is only usable as a spot color or with multi channel files where the white has been defined.
Spot Color replacement can be used with the white ink channel to designate areas of the print where white ink should be printed. The steps to use this work flow are:
- Select a CMYK + White or LcLm + White ink print mode in the driver properties.
- Right click on the area that you want to have white printed to.
- Choose to perform a spot color replacement to 'Device (bypass color management)', and choose the
'White' option.
- Enter the density of white ink you want to print (we recommend always using the maximum density setting, 255).
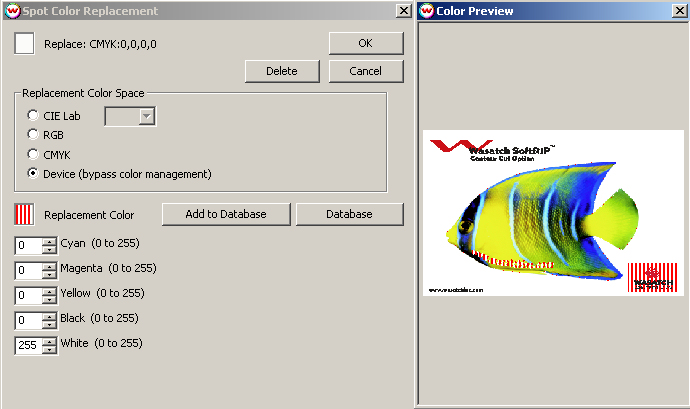
The areas marked with red and white strips are the areas in which the white ink will print.