 Mutoh Falcon-II / Agfa Grand Sherpa
March 3, 2004
Print Mode:
Pressing the Properties button next to the Printer Model window on the
Imaging Configurations screen will launch a control panel for this printer.
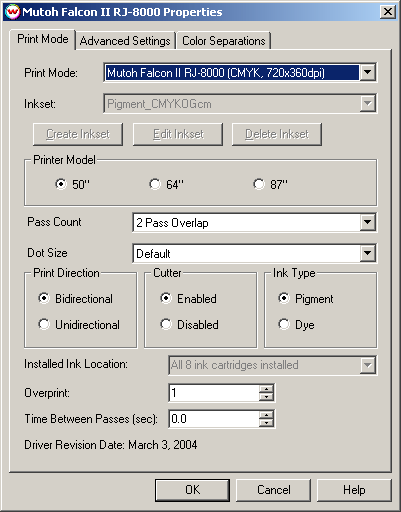
This page of the properties sheet allows you to select a print mode, the
print direction, the number of passes, the dot size, control the cutter, overprint, and time
between passes.
- Print Mode: Select the ink type and printing resolution
- Printer Model: Select the size of the printer
- Pass Count: Select pass count / Overlap
- Dot Size: Select the size of the dot
- Print Direction: Print in both directions (bi) or one direction (uni)
- Ink Type: Select the type of ink installed.
- Cutter: Enable or disable paper cutting after the print
- Overprint: Overprint controls the number of times the printer prints over the
same area. A setting of 2 will double the amount of ink laid down.
- Time Between Passes: Time Between Passes allows you to set a drying time between
each pass. This is especially useful when printing on film
Advanced Settings:
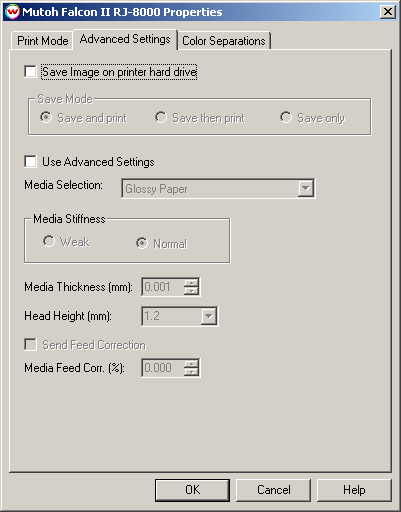
The Advanced page controls saving images to the hard drive and allows you to select options to
fine tune the type of media installed.
- Save Image on printer hard drive: Choose whether to enable the hard drive save feature
- Note: There will be a prompt for a file name when the job is spooled to the printer
The file name may only contain capitol letters (A-Z) and/or numbers (0-9)
- Save and print: Saves the image to the hard drive while the image is being spooled to
the printer
- Save then print: Saves the image to the hard drive and then immediately proceeds to print
the saved image off of the hard drive (See note below: uses the same front panel settings as "Save only")
- Save only: Saves the image to the hard drive. Printing will be done off of the front panel
- Note: The front panel control for the following commands will have precedence over
the driver control when printing from the hard drive
- Media Thickness and Head Height (On "Advanced Settings" tab)
- Media Stiffness (On "Advanced Settings" tab)
- Media Feed Correction (On "Advanced Settings" tab)
- Media Cut (On "Print Mode" tab)
- Use Advanced Settings: Choose whether to disable the advanced settings
- Media Stiffness: Will adjust the power of the media vacuum
- Media Thickness: Select thickness of the media in mm
- Head Height: Set the gap between the platen and the head
- Send Feed Correction: Check to send a value
- Media Feed Correction: Adjust the amount of feed correction necessary to eliminate
micro-banding
Adjusting media feed to reduce banding
- Print PurplePatch.ps (found in the psfiles folder located on the root of the Wasatch
SoftRIP installation drive) with the following settings:
- Print Mode: 360dpi
- Print Direction: Unidirectional
- Pass Count: "Overlap Off"
- Click on Advanced Settings tab
- Check Use Advanced Settings
- Check Send Feed Correction
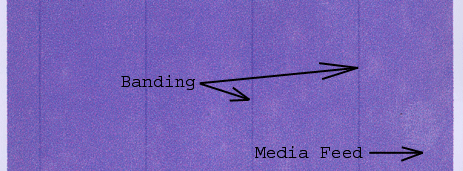
- For Dark Banding, increase Media Feed Correction by tenths (0.1) adjust by hundredths if further fine tuning is needed
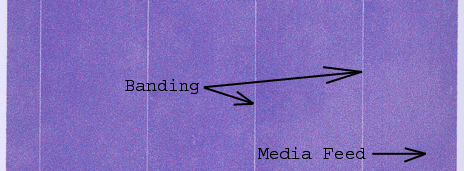
- For Light Banding, reduce Media Feed Correction by tenths (0.1) adjust by hundredths if further fine tuning is needed
Color Separations:
When you click on Color Separations, the following Properties page will be displayed:
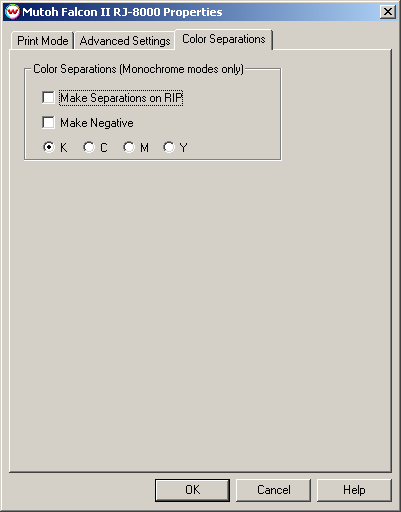
If a Monochrome mode is selected, this page allows you to make Color Separations.
Problems and Caveats
- Connect this printer using the 100BaseT ethernet card from Mutoh, which is installed directly into the printer. As of this writing, this ethernet card has a problem with particular IP address ranges. For instance, any IP Address with a '0' in it fails. There may be other addresses that fail. If you have problems with this, try changing your IP address range to 169.254.137.xxx. It
is recommended that you use a 3Com network adapter in your computer, and either a switch or direct crossover cable.
- This printer cannot be connected through a Windows driver or through the Mutoh Thunderbird RIP.
- With dozens of different print modes, this is the most flexible and most
complex printer we've ever seen. It is important to carefully choose among the great number of possible tradeoffs between speed, image quality, and ink density. Not all modes will produce high quality, and the setting of these print modes will usually invalidate color profiles.
- If you are interested in running with both pigment and dye inks installed at the same time, watch for a special problem. After installing a set of CMYK dye and a set of CMYK pigment into the machine, and selecting this option from
the front panel, it is necessary to reboot the printer before sending prints. We think it likely that there are other, undiscovered, bugs in this printer's firmware.
Hi-Fi Printing Using Non-Standard Inksets
If you have the special registration code TEXTILE enabled in Wasatch SoftRIP, you can create inksets for printing with colors other than just orange and green. When this variable is enabled, you will see the following screen when you press the Properties button:
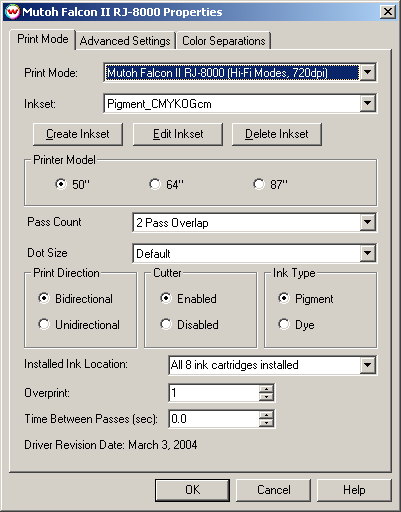
The options for "Hi-Fi modes" will be added to the print mode box, and you will be able to select non-standard inksets. You will also have the options to Create, Edit, and Delete inksets. For more information see: Creating HiFi Ink Print Modes.
 Mutoh Falcon-II / Agfa Grand Sherpa
 Mutoh Falcon-II / Agfa Grand Sherpa


