 Roland VersaCAMM VS-300i/VS-540i/VS-640i Help
January 27, 2014
Print Mode:
Pressing the Properties button next to the Printer Model
window on the Imaging Configurations screen will launch the control
panel for this printer.
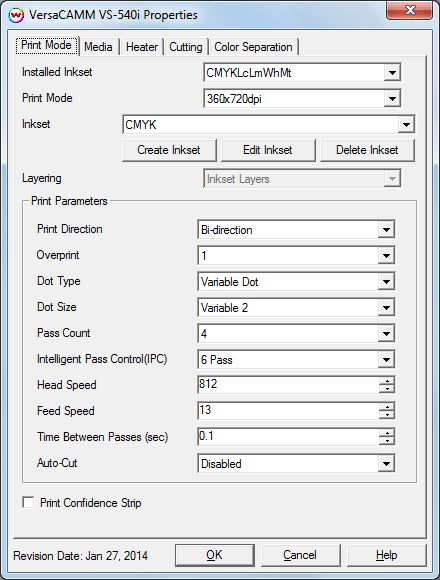
This page allows you to select from the following parameters:
- Installed Inkset: Select the inkset that matches the inks loaded in the printer.
- Print Mode: Set the resolution of the print.
- Inkset: Select a previously created custom inkset to use for printing.
- Create Inkset: Create a new custom inkset.
- Edit Inkset: Edit an existing custom inkset.
- Delete Inkset: Delete an existing custom inkset.
- Layering: Set the layering order for unmanaged channels, such as white or metallic ink.
- Print Direction: Select either Uni-direction or Bi-direction printing.
- Overprint: Prints over the printed area the selected number of times. For example, if 2 is selected, the amount of ink laid down is doubled. The maximum value is 3.
- Dot Type: Choose either a variable dot or fixed dot for printing.
- Dot Size: Set the desired dot size. Multiple dot sizes are available depending on the Dot Type set above.
- Pass Count: Allows you to specify the number of passes the head will make over a particular line. A higher pass count has a better quality but a slower print speed.
- Intelligent Pass Control (IPC): Additional, higher pass counts may be selected. Choices are dependent on the Pass Count set above.
- Head Speed: The head speed control allows you to slow down the head for higher-quality prints. This is also useful if the media has ink-drying problems. The Head Speed is dependent on pass count. A low pass count will need to limit the head speed to avoid damaging the printer.
- Feed Speed: The feed speed control allows you to control the speed of the media as it is being fed through the printer.
- Time Between Passes (sec): Allows you to specify the additional time that each printhead pass will take. It may be necessary to slow down the printhead when there are excessive drying problems.
- Auto-Cut: When selected the media will be cut off after the print.
- Print Confidence Strip: Enables the confidence strip to be printed.
Media:

- Vacuum Power: Controls the suction on the media when printing. Media that tends to curl up when printing may require the 'Strong' setting.
- Drying Time: The number of seconds the printer waits at the end of the print.
- Enable Calibration: If enabled, this compensates for slippage of the media.
- Calibration Value (-5 to 5%): This allows you to specify the Feed Calibration value.
- Space After Print: Set the space after print. This value is in addition to any margins that are set.
- Rewind Media After Print: If enabled, the media will be set back to the beginning of the print.
Heater:
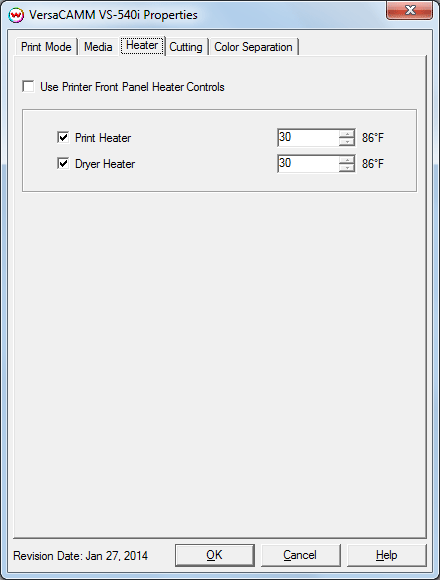
- Use Printer Front Panel Heat Control: If enabled, the printer will use the settings from the front panel of the printer.
- Print Heater: Warms the media under the print heads
- Dryer Heater: Warms the media after printing
Cutting:
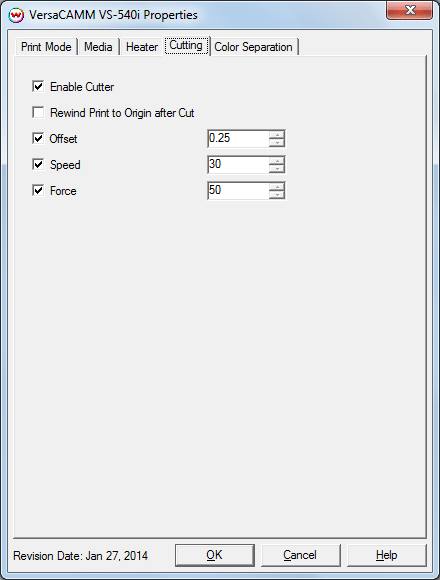
- Enable Cutter: When enabled, the device will cut out the cut path at the end of the print. When disabled, the cut path will show up in the queue at the end of the print.
- Rewind Print to Origin after Cut: After the cut path has been cut out, the print will be rewound to the print's origin point, and the cut can be resent, if necessary.
- Offset: Set the appropriate value for the blade in use. Inappropriate values in this field can lead to poor cut quality or unfinished cut lines. The default value is 0.250.
- Speed: Set the cutting speed. Usually setting a lower speed will result in longer cut times, but will produce higher quality results.
- Force: Set the blade pressure for cutting. When the values set here are too small, the blade will not have enough pressure to cut the sheet. Similarly, if the pressure is too high, not only it will not work properly, but also it can cut through the back of the media and may cause damage to printer. Be careful to set the correct value for the thickness and the hardness of the material you are using.
Color Separation:
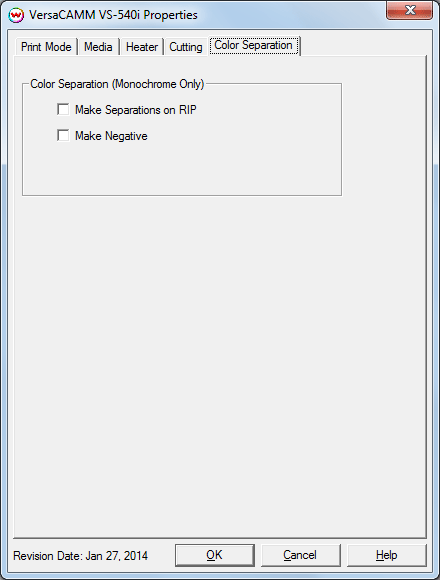
The Color Separations controls are the same as those of other printers, and are only available if a 'Monochrome' Inkset has been selected on the Print Mode tab.
- Make Separations on RIP: This will cause the RIP to separate the image into CMYK plates.
- Make Negative: This inverts the monochrome images when printed.
Auto-Generation:
The Auto-Generation tab(s) allow additional options to be set for the unmanaged channels.
The 'Installed Inkset' control, on the Print Mode tab, must first be set to include white (Wh) or metallic (Mt) or both.
Note: Inks other than White or Metallic can be loaded in the printer and used as unmanaged channels. However, the Installed Inkset on the Print Mode tab must be set to CMYKLcLmWhMt.
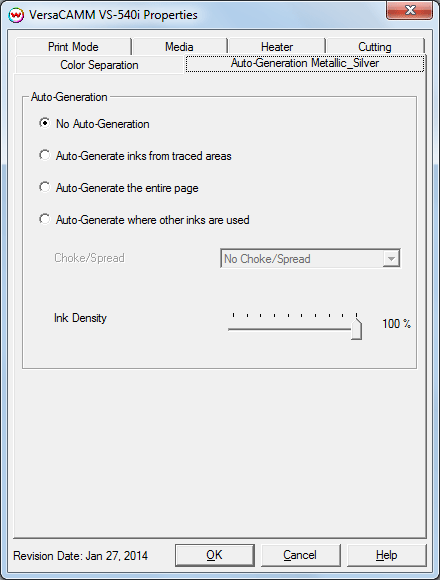
- Auto-Generation:
- No Auto-Generation: The unmanaged channel (white) is not printed unless specified through spot color replacement.
- Auto-Generate ink from traced areas: The unmanaged channel (white) will be applied only to the traced areas that have been set using the Trace tab in the main SoftRIP interface.
- Auto-Generate the entire page: Prints the unmanaged channel (white) over the entire image.
- Auto-Generate where other inks are used: Prints the unmanaged channel (white) on all non-zero pixels(marked areas). In addition, a "choke" or "spread" may be selected.
Note: A choke shrinks the unmanaged channel (white) in relation to the printed area.
Note: A spread expands the unmanaged channel (white) in relation to the printed area.
- Ink Density: Set percentage of the unmanaged channel to be used. Can be set from 10% to 100%.
[ Wasatch Home ]