 SPSI Solis Help
September 7, 2023
Important notes and Instructions
Connecting To The Printer Software For Direct Streaming:
The Printer Manager software must be installed prior to printing.
The print manager software can be downloaded here: Download
The printer manager software must run at an Administrator level. To make sure it runs at the Administrator level, every time, do the following:
- From the Windows Desktop, right-click on the newly created Printer Manager shortcut and select Properties.
- Click on the Compatibility tab and in 'Privilege Level' section, put a check in the box for 'Run this program as an administrator'.
- Click OK to save the changes.

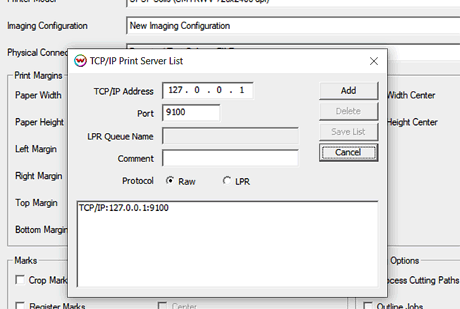
To send print jobs directly to the print manager, SoftRIP needs to have the localhost IP address added to the TCP/IP list then selected as the physical connection. On the Print menu select Setup, or click on the two blue gears in the upper right of the SoftRIP window. Locate the 'TCP/IP List' button to the right of the Physical Connection drop-down menu, click and Add '127.0.0.1' to the list then Save the list. See the example below. Be sure to select this choice for the Physical Connection.
Print Mode Options:
Pressing the Properties button next to the Printer Model window on the
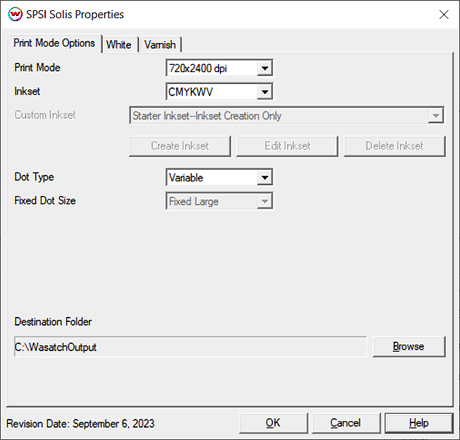
Imaging Configurations screen will launch a control panel for this printer.

This page allows you to select from the following parameters:
- Print Mode: Choose resolution for printing. Options are 360x600, 360x1200, 360x1800, 360x2400, 360x3600, 720x600, 720x1200, 720x1800, 720x2400, and 720x3600
- Inkset: Choose an inkset to use. Options include: CMYK, CMYKW, and CMYKWV.
Note: When Custom is selected, the following controls will be available:
- Create Inkset: Create a new custom inkset.
- Edit Inkset: Edit an existing custom inkset.
- Delete Inkset: Delete an existing custom inkset.
- Dot Type: Choose to print with either a Variable dot or a Fixed dot type.
- Fixed Dot Size: When the Dot Type has been set to Fixed, then the size can be set to small, medium, or large.
- Destination Folder: Set the output folder for the PRN files to be saved. Option only available when the Physical Connection on the Print>Setup window has been set to "PRN File Unit x".
White and Varnish Auto-Generation:
- Specific information about the Auto-Generation options can be found HERE
 SPSI Solis Help
 SPSI Solis Help
