 Workflow for printing white on dark substrates Workflow for printing white on dark substrates
March 28, 2023
There is an option available in SoftRIP that can aid in printing on dark substrates:
An Auto-Generation control called 'Replace black ink with black substrate'.
The control should be used similar to the Garment Creator preset, 'Black Color T-Shirt (Use Garment Black)'.
When this option is selected, a virtual CMYK space is created from CMY, plus the white ink, plus the black of the underlying surface. No black ink is used whatsoever in the print. Put simply, white ink is output as the negative of the black ink. Because this exchange of black for white is done upstream of our 16-bit calibration stage, the process can be made smooth and easily to accurately create a color profile. A description of the 'White Ink on Black Substrate' color separation rule can be found below under Profiling white ink on black shirts
The Auto-Generation and related controls can be used in similar situations as the Garment Creator preset, 'Dark Color T-Shirt (White)'.
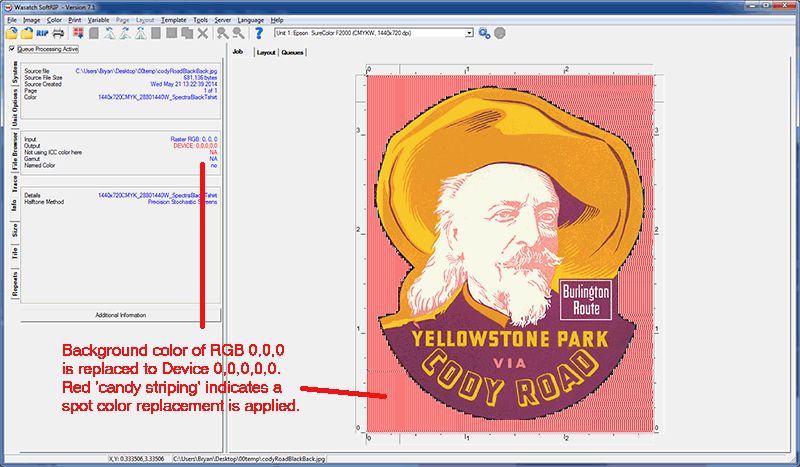
A typical workflow, when using a file containing a consistent background, would be to apply a spot color replacement to the background color and set it to Device, 0,0,0,0,0. Note: The Auto-Generation option 'Create mask from traced areas' is recommended when printing a file with a backround that is not one consistent color.
Two features are available in SoftRIP related to printing a white underlay on dark substrates.
NOTE: The two options described below are not needed if the background of the image is transparent, such as in a PNG file.
Illustration #1 shows an example using a spot color replacement to control how the background image data is printed. The spot color replacement is set to Device 0,0,0,0,0 which will not lay down any ink where the red 'candy striping' is shown. Without using the spot color replacement a rectangle of ink would be printed on the shirt. Often times this rectangle of ink is not desired when printing on T shirts.
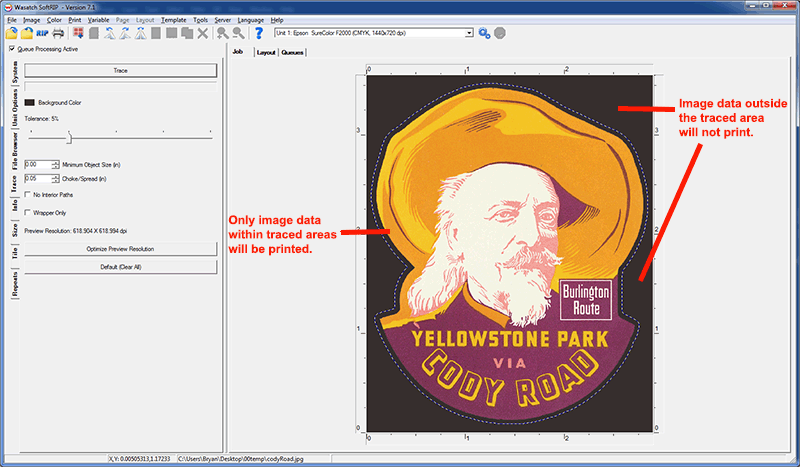
Using a spot color replacement relies on the background color being a consistent fill. If your backgound color is not consistent, for example it contains a gradient, you will need to use the 'Create mask from traced areas'.
Illustration #2 shows an example using 'Create mask from traced areas' to achieve the same results as in Illustration #1. Once the 'Create mask from traced areas' control is enabled open your image file on the Job tab. Select the Trace tab on the left edge of SoftRIP's window. Right click and select 'Background Color'. Set the Tolerance and Choke/Spread controls and then click the Trace button.
When profiling a dark color shirt printed with White ink there are two methods. For dark shirts that are not black where Black ink is printed, with some level of White underbase. Or, when printing on a black shirt, the black of the garment combined with the White ink can be used instead of Black ink.
Regardless of which method you wish to profile, after selecting a Layer Method that uses CMYKW inks, then print one of the following target files according to the X-Rite device you're using:
Use this print to determine an appropriate level of White ink. If the initial print requires an ink reduction, in the Print Setup click Edit -> Color Transforms -> Calibration. Then set the appropriate ink level. Re-print to check the results and reduce further as necessary.
When the level of white is set correctly, then click Edit -> Color Transforms -> Calibration -> Calibration Curves. Select the densitometer from the list to scan the target. At this time only White needs to be scanned. The other channels will need further review at a later step.
After linearizing the White channel then the next step depends on if profiling a full white base for a dark color shirt or using the garment black method on a black shirt.
After White is linearized, on the Print Setup window, click Edit -> Properties -> Auto-Generation 1. Next, select "Auto-Generate the entire page". If White has been reduced in Calibration, place the same reduction here. Click OK on all windows and save the change.
With a White base set and the White channel linearized, proceed with the profiling process as outlined in 'Profiling with SoftRIP'.
Once a profile has been generated relative to this white base, the profile can be re-used on any non-white shirt and with different Auto-Generation rules to suit the printing objective.
When printing using the Auto Generation option 'Replace black ink with black substrate', this option will not print any black ink, instead white ink is printed as a negative of the black channel. Follow the normal procedure for profiling of the Cyan, Magenta and Yellow channels.
No data should be applied to the Black linearization curve. Skip scanning the black channel when using 'Replace black ink with black substrate'.
Proceed with the profiling process as outlined in 'Profiling with SoftRIP'.