Illustration 1: Main Server Controls
The Server feature allows you to automate the workflow in even the most complex production environment. You may set up and configure any number of hot folders and sub-folders for each printer installed on SoftRIP. When job files are sent to these directories via ImageNET or other method, they are processed according to the settings specified for each directory.
Hot folders can be configured to specify
Illustration 1: Main Server Controls
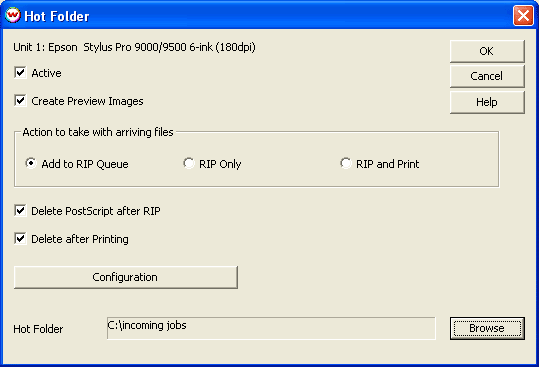
To activate this feature for the current printing unit, launch the Hot Folder screen from the main screen Server menu. Click in the Active box to activate the controls (Illustration 1).
The hot folders you set up will apply to the printer unit currently selected in the Unit window of the main screen. You may set up as many folders and sub-directory levels as you wish and specify separate operating parameters within each one.
Folders and sub-directories are chosen using the Browse feature at the bottom of the Hot Folder screen. When you choose a folder, SoftRIP will automatically include any sub-directories already in the root folder, creating job hierarchies that are multiple levels deep.
In Illustration 1, the root folder incoming jobs has been selected from the C: drive. Once the other parameters have been set up on this and related screens, pressing OK will cause SoftRIP to process any job file transmitted to that folder according to the instructions specified in the Actions to Take with Arriving Files area (Add to RIP Queue, RIP only, RIP and Print).
Checking Create Preview Images produces preview thumbnails for entries made to the RIP and Print Queues.
Check this box to remove both the PostScript file and associated RIP Queue entries after processing.
Check this box to remove all Print Queue entries generated by the Server after printing. This feature is essential if you are operating with limited disk space.
This button launches the Configuration screen (Illustration 2) which lists your folder hierarchy for the current print unit.
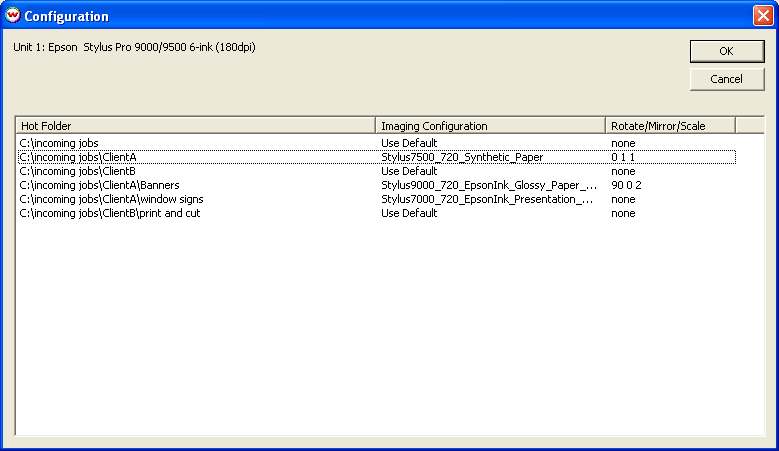
Illustration 2: Configuration window shows folder and directory structure
This column shows the structure of your root directory and sub-directories. You may set up as many levels as you choose.
This column displays the Imaging Configuration that will be applied to the incoming job file. In this example, the first folder uses the Default Imaging Configuration and the next uses Synthetic Paper. Note: Default means whatever Imaging Configuration is currently specified for the Unit.
This column displays image adjustments to be applied to incoming job files. The third listing in the window displays 90 0 2 in this column. This indicates a 90 degree rotation, no mirroring and a 200 scaling factor.
Double-clicking any listing in the window launches the screen shown in Illustration 3.
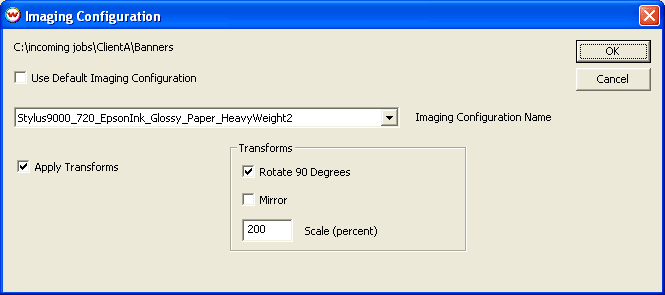
Illustration 3: Imaging Configuration Controls
If you leave the Use Default Imaging Configuration box checked, the folder will apply the Imaging Configuration currently specified for that unit. When Default is selected, the Imaging Configuration is shown in the grayed out.
You may also override the current selection by unchecking the Default box and selecting a new one from the drop down window. Imaging Configurations you have previously loaded from the SoftRIP's Imaging Configurations Download will be available in this window.
Checking Apply Transforms activates the Rotate/Mirror/Scale controls.
You must click OK to active your changes. When you send a job file to the folder or sub-directory, SoftRIP will automatically process the job according to the parameters you have set up in these screens.