 Summa S3 T-Series
May 7, 2026
Notes:
- The Summa S3 T-Series is a cut only device, and is only available when the Cutting Option is enabled for your license.
- This cutter can be used for cutting of DTF prints. For more information about this workflow click HERE.
- Connections: Choose the physical connection by going to the Print menu and selecting Setup.
- To PLT File: Output to file can be used with the 'Summa Cutter Control' software barcode controls. Refer to the Summa documentation on how to use the Cutter Control software with the barcode functionality.
- USB: When the cutter is initially plugged into a USB port, you will be prompted to install a USB driver. Install the Summa driver provided with the cutter. Once complete, the USB connection will be displayed in the Physical Connection list (Print menu followed by Setup) as USB, USB_2, USB_3, or USB_4, depending on the USB Class selected on the front panel of the cutter.
Note: Multiple Summa devices can be connected simultaneously when using Summa USB drivers (using version 6.2 or higher) and firmware (version 036 or newer). Older drivers and firmware revisions are limited to a single connection. Each Summa cutter connected to the computer must have a unique Summa USB port on the front panel of the cutter. This can be set by selecting Configuration, then Settings, followed by Communication, and USB Class then selecting a different Summa USB port for each cutter. After changing the USB Class, the cutter will need to be restarted.
- TCP/IP: Before an IP address can be selected from the Physical Connection drop-down menu, the IP address of the cutter must first be entered into Wasatch SoftRIP. Clicking the TCP/IP List button will open a window to allow the cutter's IP address to be entered and saved. Once this has been completed the new IP address can be selected for the Physical Connection.
- Suggestions for Flex Cut and DTF film:
First set the blade exposure. With the blade cutting through the media, rotate the tool counterclockwise to retract the blade. A good procedure is to do this in quarter turns.
Once the blade is no longer cutting through the media, do a quarter turn clockwise. This should set the blade at an appropriate amount.
The pressure settings are directly related to the blade setting and the media type, but 80-120g should work for film with full pressure and 50-70g for the flex pressure.
Using Flex Cut settings with the "Flex length" at 10% of the "Cutting Length" is a good starting point. (eg. 10mm Cut Length & 1mm Flex Length).
Properties
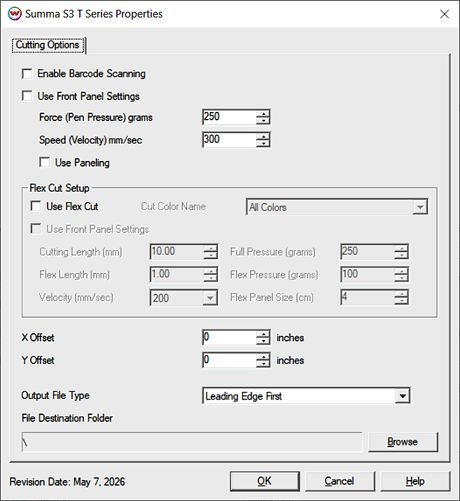
- Enable Barcode Scanning: When OPOS XY with Barcodes are selected for the Cutting Registration Marks, enabling this control will launch a SoftRIP service that sends the cut paths to the cutter once the barcodes gets scanned. The Summa barcode registration method requires that the image(s) intended for cutting be at least 10.25" (260mm) in width.
Note: For more information on automated barcode workflows, click HERE
Note: When the Physical Connection is set as To PLT File, this option is disabled.
Use front panel settings: This control will use the settings from the front panel of the Summa cutter for velocity, force, etc.
- Force (Pen Pressure): Set the force to use for cutting of all Non-FlexCut paths (in grams).
- Speed (Velocity): Set the velocity to use for cutting of all Non-FlexCut paths (in mm/sec).
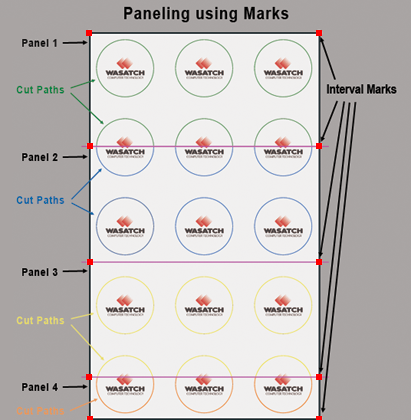
- Use Paneling: When enabled, uses marks along the edges of the media to determine the size of the panel to be cut. Paneling can be helpful, when cutting long runs or when using media that is less stable, by cutting the entire cut job into smaller sections (panels) then cutting them. Interval Marks need to be turned on from within Wasatch SoftRIP prior to printing. The marks can be turned on by going to the Print menu and checking the Cutting Registration Marks box, or click the Cutting Mark button, then setting the Mark Type to Contour Cutting Marks and select Summa>SummaSign Pro from the Marks drop-down menu.
Important Note: Setting the Autoload option, from the cutter's front panel, will cause the cutter to NOT move to the end of the media when checking the size or reading standard marks. This is very important when the media is a roll or a long sheet, as this can cause tracking issues.
- Use FlexCut: Select to have Wasatch SoftRIP create perforated cuts for all cut paths, or for a specific cutting color.
- Cut Color Name: Select which cutting colors are generated as FlexCut. Options are All Colors, cutpath, cutcontour, cutoutline, cutannotation, and any additional Cutting Colors that have been added from the Preferences window.
- Use front panel settings: This control will use the front panel settings for FlexCut instead of the Wasatch SoftRIP settings.
- Cutting Length: Set the length of Full Pressure cuts for FlexCut paths.
- Flex Length: Set the length of Flex Pressure cuts for FlexCut paths.
- Velocity: Set the speed for FlexCut paths in mm/sec.
- Full Pressure: Set the force of Full Pressure cuts for FlexCut paths
- Flex Pressure: Set the force of Flex Pressure cuts for FlexCut paths
- Flex Panel Size: Set the size of the panels that the printer will cut. The distance set in cm will split the full cut into multiple panel segments. All cuts in the first panel will be completed before advancing the media to cut the later panels. See this video from Summa for an in depth explanation of how Paneling works.

- X Offset / Y Offset: Horizontal (x offset) and vertical (y offset) adjustments can be made to line up the cutpath to the image, when needed. Adjustment range is -2.0 to 2.0 (inches).
- Output To File Type: When the To PLT File option is selected for the Physical Connection, the control will become active, allowing either a Leading Edge First or Trailing Edge First barcode to be printed. Using Trailing Edge First is needed when the media is loaded into the cutter in reverse order. If the direction the media will be loaded in the cutter is unknown then the option Create Both Files can be selected, and two files will be saved.
- File Destination Folder: When the Physical Connection is set To PLT File, this setting will determine where the file is saved.
Note: When printing the image, that will be cut, note the way it comes off the printer. The image will be loaded in the cutter in the same direction (Generally upside-down)
Device-Specific Instructions for Print now, Cut later (RIP Detect Registration)
Note: The print should have been printed with SummaSign Pro cutting registration marks. Select these marks by going to the Print menu and selecting Setup then clicking the Cutting Marks button. Additional options are available by clicking the Properties button, such as selecting between OPOS Marks and OPOS XY marks, along with setting the interval between the registration marks. See the Interval, OPOS XY Cut Marks, and OPOS Barcode Marks discussion below.

Loading the media:
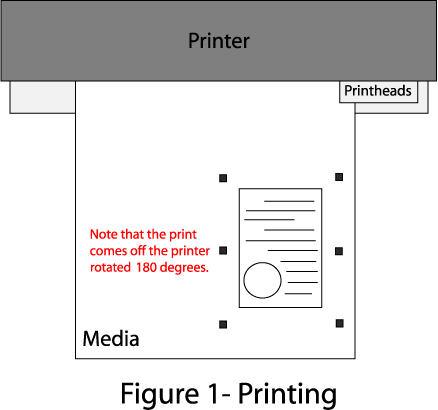
- As the print comes off the printer, note the edge that is to the lower right corner of the print. That corner will be referred to hereafter as the Origin of the print (see Figure 1).
- Insert the media in the same direction as the media originally came out of the printer.
- Set the pinch rollers. Since the cutter cannot cut any media beyond the pinch rollers, position the pinch rollers outside of the cutting area. (See Figure 2)
- The cutter is now ready for the cut path to be sent from the queue
- When the job is sent to the cutter, the cutter will ask you to set the first point
- See the user manual for further assistance.
Device-Specific Instructions for Print now, Cut later (OPOS Barcode Registration)
Note: Wasatch recommends that the Summa S Class cutter's internal firmware be upgraded and running firmware revision 036 for the S Class and 018 for the S Class 2 or later when attempting to use the barcode registration option. The current firmware revision installed on the cutter is listed on the front panel, under 'ROM Revision.' You can download firmware updates from Summa's website. Please refer to the Summa user manual and/or technical support for instructions on upgrading the firmware.
Note: The print should have been printed with SummaSign Pro cutting registration marks. Select these marks by going to the Print menu and selecting Setup then clicking the Cutting Marks button. Click the Properties button then select the Summa OPOS XY with Barcode option to have both the barcode, as well as any registration and/or interval marks.
Note: The Summa barcode registration method requires that the image(s) intended for cutting be at least 10.25" (260mm) in width. Also, the Read Barcode Job Via Front Panel option must be checked in the printer Properties window in SoftRIP.
Loading the media:
- As the print comes off the printer, note the edge that is to the lower right corner of the print. That corner will be referred to hereafter as the Origin of the print (see Figure 1).
- Insert the media into the Summa cutter, the same direction as the media originally came out of the printer.
- Set the pinch rollers. Since the cutter cannot cut any media beyond the pinch rollers, align the media so that the pinch rollers are outside of the cutting area. (See Figure 2)
- On the front panel of the cutter, select Actions, Load, then OPOS Barcode.
- Use the directional arrows on the front panel of the cutter to place the tool slightly in front of the barcode, and click Apply.
- The cutter will then scan the barcode, and select the appropriate cut path from within SoftRIP. Once the proper cut path has been sent, the cutter will proceed to scan the registration/interval marks, then proceed to cut the job.
- Once the cut is complete, the Summa will automatically look for additional barcodes, and will cut the jobs accordingly, until no other barcodes are found.
Device-Specific Instructions for Cut Only
Loading the media:
- Insert the media in the cutter and align the media so that the pinch rollers are outside of the cutting area.
- After setting the pinch roller, the cutter will detect the paper.
- Set the Origin to the point you wish the cut job to begin.
See the user manual for further assistance.
- The cutter is now ready for the cut path to be sent from the SoftRIP's queue.
Loading DTF media for barcode workflows
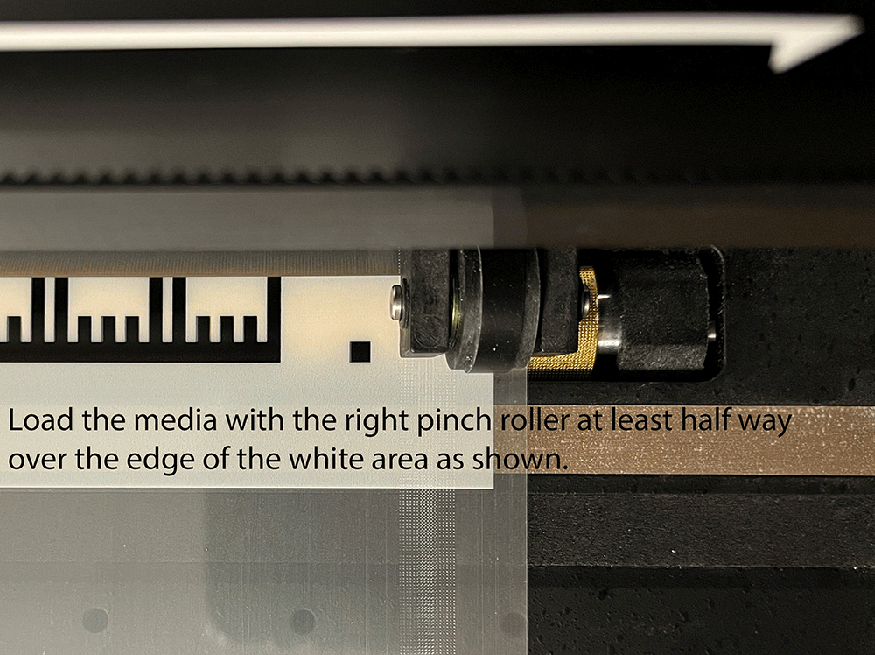
When loading DTF media on the Summa cutter, ensure the image width is a minimum of 10.25" (260mm).
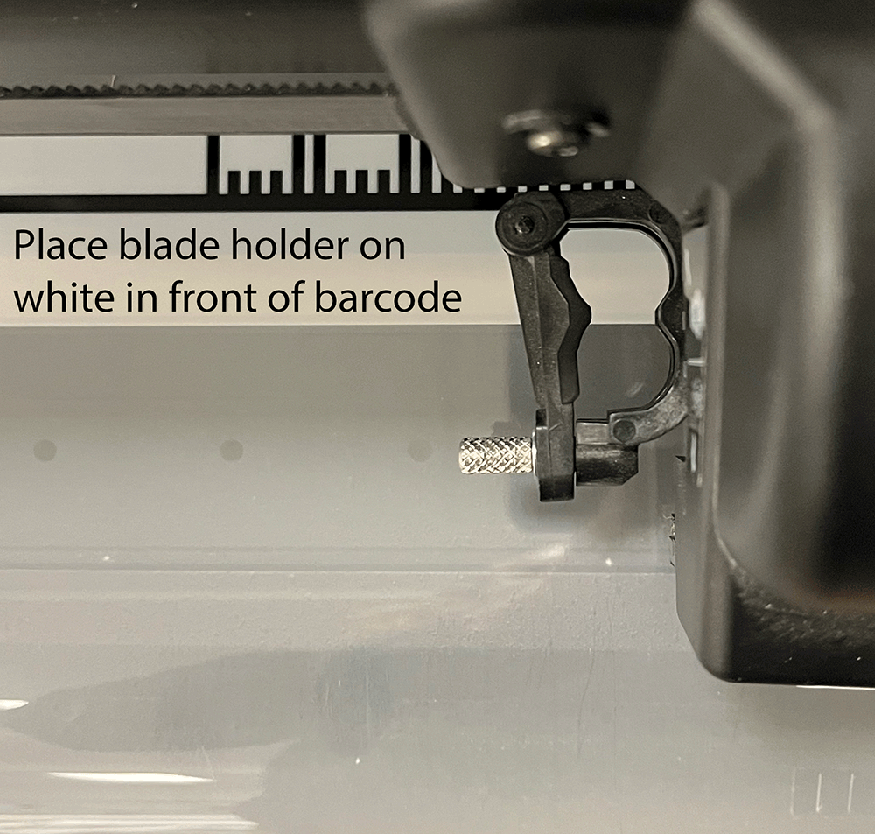
Place the right most pinch roller at least partially over the right edge of the white area. This will ensure correct placement when reading the barcode. The white area has been added because DTF media is not opaque and for the sensor to read the barcode, a contrasting background needs to be set. See below:
After the pinch roller lever is engaged and the media is detected by the cutter, then press the Action button followed by OPOS Barcode. Then use the arrow controls to move the blade holder on the white in front of the barcode, as shown below:
Interval, OPOS XY, and OPOS Barcode Cut Marks
When you select SummaSign Pro register marks from the Cutting Registration Marks menu in Wasatch SoftRIP, registration marks will be printed at regular intervals down the edges of any print layout. (This feature only works with layouts and with the print spooler, never with immediate print of a single page.)
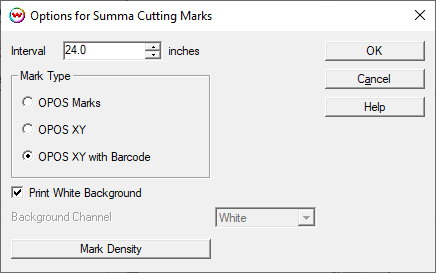
You will also be able to select between OPOS Marks, OPOS XY, and OPOS XY with Barcode. Selecting OPOS XY prints an additional line between the cutting registration marks at the top and bottom of the cut job. This line allows the Summa cutter to compensate for 'bowing' of the media. OPOS XY with Barcodes will print a specific barcode on the top and bottom of each job. This allows the OPOS sensor to scan and select the appropriate job from the Summa's cutting queue.
When you select SummaSign Pro register marks, you'll be presented with the following control.
- Interval:
If the length of the print equals or is greater than the Interval value, then interval marks will be created at a regular subdivision spacing. This means that the interval marks would be half of the print length, as would happen if you set a 24 inch interval and were printing 24.1 inches, as shown above.
For example:
- When printing an image 24" long, with the maximum cutting mark interval of 24", two marks are placed along the edge (at the corners).
- When printing an image 25" long, with the maximum cutting mark interval of 24", three marks are placed along the edge at a 12-1/2" intervals (at the corners + middle).
- When printing an image 25" long, with the maximum cutting mark interval of 12", four marks are placed along the edge at an 8-1/3" intervals (the corners + 2 additional marks).
- Print White Background: Enable if printing to DTF or similar clear film that requires additional contrast on print in order to read the barcode and register marks from the clear film.
- Background Channel: When printing to a HiFi device or one with more than a single unmanaged color channel, this control can be used to set the 'White' ink that will be printed around the black barcode and register marks.
- Mark Density: This can be used to set the printed density for the Black (top slider) and White inks that compose the register marks. It is recommended to start with the same values as set in the selected Imaging Configuration and adjust as needed to be read by the cutter. The imaging configuration values can be found by going to the Print menu and selecting Setup followed by Edit then Color Transforms and Calibration. A warning will appear, click okay but do not change any of these values, note the ink reduction levels of the white and black channels then close this window.
